What、Why、How?解读Webpack官方文档
What is Webpack?
Webpack具有Grunt、Gulp对于静态资源自动化构建的能力,但更重要的是,Webpack弥补了requireJS在模块化方面的缺陷,同时兼容AMD与CMD的模块加载规范,具有更强大的JS模块化的功能。
因此我理解的Webpack,就是一个更出色的前端自动化构建工具、模块化工具、资源管理工具。
webpack is a module bundler. webpack takes modules with dependencies and generates static assets representing those modules.
Why Webpack?
为什么选择Webpack,两点原因。
1、前端需要模块化:JS模块化不仅仅为了提高代码复用性,更是为了让资源文件更合理地进行缓存;
2、AMD与CMD规范日渐衰弱:原因?ES6带来了很强的模块化语法糖。虽然ES6的更多语法糖让JS可能失去了简单的优势,在一些技术社区还偶尔看到一些反ES6的文章,但感觉ES6仍然是未来发展的趋势;
module DBLayer {
  export function query(s) { ... }
  export function connection(..args) { ... }
}
import DBLayer.*;

module CanvasLib = require('http://../canvas.js');
import CanvasLib.{Triangle, rotate};
参考使用简单的JavaScript,我们为什么应该抵制ES6例子。
当然,ES6,我觉得还是未来的事情,尤其是在China地盘要全面普及支持ES6的高级浏览器,真的比证明你妈是你妈还要困难。
所以,我认为,AMD跟CMD慢慢过时的原因,是模块化前端项目的发布打包问题,requireJS跟seaJS都没有一个很好的解决方案。下面配置文件是,我曾经做过的一个backbone的项目以requireJS做模块化加载。项目初始阶段还好,当随着项目深入,模块切分得越细,最后发布上线的时候,页面对于JS的请求数量竟然多达20个以上。大量的HTTPRequest造成的后果,不用多想,大家都知道。
require.config({
    //baseUrl: "scripts/vendor",
    paths: {
        underscore: '../vendor/underscore.min',
        zepto: '../vendor/zepto.min',
        backbone: '../vendor/backbone.min',
        domReady: '../vendor/domReady',
        template: '../vendor/template',
        iscroll: '../vendor/iscroll/iscroll',
        common: '../common/common'
    },
    shim: {
        underscore: {
            exports: '_'
        },
        zepto: {
            exports: '$'
        },
        backbone: {
            deps: ['underscore', 'zepto'],
            exports: 'Backbone'
        }
    },
    waitSeconds: 0
});
require([
    'zepto',
    'underscore',
    'backbone',
    'domReady',
    'common',
    '../controller/homeCtrl',
    '../controller/fadeCtrl',
    '../controller/mockCtrl'
],
function ($, _, backbone, domReady, common, homeCtrl, fadeCtrl, mockCtrl) {...}
为了解决这个问题,引入的RequireJS的优化方案:r.js Optimizer。详情:前端优化:RequireJS Optimizer 的使用和配置方法。
({ name: "ptMain", optimize: "uglify",//uglify `out: "../build/ptMain-build.js",` removeCombined: true, paths: { underscore: '../vendor/underscore.min', zepto: '../vendor/zepto.min', backbone: '../vendor/backbone.min', domReady: '../vendor/domReady', iscroll: '../vendor/iscroll/iscroll.min' },
    shim: { underscore: { exports: '_' },
        zepto: { exports: '$' },
        backbone: { deps: ['underscore', 'zepto'], exports: 'Backbone' }
    }
});r.js同样可以对各个js进行压缩混淆优化,并最终在out配置中合并成一个JS文件,然后在页面中调用。就是说,不管三七二十一,每个页面对应引用的JS,都会被打包成一个JS,但这样的话,一个站点中多个页面之间公用的JS模块就无法缓存起来了。
说这么多,其实就是说,Webpack把以上两个问题解决了。
模块化
所有资源都是模块
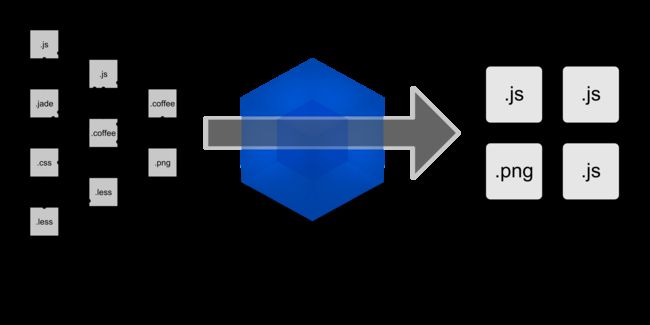
大家可以回头看下Webpack官方实例图,有一点不知道大家是否注意到:Webpack处理后,输出的静态文件只剩下js与png,而css、less、jade其他的文件都合并到了js中。在Webpack当中,所有资源的都是模块,模块都需要通过AMD或者CMD规范加载,就像css样式文件,不再在HTML中以<link>标签加载。
content.js
module.exports = "It works from content.js.";entry.js
//样式文件同样以模块方式引入
require("!style!css!./style.css");
//以CMD引入content.js
var content = require("./content.js");

function a() {
    document.write(content);
};
a();
style.css
body { background-color: yellow; }webpack.config.js
module.exports = {
    entry: "./entry.js",
    output: {
        path: __dirname,
        //打包输出文件
        filename: "bundle.js"
    },
    module: {
        //loaders引入加载器
        loaders: [
            { test: /\.css$/, loader: "style!css" }
        ]
    }
};
bundle.js
/***/ function(module, exports, __webpack_require__) {

    exports = module.exports = __webpack_require__(3)();
    // imports


    // module
    exports.push([module.id, "body {\r\n background-color: yellow;\r\n}\r\n", ""]);

    // exports


/***/ },
打包好的bundle,包含了样式表在内的静态资源,而index页面下载bundle后,会将样式还原到DOM当中。如下图。
index.html
<html>
<head>
    <meta charset="utf-8">
</head>
<body>
    <script type="text/javascript" src="bundle.js" charset="utf-8"></script>
</body>
</html>
代码切分
代码切分——抽取多个页面公用模块,打包成commonjs,便于缓存;
两大重要概念:切分点(split point)与代码块(Chunk)
AMD and CommonJs specify different methods to load code on demand.Both are supported and act as split points
AMD与CMD定义引用模块的入口就是切分点
All dependencies at a split point go into a new chunk
切分点定义中依赖的所有模块,合起来就是一个代码块。说白了就是,一个页面引用一个代码块
示例:Github common example
组织结构:build为输出结果目录
逻辑结构
配置代码
var path = require("path");
var CommonsChunkPlugin = require("../../node_modules/webpack/lib/optimize/CommonsChunkPlugin");

module.exports = {
    entry: {
        m1: './m1.js',
        m2: './m2.js'
    },
    output: {
        path: "build",
        filename: '[name].bundle.js'
    },
    plugins: [
        new CommonsChunkPlugin('common.js')
    ]
};
兼容AMD与CMD
CMD允许异步加载,写法:
require.ensure(["module-a", "module-b"], function(require) {
    var a = require("module-a");
    // ...
});
Note: require.ensure only loads the modules, it doesn’t evaluate them.
注意:只下载,不执行
AMD写法,与requireJS一致:
require(["module-a", "module-b"], function(a, b) {
    // ...
});
Note: AMD require loads and evaluate the modules. In webpack modules are evaluated left to right.
注意:与CMD不一样,AMD会下载并执行,执行顺序从左到右
Note: It’s allowed to omit the callback.
注意:并且允许省略回调
无论是AMD与CMD,文件组织方式与模块之间的逻辑都是一样的
AMD示例:Github AMD example
CMD示例:Github CMD example
丑化
webpack提供插件UglifyJsPlugin,可以优化(支持压缩、混淆)代码。插件引用方法详细,请参照。
其中混淆配置是值得注意的,由于AMD中的引用变量或方法名称混淆容易造成错误,因此混淆配置可以控制配置变量不被混淆。
A specific configuration is about mangling variable names. By default the mangle option is false. But you can say to the plugin avoid mangling a variable name passing a except list:
配置以下列表,在混淆代码时,以下配置的变量,不会被混淆
new webpack.optimize.UglifyJsPlugin({ mangle: { except: ['$super', '$', 'exports', 'require'] }
})
以上变量‘$super’, ‘$’, ‘exports’ or ‘require’,不会被混淆
Example:Github uglify example
var UglifyJsPlugin = require("../../node_modules/webpack/lib/optimize/UglifyJsPlugin");

module.exports = {
    entry: "./entry.js",
    output: {
        path: __dirname,
        filename: "bundle.js",
    },
    plugins: [
        //使用丑化js插件
        new UglifyJsPlugin({
            compress: {
                warnings: false
            },
            mangle: {
                except: ['$scope', '$']
            }
        })
    ]
};
entry.js
define("entry", function () {
    //变量 iabcdef 已引用,混淆
    var iabcdef = 11;
    //变量 $scope 已引用,但不混淆
    var $scope = "scope";

    document.write("entry module" + iabcdef);
    document.write($scope);

    //变量 ixzy 未被引用,剔除
    var ixzy = 3241;
});
版本控制
对于静态资源的版本控制,目前微信项目采取办法是版本号作为请求参数,版本号为发布日期,但有两个问题:
1、更新版本时,CDN不能及时更新;
2、没有发生变更的文件也被赋上新版本
Webpack的做法是,生成hash,区分文件。
Compute a hash of all chunks and add it.
生成所有代码块的hash
配置方法
//所有代码块添加hash
module.exports = {
    entry: "./entry.js",
    output: {
        path: "assets/[hash]/",
        publicPath: "assets/[hash]/",
        filename: "bundle.js"
    }
};
生成结果
Compute a hash per chunk and add it.
生成单个代码块文件的hash
配置方法
//单个代码块添加hash
module.exports = {
    entry: "./entry.js",
    output: {
        path: "build/",
        publicPath: "build/",
        chunkFilename: "[id].[hash].bundle.js",
        filename: "output.[hash].bundle.js",
    }
};
How to use?
安装
全局安装,在任意目录,输入以下命令
$ npm install webpack -g
仅在项目在中安装,切换到项目根目录,输入以下命令
$ npm install webpack --save-dev 检查安装成功后,显示如下。
$ webpack -v
加载插件(Plugin)
引用项目根目录node_modules
var path = require("path");

var CommonsChunkPlugin = require("../../node_modules/webpack/lib/optimize/CommonsChunkPlugin");

module.exports = {
    entry: {
        m1: './m1.js',
        m2: './m2.js'
    },
    output: {
        path: "build",
        filename: '[name].bundle.js'
    },
    plugins: [
        //引用插件
        new CommonsChunkPlugin('common.js')
    ]
};
加载加载器(Loaders)
通过加载器可以加载不同的资源文件进去各种操作,例如CoffeeScript及JSX……
安装加载器命令
$ npm install xxx-loader --save 或
$ npm install xxx-loader --save-dev 加载器应用方法有3种:
explicit in the require statement (通过require语句,显示引用)
configured via configuration (通过configuration来配置)
configured via CLI (通过CLI配置)
引入方法如下:
require("./loader!./dir/file.txt");
// => uses the file "loader.js" in the current directory to transform//    "file.txt" in the folder "dir". //“!”是链接器,链接各个加载器及文件,./loader!表明loader有明确地址

require("jade!./template.jade");
// => uses the "jade-loader" (that is installed from npm to "node_modules")//    to transform the file "template.jade" //jade-laoder,可以简写为jade,并且jade加载器需要安装在“node_modules”

require("!style!css!less!bootstrap/less/bootstrap.less");
// => the file "bootstrap.less" in the folder "less" in the "bootstrap"//    module (that is installed from github to "node_modules") is//    transformed by the "less-loader". The result is transformed by the//    "css-loader" and then by the "style-loader".  //同时使用style,css,less三个加载器,并使用“!”作为链接,对应文件时bootstrap.less
配置方法如下:
{
module: {
loaders: [
{ test: /\.jade$/, loader: "jade" },
// => "jade" loader is used for ".jade" files
{ test: /\.css$/, loader: "style!css" },
// => "style" and "css" loader is used for ".css" files
// Alternative syntax:
{ test: /\.css$/, loaders: ["style", "css"] },
]
}
}
http://segmentfault.com/a/1190000003506497
