【Oracle】物理DATAGUARD最大性能模式部署
物理DATAGUARD最大性能模式配置过程
主库主机edbjr2p1
备库主机edbjr2p2
1.创建主库
[root@edbjr2p1 ~]# xhost +
access control disabled, clients can connect from any host
[root@edbjr2p1 ~]# su - oracle
[oracle@edbjr2p1 ~]$ dbca
建库过程略。。。ORACLE_SID=ORCL
2.主库参数
[oracle@edbjr2p1 ~]$ export ORACLE_SID=ORCL
[oracle@edbjr2p1 ~]$ sqlplus / as sysdba
SQL*Plus: Release 10.2.0.1.0 - Production on Tue Dec 31 09:20:03 2013
Copyright (c) 1982, 2005, Oracle. All rights reserved.
Connected to:
Oracle Database 10g Enterprise Edition Release 10.2.0.1.0 - Production
With the Partitioning, OLAP and Data Mining options
SYS@ORCL>shutdown immediate;
Database closed.
Database dismounted.
ORACLE instance shut down.
SYS@ORCL>startup mount
ORACLE instance started.
Total System Global Area 285212672 bytes
Fixed Size 1218968 bytes
Variable Size 88082024 bytes
Database Buffers 188743680 bytes
Redo Buffers 7168000 bytes
Database mounted.
SYS@ORCL>select status from v$instance;
STATUS
------------
MOUNTED
SYS@ORCL>alter database force logging;
Database altered.
SYS@ORCL>select log_mode from v$database;
LOG_MODE
------------
NOARCHIVELOG
SYS@ORCL>
SYS@ORCL>alter database archivelog;
Database altered.
SYS@ORCL>alter system set log_archive_config='dg_config=(orcl,aux1)';
System altered.
SYS@ORCL>alter system set log_archive_dest_10='location=/home/oracle/orcl_arclog valid_for=(online_logfiles,all_roles) db_unique_name=orcl';
System altered.
SYS@ORCL>
创建目录用于存放归档
[oracle@edbjr2p1 admin]$ mkdir /home/oracle/orcl_arclog
继续更改参数
SYS@ORCL>alter system set log_archive_dest_1='service=aux1 valid_for=(online_logfiles,primary_role) db_unique_name=aux1';
System altered.
SYS@ORCL>alter system set log_archive_max_processes=4;
System altered.
SYS@ORCL>create pfile from spfile;
File created.
传输pfile文件和密码文件
[oracle@edbjr2p1 admin]$ scp $ORACLE_HOME/dbs/initORCL.ora edbjr2p2:$ORACLE_HOME/dbs/initAUX1.ora
oracle@edbjr2p2's password:
initORCL.ora 100% 1178 1.2KB/s 00:00
[oracle@edbjr2p1 admin]$ scp $ORACLE_HOME/dbs/orapwORCL edbjr2p2:$ORACLE_HOME/dbs/orapwAUX1
oracle@edbjr2p2's password:
orapwORCL 100% 1536 1.5KB/s 00:00
[oracle@edbjr2p1 admin]$
3.在备库中修改传输过来的pfile文件
[root@edbjr2p2 ~]# su - oracle
[oracle@edbjr2p2 ~]$ cd $ORACLE_HOME/dbs
[oracle@edbjr2p2 dbs]$ ls
initAUX1.ora initdw.ora init.ora orapwAUX1
[oracle@edbjr2p2 dbs]$ vi initAUX1.ora
以下是在文件中修改的
*.audit_file_dest='/u01/app/oracle/admin/AUX1/adump'
*.background_dump_dest='/u01/app/oracle/admin/AUX1/bdump'
*.control_files='/u01/app/oracle/oradata/AUX1/control01.ctl','/u01/app/oracle/oradata/AUX1/control02.ctl','/u01/app/oracle/oradata/AUX1/control03.ctl'
*.core_dump_dest='/u01/app/oracle/admin/AUX1/cdump'
*.log_archive_dest_10='location=/home/oracle/aux1_arclog valid_for=(online_logfiles,all_roles) db_unique_name=aux1'
*.user_dump_dest='/u01/app/oracle/admin/AUX1/udump'
以下是在文件中添加的
*.db_unique_name='AUX1'
*.standby_archive_dest='/home/oracle/aux1_stdlog'
*.db_file_name_convert=('/u01/app/oracle/oradata/ORCL/','/u01/app/oracle/oradata/AUX1/')
*.log_file_name_convert=('/u01/app/oracle/oradata/ORCL/','/u01/app/oracle/oradata/AUX1/')
*.standby_file_management='auto'
在备库中创建目录
[oracle@edbjr2p2 dbs]$ mkdir -p $ORACLE_BASE/admin/AUX1/{a,b,c,u}dump
[oracle@edbjr2p2 dbs]$ mkdir /home/oracle/aux1_arclog
[oracle@edbjr2p2 dbs]$ mkdir /home/oracle/aux1_stdlog
[oracle@edbjr2p2 dbs]$ mkdir $ORACLE_BASE/oradata/AUX1
4.创建监听和TNS
主库中:
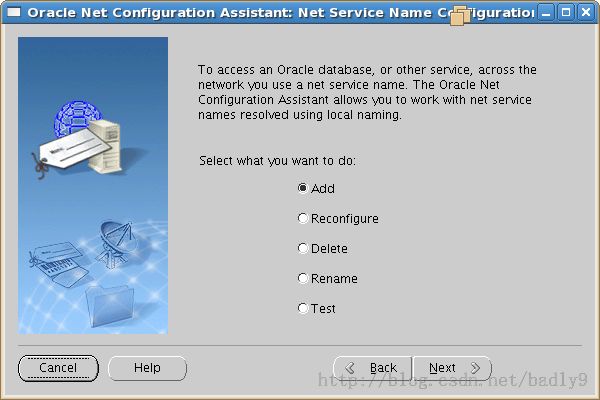
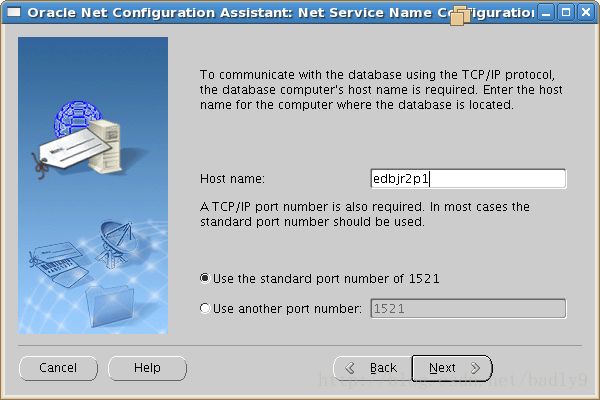
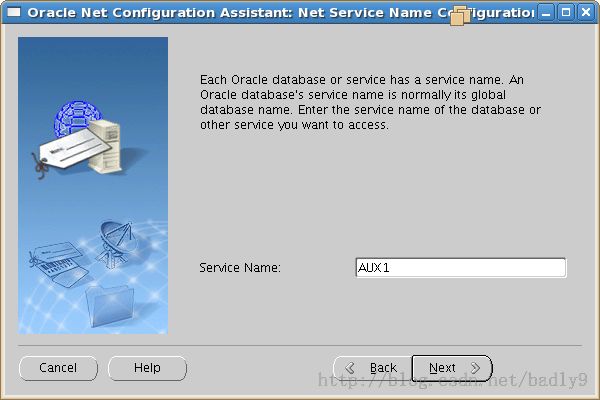
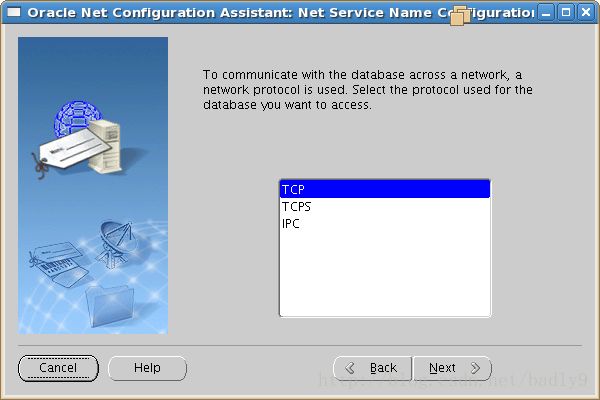
[oracle@edbjr2p1 admin]$ netca
然后一路下一步创建完监听
之后创建TNS
因为主库和备库使用的tnsnames相同 则把tnsname.ora从主库传到备库
[oracle@edbjr2p1 admin]$ scp $ORACLE_HOME/network/admin/tnsnames.ora edbjr2p2:$ORACLE_HOME/network/admin/tnsnames.ora
oracle@edbjr2p2's password:
tnsnames.ora 100% 700 0.7KB/s 00:00
[oracle@edbjr2p1 admin]$
备库中:
在备库上创建监听,过程略。。。
5.在主库中穿件rman备份
[oracle@edbjr2p1 admin]$ export ORACLE_SID=ORCL
[oracle@edbjr2p1 admin]$ rman target /
Recovery Manager: Release 10.2.0.1.0 - Production on Tue Dec 31 09:56:56 2013
Copyright (c) 1982, 2005, Oracle. All rights reserved.
connected to target database: ORCL (DBID=1363387608, not open)
RMAN> backup database;
Starting backup at 31-DEC-13
using target database control file instead of recovery catalog
allocated channel: ORA_DISK_1
channel ORA_DISK_1: sid=155 devtype=DISK
channel ORA_DISK_1: starting full datafile backupset
channel ORA_DISK_1: specifying datafile(s) in backupset
input datafile fno=00001 name=/u01/app/oracle/oradata/ORCL/system01.dbf
input datafile fno=00002 name=/u01/app/oracle/oradata/ORCL/undotbs01.dbf
input datafile fno=00003 name=/u01/app/oracle/oradata/ORCL/sysaux01.dbf
input datafile fno=00004 name=/u01/app/oracle/oradata/ORCL/users01.dbf
channel ORA_DISK_1: starting piece 1 at 31-DEC-13
channel ORA_DISK_1: finished piece 1 at 31-DEC-13
piece handle=/u01/app/oracle/product/10.2.0/db_1/dbs/01osspjr_1_1 tag=TAG20131231T095715 comment=NONE
channel ORA_DISK_1: backup set complete, elapsed time: 00:01:06
channel ORA_DISK_1: starting full datafile backupset
channel ORA_DISK_1: specifying datafile(s) in backupset
including current control file in backupset
including current SPFILE in backupset
channel ORA_DISK_1: starting piece 1 at 31-DEC-13
channel ORA_DISK_1: finished piece 1 at 31-DEC-13
piece handle=/u01/app/oracle/product/10.2.0/db_1/dbs/02ossplt_1_1 tag=TAG20131231T095715 comment=NONE
channel ORA_DISK_1: backup set complete, elapsed time: 00:00:03
Finished backup at 31-DEC-13
RMAN> exit;
Recovery Manager complete.
[oracle@edbjr2p1 admin]$
然后在主库中创建备库的controlfile
SYS@ORCL>alter database create standby controlfile as '/home/oracle/control.ctl';
Database altered.
把控制文件传输到备库主机中
[oracle@edbjr2p1 admin]$ scp /home/oracle/control.ctl edbjr2p2:$ORACLE_BASE/oradata/AUX1/control01.ctl
oracle@edbjr2p2's password:
control.ctl 100% 6896KB 6.7MB/s 00:01
[oracle@edbjr2p1 admin]$ scp /home/oracle/control.ctl edbjr2p2:$ORACLE_BASE/oradata/AUX1/control02.ctl
oracle@edbjr2p2's password:
control.ctl 100% 6896KB 6.7MB/s 00:00
[oracle@edbjr2p1 admin]$ scp /home/oracle/control.ctl edbjr2p2:$ORACLE_BASE/oradata/AUX1/control03.ctl
oracle@edbjr2p2's password:
control.ctl 100% 6896KB 6.7MB/s 00:00
[oracle@edbjr2p1 admin]$
传输rman备份的文件到备库主机的相同位置
[oracle@edbjr2p1 dbs]$ scp 01osspjr_1_1 edbjr2p2:$ORACLE_HOME/dbs/01osspjr_1_1
oracle@edbjr2p2's password:
01osspjr_1_1 100% 656MB 5.7MB/s 01:55
[oracle@edbjr2p1 dbs]$ scp 02ossplt_1_1 edbjr2p2:$ORACLE_HOME/dbs/02ossplt_1_1
oracle@edbjr2p2's password:
02ossplt_1_1 100% 6976KB 6.8MB/s 00:01
[oracle@edbjr2p1 dbs]$
6.备库中开始恢复文件
[oracle@edbjr2p2 dbs]$ export ORACLE_SID=AUX1
[oracle@edbjr2p2 dbs]$ sqlplus / as sysdba
SQL*Plus: Release 10.2.0.1.0 - Production on Tue Dec 31 10:09:23 2013
Copyright (c) 1982, 2005, Oracle. All rights reserved.
Connected to an idle instance.
SQL> startup nomount
ORACLE instance started.
Total System Global Area 285212672 bytes
Fixed Size 1218968 bytes
Variable Size 88082024 bytes
Database Buffers 188743680 bytes
Redo Buffers 7168000 bytes
SQL> alter database mount standby database;
Database altered.
SQL> exit
Disconnected from Oracle Database 10g Enterprise Edition Release 10.2.0.1.0 - Production
With the Partitioning, OLAP and Data Mining options
[oracle@edbjr2p2 dbs]$ rman target /
Recovery Manager: Release 10.2.0.1.0 - Production on Tue Dec 31 10:12:20 2013
Copyright (c) 1982, 2005, Oracle. All rights reserved.
connected to target database: ORCL (DBID=1363387608, not open)
RMAN> restore database
2> ;
Starting restore at 31-DEC-13
using target database control file instead of recovery catalog
allocated channel: ORA_DISK_1
channel ORA_DISK_1: sid=151 devtype=DISK
channel ORA_DISK_1: starting datafile backupset restore
channel ORA_DISK_1: specifying datafile(s) to restore from backup set
restoring datafile 00001 to /u01/app/oracle/oradata/AUX1/system01.dbf
restoring datafile 00002 to /u01/app/oracle/oradata/AUX1/undotbs01.dbf
restoring datafile 00003 to /u01/app/oracle/oradata/AUX1/sysaux01.dbf
restoring datafile 00004 to /u01/app/oracle/oradata/AUX1/users01.dbf
channel ORA_DISK_1: reading from backup piece /u01/app/oracle/product/10.2.0/db_1/dbs/01osspjr_1_1
channel ORA_DISK_1: restored backup piece 1
piece handle=/u01/app/oracle/product/10.2.0/db_1/dbs/01osspjr_1_1 tag=TAG20131231T095715
channel ORA_DISK_1: restore complete, elapsed time: 00:01:07
Finished restore at 31-DEC-13
RMAN> exit;
Recovery Manager complete.
[oracle@edbjr2p2 dbs]$ sqlplus / as sysdba
SQL*Plus: Release 10.2.0.1.0 - Production on Tue Dec 31 10:14:25 2013
Copyright (c) 1982, 2005, Oracle. All rights reserved.
Connected to:
Oracle Database 10g Enterprise Edition Release 10.2.0.1.0 - Production
With the Partitioning, OLAP and Data Mining options
SQL> alter database recover managed standby database disconnect from session;
Database altered.
主库和备库都执行alter system register;确保数据库都已经注册到监听
至此配置ok
6.测试
现在来进行测试,打开主库,在主库中建立表空间,查看备库中alert日志中能否看到表空间建立。
主库:
SYS@ORCL>create tablespace test
2 datafile '/u01/app/oracle/oradata/ORCL/test01.dbf' size 5m;
Tablespace created.
SYS@ORCL>alter system archive log current;
System altered.
SYS@ORCL>
备库中查看alert日志
[oracle@edbjr2p2 ~]$ cd $ORACLE_HOME/dbs
[oracle@edbjr2p2 dbs]$ ls
initAUX1.ora initdw.ora init.ora orapwAUX1
[oracle@edbjr2p2 dbs]$ cd /u01/app/oracle/admin/AUX1/bdump/
[oracle@edbjr2p2 bdump]$ ls
alert_AUX1.log aux1_arc2_14480.trc aux1_mrp0_14551.trc
aux1_arc0_14476.trc aux1_arc3_14482.trc
aux1_arc1_14478.trc aux1_dbw0_12923.trc
[oracle@edbjr2p2 bdump]$ tail -100f alert_AUX1.log
如果能看到以下内容则代表配置成功
Recovery created file /u01/app/oracle/oradata/AUX1/test01.dbf
Successfully added datafile 7 to media recovery
Datafile #7: '/u01/app/oracle/oradata/AUX1/test01.dbf'
Media Recovery Waiting for thread 1 sequence 30


