iOS APP开发集成Apple Pay与银联SDK开发教程(附示例代码)
2016年2月18日,apple pay正式进入中国,很是让人感觉到兴奋,虽说apple pay技术已经出来很久啦, 但是现在在用到,昨天的时候,我特意看了下apple pay的一些开发流程。让更多的同行可以快速在自己的app中集成apple Pay。 走在行业的前端。
第一步 : 在App里设置Apple Pay,并进行相关证书配置
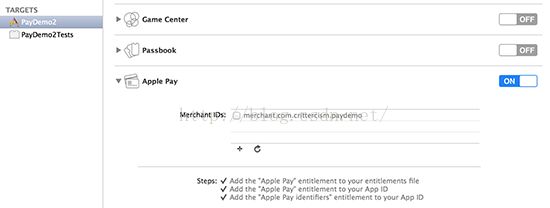
Xcode 6.0 - Xcode7.2都提供了非常方便的界面来设置Apple Pay。第一步先修改target为iOS 8.1,然后在项目Capabilities里将Apple Pay设置为on,这将自动导入需要的库文件,然后添加一个权限文件并设置,最后修改或创建你的App ID。
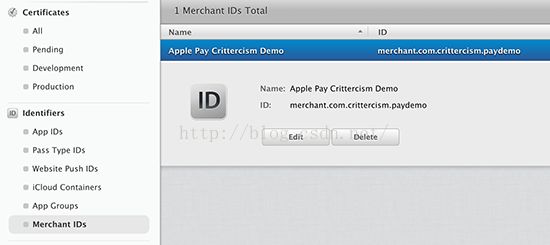
你可能会注意到上面没有有效的Merchant ID,我们需要创建一个,访问苹果iOS 开发者中心的位于Identifiers > Merchant ID的页面。
然后随着流程指引,创建一个Merchant ID并注册它。
注册商用ID标示
-
在开发者会员中心,选择“Certificates,Identifiers&Profiles”
-
在Identifiers下,选择Merchant IDs
-
在右上角点击"+"按钮
-
在Description栏、ID栏输入相应信息,点击"Continue"
-
浏览下配置参数,点击"Register"
-
点击"Done"
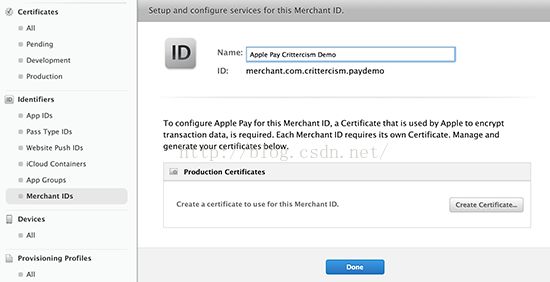
现在,我们需要给Merchant ID添加一个证书签名请求(Certificate Signing Request),以便加密支付令牌来保证其安全性。为达到这个目的,导航至你的Merchant ID,并点击Edit按钮来修改它。
现在,你需要创建一个证书。点击下面的Create Certificate按钮,并跟随苹果的流程指引完成创建。
-
在开发者会员中心,选择"Certificates,Identifiers&Profiles"
-
在Identifiers下,选择Merchant IDs
-
选择列表中的ID标示,点击Edit
-
点击"Create Certificate",按照指示获取或生成签名证书请求(CSR),点击"Continue"
-
点击"Choose File",选择你的CSR,点击"Generate"
-
点击"Download"下载证书,点击"Done"
现在Merchant ID设置好了,你可以回到Xcode并刷新Merchant ID区块,如果一切正常,你应当看到刚创建的ID出现在列表上。将它选中,然后可以进入下一部分。
第二步: 代码开发
1.0 Apple Pay使用了PassKit框架,所以你需要在适当的文件里导入头文件:
#import <PassKit/PassKit.h>
你还需要接收Apple Pay处理信息的回调,设置代理:
@interface ViewController ()<PKPaymentAuthorizationViewControllerDelegate>
@end
2.0 创建支付请求
首先你需要确认设备是否支持Apple Pay支付,确认的代码是:
 if([PKPaymentAuthorizationViewController canMakePayments]) {
<span style="white-space:pre">	</span>//在这儿进行商品的准备以及商品金额,付款参数的设置,下面进行详细的讲解
    } else {
        NSLog(@"This device cannot make payments");
    }
在上面的代码块里,你能使用PKPayment类来创建支付请求。下面是相应的代码,你需要将其中一些信息修改成自己的,比如merchantIdentifier需要与你之前创建的Merchant ID 证书中设置的id相匹配。
|
1
2
3
4
5
6
|
PKPaymentRequest *request = [[PKPaymentRequest alloc] init];
request.countryCode = @
"US"
; //CN 是中国
request.currencyCode = @
"USD"
; // CNY 是人民币的样式
request.supportedNetworks = @[PKPaymentNetworkAmex, PKPaymentNetworkMasterCard, PKPaymentNetworkVisa]; //银行卡种类的支持选择
request.merchantCapabilities = PKMerchantCapabilityEMV;
request.merchantIdentifier = @
"merchant.com.myMerchantID"
; //需要特别注意,需要匹配
|
添加物品到支付页
你可以使用PKPaymentSummaryItem来创建物品并显示,这个对象描述了一个物品和它的价格,数组最后的对象必须是总价格。
创建支付项目
NSDecimalNumber *subtotalAmount = [NSDecimalNumber decimalNumberWithMantissa:1275 exponent:-2 isNegative:NO];
self.subtotal = [PKPaymentSummaryItem summaryItemWithLabel:@"Subtotal" amount:subtotalAmount];
// 12.75 subtotal
NSDecimalNumber *subtotalAmount = [NSDecimalNumber decimalNumberWithMantissa:1275 exponent:-2 isNegative:NO];
self.subtotal = [PKPaymentSummaryItem summaryItemWithLabel:@"Subtotal" amount:subtotalAmount];
NSDecimalNumber *subtotalAmount = [NSDecimalNumber decimalNumberWithMantissa:1275 exponent:-2 isNegative:NO];
self.subtotal = [PKPaymentSummaryItem summaryItemWithLabel:@"Subtotal" amount:subtotalAmount];
// 2.00 discountNSDecimalNumber *discountAmount = [NSDecimalNumber decimalNumberWithMantissa:200 exponent:-2 isNegative:YES];self.discount = [PKPaymentSummaryItem summaryItemWithLabel:@"Discount" amount:discountAmount];PKPaymentSummaryItem *widget1 = [PKPaymentSummaryItem summaryItemWithLabel:@
"grand 1"
amount:[NSDecimalNumber decimalNumberWithString:@
"2.00"
]];
PKPaymentSummaryItem *widget2 = [PKPaymentSummaryItem summaryItemWithLabel:@
"grand 2"
amount:[NSDecimalNumber decimalNumberWithString:@
"1.00"
]];
PKPaymentSummaryItem *total = [PKPaymentSummaryItem summaryItemWithLabel:@
"Grand Total"
amount:[NSDecimalNumber decimalNumberWithString:@
"3.00"
]];
request.paymentSummaryItems = @[widget1, widget2, total];
|
显示认证视图
最后,显示由PassKit框架提供的view controller,接下来它将自动处理认证。
|
1
2
3
|
PKPaymentAuthorizationViewController *paymentPane = [[PKPaymentAuthorizationViewController alloc] initWithPaymentRequest:request];
paymentPane.delegate = self;
[self presentViewController:paymentPane animated:TRUE completion:nil];
|
实现委托方法
被请求的委托方法是被认证成功和认证完成两个事件调用的。是否解除view controller,以及让用户知道认证是否成功都取决于你。方法的签名如下:
|
1
2
|
- (void)paymentAuthorizationViewController:didAuthorizePayment:completion:
- (void)paymentAuthorizationViewControllerDidFinish:
|
支付验证
在Apple Pay验证了支付之后,仍然需要开发者来完成交易,这可以用didAuthorizePayment委托方法来完成,它需要你连接服务器并上传支付令牌和 其他信息,以完成整个支付流程。在服务器呼叫结束后,你需要调用completion方法,摒弃提供success或failure标记的参数。你可以在 示例代码里找到具体实现。
监控并优化交易
Apple Pay是现有的结账流程非常棒的解决方案,在应用里使用它无疑会让用户们高兴。尽管Apple Pay让支付流程极端简化,仍然有许多变动地方,他们的表现将直接与app的营收挂钩。
交易监控
Crittercism公司的新Transaction Management是一种很棒的方法,用来监控各种交易确保它们工作正常。如果一个API端末或服务执行缓慢,或者如果用户决定取消交易,或者你的应用崩溃了,你需要知道这些信息才能更好的优化它们。你可以到Crittercism官方网站了解更多信息。
总结
希望这个入门教程让你更好的理解和使用Apple Pay。别忘了阅读苹果的指南和文档来了解如何与供应商集成,以及用户界面的指导规范。你可以在苹果Apple Pay的官网上找到它们。
完整代码:
#import <UIKit/UIKit.h>
#import <PassKit/PassKit.h>
@interface ViewController : UIViewController
<PKPaymentAuthorizationViewControllerDelegate>
- (IBAction)checkOut:(id)sender;
@end
#import "ViewController.h"
@interface ViewController ()
@end
@implementation ViewController
- (void)paymentAuthorizationViewController:(PKPaymentAuthorizationViewController *)controller
didAuthorizePayment:(PKPayment *)payment
completion:(void (^)(PKPaymentAuthorizationStatus status))completion
{
NSLog(@"Payment was authorized: %@", payment);
// do an async call to the server to complete the payment.
// See PKPayment class reference for object parameters that can be passed
BOOL asyncSuccessful = FALSE;
// When the async call is done, send the callback.
// Available cases are:
// PKPaymentAuthorizationStatusSuccess, // Merchant auth'd (or expects to auth) the transaction successfully.
// PKPaymentAuthorizationStatusFailure, // Merchant failed to auth the transaction.
//
// PKPaymentAuthorizationStatusInvalidBillingPostalAddress, // Merchant refuses service to this billing address.
// PKPaymentAuthorizationStatusInvalidShippingPostalAddress, // Merchant refuses service to this shipping address.
// PKPaymentAuthorizationStatusInvalidShippingContact // Supplied contact information is insufficient.
if(asyncSuccessful) {
completion(PKPaymentAuthorizationStatusSuccess);
// do something to let the user know the status
NSLog(@"Payment was successful");
// [Crittercism endTransaction:@"checkout"];
} else {
completion(PKPaymentAuthorizationStatusFailure);
// do something to let the user know the status
NSLog(@"Payment was unsuccessful");
// [Crittercism failTransaction:@"checkout"];
}
}
- (void)paymentAuthorizationViewControllerDidFinish:(PKPaymentAuthorizationViewController *)controller
{
NSLog(@"Finishing payment view controller");
// hide the payment window
[controller dismissViewControllerAnimated:TRUEcompletion:nil];
}
- (IBAction)checkOut:(id)sender
{
// [Crittercism beginTransaction:@"checkout"];
if([PKPaymentAuthorizationViewControllercanMakePayments]) {
NSLog(@"Woo! Can make payments!");
PKPaymentRequest *request = [[PKPaymentRequestalloc] init];
PKPaymentSummaryItem *widget1 = [PKPaymentSummaryItemsummaryItemWithLabel:@"Widget 1"
amount:[NSDecimalNumber decimalNumberWithString:@"0.99"]];
PKPaymentSummaryItem *widget2 = [PKPaymentSummaryItemsummaryItemWithLabel:@"Widget 2"
amount:[NSDecimalNumber decimalNumberWithString:@"1.00"]];
PKPaymentSummaryItem *total = [PKPaymentSummaryItemsummaryItemWithLabel:@"Grand Total"
amount:[NSDecimalNumber decimalNumberWithString:@"1.99"]];
request.paymentSummaryItems = @[widget1, widget2, total];
request.countryCode = @"CN";
request.currencyCode = @"CNY";
request.supportedNetworks =@[PKPaymentNetworkAmex,PKPaymentNetworkVisa];
request.merchantIdentifier =@"merchant.com.demo.crittercismdemo";
request.merchantCapabilities =PKMerchantCapabilityEMV;
PKPaymentAuthorizationViewController *paymentPane = [[PKPaymentAuthorizationViewControlleralloc] initWithPaymentRequest:request];
paymentPane.delegate = self;
[selfpresentViewController:paymentPane animated:TRUEcompletion:nil];
} else {
NSLog(@"This device cannot make payments");
}
}
- (void)viewDidLoad {
[superviewDidLoad];
// Do any additional setup after loading the view, typically from a nib.
}
- (void)didReceiveMemoryWarning {
[superdidReceiveMemoryWarning];
// Dispose of any resources that can be recreated.
}
@end
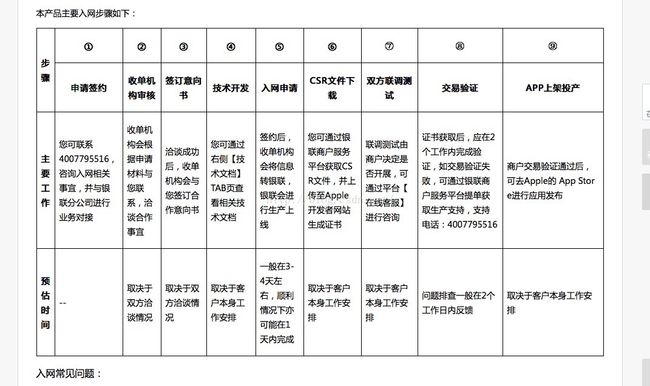
apple pay 还需要与银联进行一个关联: 否则,交易的钱去那儿都不清除:
1. 银联接入接口 : 点击打开链接
2.大致流程


