Unreal Engine 4 —— Post Process Shader练手(HLSL)
UE4的材质大多数都是通过节点连线的,使用节点连线效率更高,对艺术家也更友好。但是用久了之后也会怀念当年写HLSL着色器代码的青葱岁月(注:这篇博客原本写于2015年10月,那段青葱岁月应该指的是倒腾FX composer的时光)。万幸UE4内置了Custom节点,可以编译着色器代码,所以不禁手痒写了几个后期特效,写篇博客记录一下吧!
Edge Detection
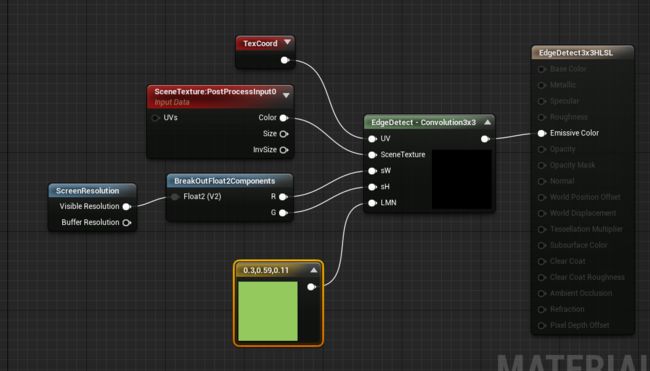
先有必要解释一下一些函数和参数:SceneTextureLookup函数指的是从总共的SceneTexture中选取对应ID的Texture,并且通过纹理坐标进行采样。参数分别为纹理坐标,Texture的ID和是否有Filter。LMN指的是进行grayscale操作中各颜色通道组成的向量,方便直接点乘。
材质如下:
节点代码如下:
int tIndex = 14;
float t1 = dot(SceneTextureLookup (UV + float2(-1.0f / sW, -1.0f / sH),tIndex, false), LMN );
float t2 = dot(SceneTextureLookup (UV + float2(0 , - 1.0f / sH),tIndex, false), LMN );
float t3 = dot(SceneTextureLookup (UV + float2(1.0f / sW, -1.0f / sH),tIndex, false), LMN );
float m1 = dot(SceneTextureLookup (UV + float2(-1.0f / sW, 0),tIndex ,false), LMN);
float b1 = dot(SceneTextureLookup (UV + float2(-1.0f / sW, 1.0f / sH),tIndex, false), LMN );
float b2 = dot(SceneTextureLookup (UV + float2(0 , 1.0f / sH),tIndex, false), LMN );
float b3 = dot(SceneTextureLookup (UV + float2(1.0f / sW, 1.0f / sH),tIndex, false), LMN );
float tot1 = t3 + b3 + ( 2 * m3) - t1 - (2 * m1 ) - b1; float tot2 = b1 + (2 * b2 ) + b3 - t1 - ( 2 * t2) - t3;
float4 col;
if ((( tot1 * tot1 ) + (tot2 * tot2 )) > 0.05 )
{
    col = float4 (0, 0,0 ,1);
}
else
{
    col = float4 (1, 1,1 ,1);
}
return col;
其实原理很简单,就是DIP中的滤波……
说实话,其实我挺喜欢这种风格……
浮雕风格
浮雕特效的shader其实特别简单,是一个只关于左上角和右下角的Filter。代码如下:
int tIndex = 14;
float4 s22 = SceneTextureLookup (UV, tIndex,false);
float4 s11 = SceneTextureLookup (UV + float2(-1.0f / sW, -1.0f / sH),tIndex, false);
float4 s33 = SceneTextureLookup (UV + float2(1.0f / sW, 1.0f / sH),tIndex, false);
s11.rgb = ( s11.r + s11. g + s11.b );
s22.rgb = ( s22.r + s22. g + s22.b ) * -0.5;
s33.rgb = ( s22.r + s22. g + s22.b ) * 0.2 ;
return ( s11 + s22 + s33);ASCII Art
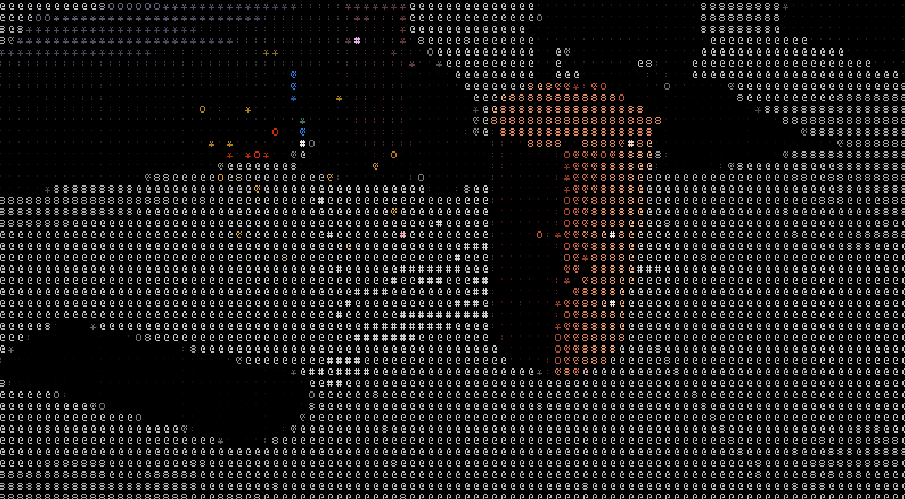
代码参考自shadertoy,说实话我也没搞懂这是什么鬼……
代码如下:
int tIndex = 14;
float2 uv  = UV .xy * ScreenResolution.xy ;
float3 col = SceneTextureLookup( floor(uv /8.0)* 8.0/ScreenResolution .xy, tIndex,false);
float gray = (col.r + col. b)/2.0;
float n =   65536.0;             // .c
if ( gray > 0.2) n = 65600.0 ;    // :
if ( gray > 0.3) n = 332772.0 ;   // *
if ( gray > 0.4) n = 15255086.0 ; // o
if ( gray > 0.5) n = 23385164.0 ; // &
if ( gray > 0.6) n = 15252014.0 ; // 8
if ( gray > 0.7) n = 13199452.0 ; // @
if ( gray > 0.8) n = 11512810.0 ; // #
float2 p = fmod (uv/ 4.0, 2.0) - 1.0 ;
p = floor (p* float2(4.0 , - 4.0) + 2.5 );
if ( clamp(p .x, 0.0 , 4.0 ) == p.x && clamp (p. y, 0.0, 4.0 ) == p.y) {
float c = fmod(n /exp2( p.x + 5.0*p .y), 2.0 );
if ( int(c ) == 1 ) col = col*1 ;
else col = col*0 ;
}
else col = col*0 ;
return float4(col, 1.0); 有那么点酷炫啊……
——全文完——


