第二章 Cameras, Lights, and Shadows
由于第二章写出的时候还没有把wizzard搞出来,所以这个项目是手动生成,估计后面我都会用WIZZARD来生成
#include "BaseTutorial2.h"
BasicTutorial2::BasicTutorial2(void)
{

}
BasicTutorial2::~BasicTutorial2(void)
{

}
void BasicTutorial2::createCamera(void)
{
	mCamera=mSceneMgr->createCamera("PlayerCam");//you can use getCamera retrieves a pointer to the named camera.
	mCamera->setPosition(Ogre::Vector3(0,10,500));
	mCamera->lookAt(Ogre::Vector3(0,0,0));
	mCamera->setNearClipDistance(5);
	//though you should not use a far clip distance with Stencil Shadows
	mCameraMan=new OgreBites::SdkCameraMan(mCamera);
	//The Ogre Wiki Tutorial Framework uses OgreBites for GUI widgets and camera handling.
	//It uses it because OgreBites - the Ogre sample framework - is included in every Ogre SDK, and because it simplifies things a lot.

}
void BasicTutorial2::createViewports(void)
{
	Ogre::Viewport* vp=mWindow->addViewport(mCamera);
	vp->setBackgroundColour(Ogre::ColourValue(0,0,0));
	mCamera->setAspectRatio(Ogre::Real(vp->getActualWidth())/Ogre::Real(vp->getActualHeight()));

}
void BasicTutorial2::createScene(void)
{
	mSceneMgr->setAmbientLight(Ogre::ColourValue(0,0,0));
	mSceneMgr->setShadowTechnique(Ogre::SHADOWTYPE_STENCIL_ADDITIVE);
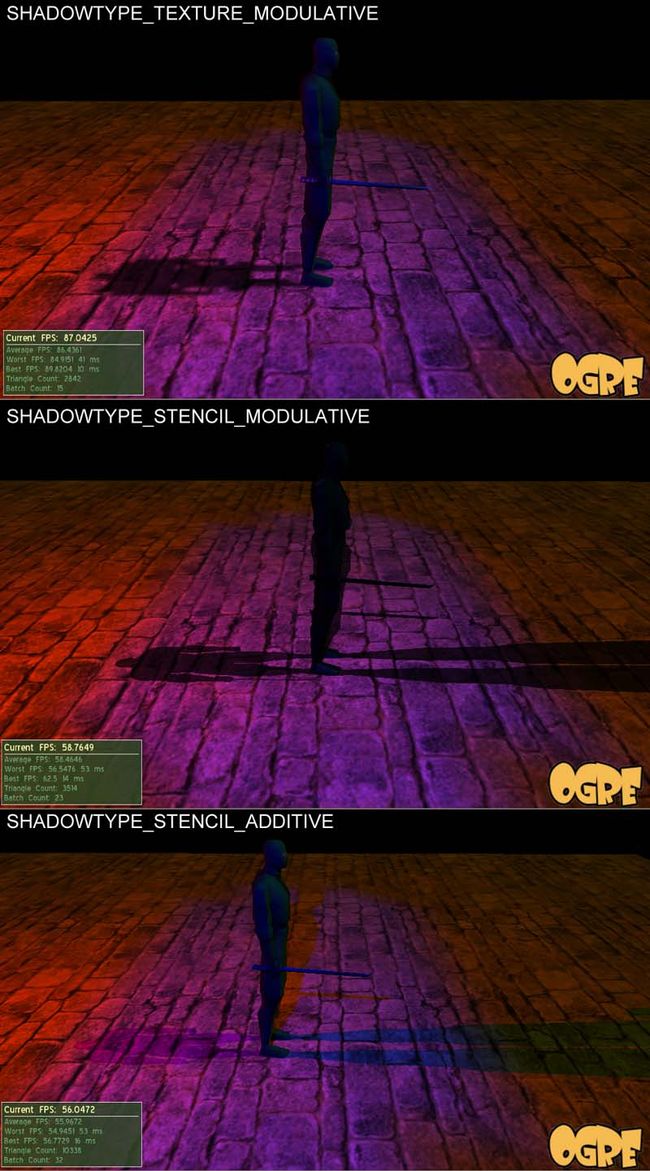
	//Ogre currently supports three types of Shadows:
	//1.Modulative Texture Shadows (Ogre::SHADOWTYPE_TEXTURE_MODULATIVE) - The least computationally expensive of
	//the three. This creates a black and white render-to-texture of shadow casters, which is then applied to the scene.
	//2.Modulative Stencil Shadows (Ogre::SHADOWTYPE_STENCIL_MODULATIVE) - This technique renders all shadow volumes as
	//a modulation after all non-transparent objects have been rendered to the scene. This is not as intensive as
	//Additive Stencil Shadows, but it is also not as accurate.
	//3.Additive Stencil Shadows (Ogre::SHADOWTYPE_STENCIL_ADDITIVE) - This technique renders each light as a separate
	//additive pass on the scene. This is very hard on the graphics card because each additional light requires an
	//additional pass at rendering the scene.
	//Ogre does not support soft shadows as part of the engine. If you want soft shadows you will need to write your own vertex and fragment programs.
	Ogre::Entity* entNinja=mSceneMgr->createEntity("Ninja","ninja.mesh");
	entNinja->setCastShadows(true);
	mSceneMgr->getRootSceneNode()->createChildSceneNode()->attachObject(entNinja);
	Ogre::Plane plane(Ogre::Vector3::UNIT_Y,0);
	Ogre::MeshManager::getSingleton().createPlane("ground",Ogre::ResourceGroupManager::DEFAULT_RESOURCE_GROUP_NAME,plane,\
		1500,1500,20,20,true,1,5,5,Ogre::Vector3::UNIT_Z);
	Ogre::Entity* entGround = mSceneMgr->createEntity("GroundEntity","ground");
	mSceneMgr->getRootSceneNode()->createChildSceneNode()->attachObject(entGround);
	entGround->setMaterialName("Examples/Rockwall");
	entGround->setCastShadows(false);

	//Now that we have a Ninja and ground in the scene, let's compile and run the program.
	//We see... nothing! What's going on? In the previous tutorial we added entities and they displayed fine.
	//The reason the Ninja doesn't show up is that the scene's ambient light has been set to total darkness.
	//So let's add a light to see what is going on.
	Ogre::Light* pointLight = mSceneMgr->createLight("pointLight");
	pointLight->setType(Ogre::Light::LT_POINT);
	pointLight->setPosition(Ogre::Vector3(0,150,250));
	pointLight->setDiffuseColour(1.0f,0.0f,0.0f);
	pointLight->setSpecularColour(1.0f,0.0f,0.0f);
	Ogre::Light* directionalLight=mSceneMgr->createLight("directionalLight");
	directionalLight->setType(Ogre::Light::LT_DIRECTIONAL);
	directionalLight->setDiffuseColour(Ogre::ColourValue(.25f,.25f,0));
	directionalLight->setSpecularColour(Ogre::ColourValue(.25f,.25f,0));
	directionalLight->setDirection(Ogre::Vector3( 0,-1,1));
	Ogre::Light* spotLight=mSceneMgr->createLight("spotLight");
	spotLight->setType(Ogre::Light::LT_SPOTLIGHT);
	spotLight->setDiffuseColour(0,0,1.0f);
	spotLight->setSpecularColour(0,0,1.0f);
	spotLight->setDirection(-1,-1,0);
	spotLight->setPosition(Ogre::Vector3(300,300,0));
	spotLight->setSpotlightRange(Ogre::Degree(35),Ogre::Degree(35));
}

//2 end


#if OGRE_PLATFORM == OGRE_PLATFORM_WIN32
#define WIN32_LEAN_AND_MEAN
#include "windows.h"
#endif

#ifdef __cplusplus
extern "C" {
#endif

#if OGRE_PLATFORM == OGRE_PLATFORM_WIN32
    INT WINAPI WinMain( HINSTANCE hInst, HINSTANCE, LPSTR strCmdLine, INT )
#else
    int main(int argc, char *argv[])
#endif
    {
        // Create application object
        BasicTutorial2 app;

        try {
            app.go();
        } catch( Ogre::Exception& e ) {
#if OGRE_PLATFORM == OGRE_PLATFORM_WIN32
            MessageBox( NULL, e.getFullDescription().c_str(), "An exception has occured!", MB_OK | MB_ICONERROR | MB_TASKMODAL);
#else
            std::cerr << "An exception has occured: " <<
                e.getFullDescription().c_str() << std::endl;
#endif
        }

        return 0;
    }

#ifdef __cplusplus
}
#endif
三种不同的阴影效果:
