Hive+mysql安装
Hive+mysql安装
1、用到的软件:
hive-0.9.0.tar.gz
MySQL-server-5.5.10-1.rhel5.x86_64.rpm
MySQL-client-5.5.10-1.rhel5.x86_64.rpm
mysql-connector-java-5.1.10.jar
mysql下载地址:http://downloads.mysql.com/archives/community/
示例环境:hadoop-1.2.1伪分布
2、解压hive,改名改权限:
[root@baolibin local]# pwd
/usr/local
[root@baolibin local]# ll
总用量 99940
drwxr-xr-x. 9 root root 4096 2月 28 11:42 hive
-rw-r--r--. 1 root root 30195232 2月 28 11:42 hive-0.9.0.tar.gz
3、设置hive的环境变量:
[root@baolibin local]# vim /etc/profile
#set hive environment
exportHIVE_HOME=/usr/local/hive
exportPATH=$PATH:$HIVE_HOME/bin
[root@baolibin local]# source /etc/profile
4、在目录$HIVE_HOME/conf/下,执行命令mv hive-default.xml.template hive-site.xml重命名
查看$HIVE_HOME/conf/下的配置文件:
[root@baolibin conf]# ls
hive-default.xml.template hive-exec-log4j.properties.template
hive-env.sh.template hive-log4j.properties.template
改名:
[root@baolibin conf]# mv hive-default.xml.template hive-site.xml
5、在目录$HIVE_HOME/conf/下,执行命令mv hive-env.sh.template hive-env.sh重命名
[root@baolibin conf]# mv hive-env.sh.template hive-env.sh
[root@baolibin conf]# ll
总用量 60
-rw-rw-r--. 1 root root 2378 4月 25 2012 hive-env.sh
-rw-rw-r--. 1 root root 2422 4月 25 2012 hive-exec-log4j.properties.template
-rw-rw-r--. 1 root root 2828 4月 25 2012hive-log4j.properties.template
-rw-rw-r--. 1 root root 48930 4月 25 2012 hive-site.xml
6、修改hadoop的配置文件hadoop-env.sh,修改内容如下:
exportHADOOP_CLASSPATH=.:$CLASSPATH:$HADOOP_CLASSPATH:$HADOOP_HOME/bin
[root@baolibin conf]# pwd
/usr/local/hive/conf
[root@baolibin conf]# cd../../../hadoop/conf
[root@baolibin conf]# ls
capacity-scheduler.xml hadoop-policy.xml slaves
configuration.xsl hdfs-site.xml ssl-client.xml.example
core-site.xml log4j.properties ssl-server.xml.example
fair-scheduler.xml mapred-queue-acls.xml taskcontroller.cfg
hadoop-env.sh mapred-site.xml task-log4j.properties
hadoop-metrics2.properties masters
[root@baolibin conf]# vim hadoop-env.sh
# Extra Java CLASSPATHelements. Optional.
exportHADOOP_CLASSPATH=.:$CLASSPATH:$HADOOP_CLASSPATH:$HADOOP_HOME/bin
7、在目录$HIVE_HOME/bin下面,修改文件hive-config.sh,增加以下内容:
export JAVA_HOME=/usr/local/jdk
export HIVE_HOME=/usr/local/hive
export HADOOP_HOME=/usr/hadoop
[root@baolibin conf]# pwd
/usr/hadoop/conf
[root@baolibin conf]# cd../../local/hive/bin
[root@baolibin bin]# ll
总用量 16
drwxr-xr-x. 3 root root 4096 4月 25 2012 ext
-rwxr-xr-x. 1 root root 5667 4月 25 2012 hive
-rwxr-xr-x. 1 root root 1900 4月 25 2012 hive-config.sh
[root@baolibin bin]# vim hive-config.sh
8、hive在hdfs中的默认位置是/user/hive/warehouse,是由配置文件hive-site.xml中属性
hive.metastore.warehouse.dir决定的。
把/user/hive/warehouse改为/hive
默认:
改为:
<property>
<name>hive.metastore.warehouse.dir</name>
<value>/hive</value>
<description>location of default database for thewarehouse</description>
</property>
9、启动hadoop和hive
启动hadoop:
[root@baolibinbin]# jps
2958TaskTracker
2838JobTracker
3017 Jps
2643DataNode
2534NameNode
2754SecondaryNameNode
进入hive:
[root@baolibinbin]# hive
WARNING:org.apache.hadoop.metrics.jvm.EventCounter is deprecated. Please useorg.apache.hadoop.log.metrics.EventCounter in all the log4j.properties files.
Logginginitialized using configuration in jar:file:/usr/local/hive/lib/hive-common-0.9.0.jar!/hive-log4j.properties
Hivehistory file=/tmp/root/hive_job_log_root_201502281209_43913064.txt
hive>
查看所有数据库:
hive>show databases;
OK
default
Timetaken: 22.087 seconds
hive>
进入default数据库:
hive>use default;
OK
Timetaken: 0.048 seconds
查看所有表:
hive>show tables;
OK
Timetaken: 2.393 seconds
创建表tb1:
hive> create table tb1(name string);
OK
Timetaken: 1.386 seconds
查看创建的表:
hive>show tables;
OK
tb1
Timetaken: 0.141 seconds
查询表tb1信息:
hive>select * from tb1;
OK
Timetaken: 1.365 seconds
查看表tb1字段:
hive>desc tb1;
OK
name string
Timetaken: 0.176 seconds
hive>
退出表:
hive>quit ;
hive默认使用的是derby数据库存储数据,而且一次只能一个用户访问,访问必须在同一个路径。
[root@baolibinbin]# pwd
/usr/local/hive/bin
[root@baolibinbin]# ls
derby.log ext hive hive-config.sh metastore_db
安装mysql:
10、把数据存储在mysql中,不用默认的derby数据库:
10.1、删除系统已经安装的mysql:
[root@baolibinconf]# pwd
/usr/local/hive/conf
[root@baolibinconf]# rpm -qa | grep mysql
mysql-libs-5.1.71-1.el6.x86_64
[root@baolibinconf]# rpm -e mysql-libs-5.1.71-1.el6.x86_64 –nodeps
[root@baolibinconf]# rpm -qa | grep mysql
[root@baolibinconf]#
10.2、安装mysql服务端:
[root@baolibinconf]# cd /home/hadoop
[root@baolibinhadoop]# ls
baozi MySQL-client-5.5.10-1.rhel5.x86_64.rpm text01 文档
baozi.txt MySQL-client-5.5.31-2.el6.i686.rpm xiaobaozi 下载
hadoop-1.2.1.tar.gz mysql-connector-java-5.1.10.jar 公共的 音乐
hive-0.9.0.tar.gz MySQL-server-5.5.10-1.rhel5.x86_64.rpm 模板 桌面
HTTP_20130313143750.dat MySQL-server-5.5.31-2.el6.i686.rpm 视频
jdk-6u45-linux-x64.bin pig-0.11.1.tar.gz 图片
[root@baolibinhadoop]#
10.3、启动mysql服务端:
执行安装mysql命令:rpm -i MySQL-server-5.5.10-1.rhel5.x86_64.rpm
[root@baolibinhadoop]# rpm -i MySQL-server-5.5.10-1.rhel5.x86_64.rpm
PLEASEREMEMBER TO SET A PASSWORD FOR THE MySQL root USER !
To do so,start the server, then issue the following commands:
/usr/bin/mysqladmin-u root password 'new-password'
/usr/bin/mysqladmin-u root -h baolibin password 'new-password'
Alternativelyyou can run:
/usr/bin/mysql_secure_installation
whichwill also give you the option of removing the test
databasesand anonymous user created by default. This is
stronglyrecommended for production servers.
See themanual for more instructions.
Pleasereport any problems with the /usr/bin/mysqlbug script!
[root@baolibinhadoop]#
启动mysql 服务端,执行命令 mysqld_safe &
[root@baolibinhadoop]# mysqld_safe &
[1] 1919
[root@baolibinhadoop]# 150302 19:47:00 mysqld_safe Logging to '/var/lib/mysql/baolibin.err'.
15030219:47:01 mysqld_safe Starting mysqld daemon with databases from /var/lib/mysql
^C
[root@baolibinhadoop]#
10.4、安装mysql客户端:
执行命令:rpm -i MySQL-client-5.5.10-1.rhel5.x86_64.rpm
[root@baolibinhadoop]# rpm -i MySQL-client-5.5.10-1.rhel5.x86_64.rpm
[root@baolibinhadoop]#
10.5、设置root用户密码
执行命令:mysql_secure_installation
10.5.1、键入当前的密码,为空:
直接回车:
[root@baolibinhadoop]# mysql_secure_installation
NOTE:RUNNING ALL PARTS OF THIS SCRIPT IS RECOMMENDED FOR ALL MySQL
SERVERS IN PRODUCTION USE! PLEASE READ EACH STEP CAREFULLY!
In orderto log into MySQL to secure it, we'll need the current
passwordfor the root user. If you've justinstalled MySQL, and
youhaven't set the root password yet, the password will be blank,
so youshould just press enter here.
Entercurrent password for root (enter for none):
10.5.2、是否设置root密码,选Y,依次填入设置的密码,我的密码是admin:
Entercurrent password for root (enter for none):
OK,successfully used password, moving on...
Settingthe root password ensures that nobody can log into the MySQL
root userwithout the proper authorisation.
Set rootpassword? [Y/n] Y
Newpassword:
Re-enternew password:
10.5.3、是否删除匿名用户,选N留着就行:
Removeanonymous users? [Y/n] n
... skipping.
Normally,root should only be allowed to connect from 'localhost'. This
ensuresthat someone cannot guess at the root password from the network.
Disallowroot login remotely? [Y/n]
10.5.4、是否关闭远程登录,选n不关闭:
Disallowroot login remotely? [Y/n] n
... skipping.
Bydefault, MySQL comes with a database named 'test' that anyone can
access. This is also intended only for testing, andshould be removed
beforemoving into a production environment.
Removetest database and access to it? [Y/n]
10.5.5、是否删除测试数据库,选n不删除:
Removetest database and access to it? [Y/n] n
... skipping.
Reloadingthe privilege tables will ensure that all changes made so far
will takeeffect immediately.
Reloadprivilege tables now? [Y/n]
10.5.6、是否重新加载权限表,选Y留着:
Reloadprivilege tables now? [Y/n] Y
... Success!
Cleaningup...
Alldone! If you've completed all of theabove steps, your MySQL
installationshould now be secure.
Thanksfor using MySQL!
[root@baolibinhadoop]#
11、进入mysql:
执行命令:mysql -uroot –padmin
[root@baolibinhadoop]# mysql -uroot -padmin
Welcometo the MySQL monitor. Commands end with; or \g.
YourMySQL connection id is 6
Server version:5.5.10 MySQL Community Server (GPL)
Copyright(c) 2000, 2010, Oracle and/or its affiliates. All rights reserved.
Oracle isa registered trademark of Oracle Corporation and/or its
affiliates.Other names may be trademarks of their respective
owners.
Type'help;' or '\h' for help. Type '\c' to clear the current input statement.
mysql>
查看所有数据库:
mysql>show databases;
+--------------------+
|Database |
+--------------------+
|information_schema |
|mysql |
|performance_schema |
|test |
+--------------------+
4 rows inset (0.10 sec)
mysql>
12、使用mysql作为hive的metastore
12.1、把mysql的jdbc驱动放置到hive的lib目录下
[root@baolibinhadoop]# cp mysql-connector-java-5.1.10.jar/usr/local/hive/lib
[root@baolibinhadoop]#
12.2、修改hive-site.xml文件:
可以看到默认用的是derby数据库:
<property>
<name>javax.jdo.option.ConnectionURL</name>
<value>jdbc:derby:;databaseName=metastore_db;create=true</value>
<description>JDBC connect string for a JDBCmetastore</description>
</property>
默认用户名和密码:
<property>
<name>javax.jdo.option.ConnectionUserName</name>
<value>APP</value>
<description>usernameto use against metastore database</description>
</property>
<property>
<name>javax.jdo.option.ConnectionPassword</name>
<value>mine</value>
<description>password to use against metastoredatabase</description>
</property>
主机IP:192.168.1.100
mysql端口:3306
修改内容如下:
<property>
<name>javax.jdo.option.ConnectionURL</name>
<value>jdbc:mysql://192.168.1.100:3306/hive?createDatabaseIfNotExist=true</value>
</property>
<property>
<name>javax.jdo.option.ConnectionDriverName</name>
<value>com.mysql.jdbc.Driver</value>
</property>
<property>
<name>javax.jdo.option.ConnectionUserName</name>
<value>root</value>
</property>
<property>
<name>javax.jdo.option.ConnectionPassword</name>
<value>admin</value>
</property>
13、查看mysql里的hive表:
进入hive:
[root@baolibin ~]# hive
WARNING:org.apache.hadoop.metrics.jvm.EventCounter is deprecated. Please useorg.apache.hadoop.log.metrics.EventCounter in all the log4j.properties files.
Logginginitialized using configuration in jar:file:/usr/local/hive/lib/hive-common-0.9.0.jar!/hive-log4j.properties
Hivehistory file=/tmp/root/hive_job_log_root_201503022039_1040178710.txt
hive>show databases;
OK
default
Timetaken: 48.934 seconds
hive>
进入mysql查看hive的表:
[root@baolibin ~]# mysql -uroot -padmin
Welcometo the MySQL monitor. Commands end with; or \g.
YourMySQL connection id is 35
Serverversion: 5.5.10 MySQL Community Server (GPL)
Copyright(c) 2000, 2010, Oracle and/or its affiliates. All rights reserved.
Oracle isa registered trademark of Oracle Corporation and/or its
affiliates.Other names may be trademarks of their respective
owners.
Type'help;' or '\h' for help. Type '\c' to clear the current input statement.
mysql>
可以看到hive表:
mysql> show databases;
+--------------------+
| Database |
+--------------------+
|information_schema |
|hive |
|mysql |
|performance_schema |
|test |
+--------------------+
5 rows inset (0.93 sec)
查看hive里的表:
mysql>
mysql> show tables;
+-----------------+
|Tables_in_hive |
+-----------------+
|DATABASE_PARAMS |
|DBS |
|SEQUENCE_TABLE |
+-----------------+
3 rows inset (16.39 sec)
mysql>
14、在hive里面创建内部表,并查看创建的内容:
在hive的default数据库里面创建表t1:
hive>show databases;
OK
default
Timetaken: 11.034 seconds
hive>use default;
OK
Timetaken: 0.075 seconds
hive>show tables;
OK
Timetaken: 1.767 seconds
hive> CREATE TABLE t1(name string,id int) ROW FORMAT DELIMITED FIELDS TERMINATED BY ' ';
OK
Timetaken: 3.996 seconds
hive>
指定目录加载一条数据:
hive> LOAD DATA LOCAL INPATH '/home/hadoop/in' INTO TABLE t1;
Copyingdata from file:/home/hadoop/in
Copyingfile: file:/home/hadoop/in
Loadingdata to table default.t1
OK
Timetaken: 6.695 seconds
hive>
操作mysql,查看hive数据库里面的表:
mysql>show databases;
+--------------------+
|Database |
+--------------------+
|information_schema |
|hive |
|mysql |
|performance_schema |
|test |
+--------------------+
5 rows inset (0.43 sec)
mysql>use hive
Databasechanged
mysql> show tables;
+-----------------+
|Tables_in_hive |
+-----------------+
|BUCKETING_COLS |
|CDS |
|COLUMNS_V2 |
|DATABASE_PARAMS |
|DBS |
|PARTITION_KEYS |
|SDS |
|SD_PARAMS |
|SEQUENCE_TABLE |
|SERDES |
|SERDE_PARAMS |
| SORT_COLS |
|TABLE_PARAMS |
|TBLS |
+-----------------+
14 rowsin set (0.08 sec)
mysql>
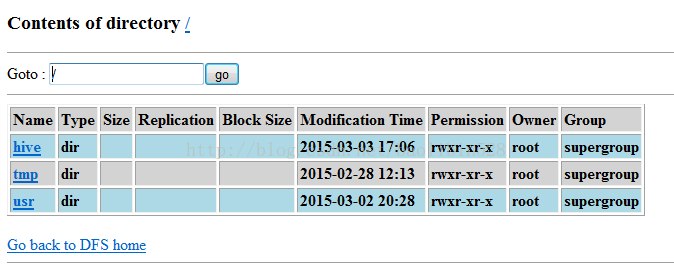
进入网址http://192.168.1.100:50070/dfshealth.jsp,点击Browse the filesystem:
进入HDFS木里的hive:
附HDFS目录:
可以看到hive目录里面有刚才创建的表t1:
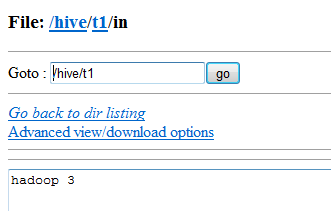
进入t1里面,有刚才加载的文件in:
点击in可以看到之前的内容:
之前的内容:
用rpm安装mysql可能会出现如下错误:
高版本的mysql装在了低版本的Linux系统上面:
[root@baolibinhadoop]# rpm -i MySQL-server-5.5.31-2.el6.i686.rpm
error:Failed dependencies:
libaio.so.1 is needed by MySQL-server-5.5.31-2.el6.i686
libaio.so.1(LIBAIO_0.1) is needed byMySQL-server-5.5.31-2.el6.i686
libaio.so.1(LIBAIO_0.4) is needed byMySQL-server-5.5.31-2.el6.i686
libc.so.6 is needed by MySQL-server-5.5.31-2.el6.i686
libc.so.6(GLIBC_2.0) is needed byMySQL-server-5.5.31-2.el6.i686
libc.so.6(GLIBC_2.1) is needed byMySQL-server-5.5.31-2.el6.i686
libc.so.6(GLIBC_2.1.2)is needed by MySQL-server-5.5.31-2.el6.i686
libc.so.6(GLIBC_2.1.3)is needed by MySQL-server-5.5.31-2.el6.i686
libc.so.6(GLIBC_2.12) is needed byMySQL-server-5.5.31-2.el6.i686
libc.so.6(GLIBC_2.2) is needed byMySQL-server-5.5.31-2.el6.i686
libc.so.6(GLIBC_2.2.3)is needed by MySQL-server-5.5.31-2.el6.i686
libc.so.6(GLIBC_2.3) is needed byMySQL-server-5.5.31-2.el6.i686
libc.so.6(GLIBC_2.3.3)is needed by MySQL-server-5.5.31-2.el6.i686
libc.so.6(GLIBC_2.3.4)is needed by MySQL-server-5.5.31-2.el6.i686
libc.so.6(GLIBC_2.4) is needed byMySQL-server-5.5.31-2.el6.i686
libc.so.6(GLIBC_2.7) is needed byMySQL-server-5.5.31-2.el6.i686
libcrypt.so.1 is needed byMySQL-server-5.5.31-2.el6.i686
libcrypt.so.1(GLIBC_2.0) is needed by MySQL-server-5.5.31-2.el6.i686
libdl.so.2 is needed by MySQL-server-5.5.31-2.el6.i686
libdl.so.2(GLIBC_2.0) is needed byMySQL-server-5.5.31-2.el6.i686
libdl.so.2(GLIBC_2.1) is needed by MySQL-server-5.5.31-2.el6.i686
libm.so.6 is needed by MySQL-server-5.5.31-2.el6.i686
libm.so.6(GLIBC_2.0) is needed byMySQL-server-5.5.31-2.el6.i686
libm.so.6(GLIBC_2.1) is needed byMySQL-server-5.5.31-2.el6.i686
libpthread.so.0 is needed byMySQL-server-5.5.31-2.el6.i686
libpthread.so.0(GLIBC_2.0) is needed byMySQL-server-5.5.31-2.el6.i686
libpthread.so.0(GLIBC_2.1) is needed byMySQL-server-5.5.31-2.el6.i686
libpthread.so.0(GLIBC_2.2) is needed byMySQL-server-5.5.31-2.el6.i686
libpthread.so.0(GLIBC_2.3.2)is needed by MySQL-server-5.5.31-2.el6.i686
librt.so.1 is needed by MySQL-server-5.5.31-2.el6.i686
librt.so.1(GLIBC_2.2) is needed byMySQL-server-5.5.31-2.el6.i686
[root@baolibinhadoop]#
另外在mysql里面可以查看hive的DBS表:
可以看到hive指定的默认数据库:


