Android之gallery 常见2种使用方法和3D效果总结
我们有时候在iPhone手机上或者Windows上面看到动态的图片,可以通过鼠标或者手指触摸来移动它,产生动态的图片滚动效果,还可以根据你的点击或者触摸触发其他事件响应。同样的,在Android中也提供这这种实现,这就是通过Gallery在UI上实现缩略图浏览器。
一般情况下,我们在Android中要用到类似这种图片容器的控件,都需要为它指定一个适配器,让它可以把内容按照我们定义的方式来显示,因此我们来给它加一个适配器,至于这个适配器如何实现,后面接着来操作,这里只需知道这个适配器的类叫ImageGalleryAdapter 。 gallery.setAdapter(new ImageGalleryAdapter (this));
下面介绍常用2种用法:
第一种方法:
第一步:设计xml布局文件
代码如下:main.xml
<LinearLayout xmlns:android="http://schemas.android.com/apk/res/android"
    android:layout_width="fill_parent"
    android:layout_height="fill_parent"
    android:orientation="vertical" >

    <Gallery
        android:id="@+id/myGallery"
        android:layout_width="fill_parent"
        android:layout_height="wrap_content"
        android:gravity="center_vertical"
        android:spacing="3px"
        android:text="@string/hello" />
</LinearLayout>
package net.loonggg.gallery;

import android.content.Context;
import android.view.View;
import android.view.ViewGroup;
import android.view.ViewGroup.LayoutParams;
import android.widget.BaseAdapter;
import android.widget.Gallery;
import android.widget.ImageView;

public class ImageGalleryAdapter extends BaseAdapter {
private Context context;
// 里面所有的方法表示的是可以根据指定的显示图片的数量,进行每个图片的处理
private int[] image = new int[] { R.drawable.ispic_a, R.drawable.ispic_b,
R.drawable.ispic_c, R.drawable.ispic_d, R.drawable.ispic_e };

public ImageGalleryAdapter(Context context) {
this.context = context;
}

public int getCount() { // 取得要显示内容的数量
return image.length;
}

public Object getItem(int position) { // 每个资源的位置
return image[position];
}

public long getItemId(int position) { // 取得每个项的ID
return image[position];
}

// 将资源设置到一个组件之中,很明显这个组件是ImageView
public View getView(int position, View convertView, ViewGroup parent) {
ImageView iv = new ImageView(context);
iv.setBackgroundColor(0xFFFFFFFF);
iv.setImageResource(image[position]);// 给ImageView设置资源
iv.setScaleType(ImageView.ScaleType.CENTER);// 设置对齐方式
iv.setLayoutParams(new Gallery.LayoutParams(LayoutParams.WRAP_CONTENT,
LayoutParams.WRAP_CONTENT));
return iv;
}
}
第三步:主方法:
package net.loonggg.gallery;

import android.app.Activity;
import android.os.Bundle;
import android.view.View;
import android.widget.AdapterView;
import android.widget.AdapterView.OnItemClickListener;
import android.widget.Gallery;
import android.widget.Toast;

public class GalleryActivity extends Activity {
private Gallery myGallery;

@Override
public void onCreate(Bundle savedInstanceState) {
super.onCreate(savedInstanceState);
setContentView(R.layout.main);
myGallery = (Gallery) findViewById(R.id.myGallery);
myGallery.setAdapter(new ImageGalleryAdapter(this));
myGallery.setOnItemClickListener(new OnItemClickListenerImpl());
}

private class OnItemClickListenerImpl implements OnItemClickListener {

public void onItemClick(AdapterView<?> parent, View view, int position,
long id) {
Toast.makeText(GalleryActivity.this, String.valueOf(position),
Toast.LENGTH_SHORT).show();
}

}
}
第二种方法
第一步:设计xml布局文件<?xml version="1.0" encoding="utf-8"?>
<LinearLayout xmlns:android="http://schemas.android.com/apk/res/android"
android:layout_width="fill_parent"
android:layout_height="fill_parent"
android:gravity="bottom"
android:orientation="vertical" >
<ImageSwitcher
android:id="@+id/is"
android:layout_width="fill_parent"
android:layout_height="wrap_content" >
</ImageSwitcher>
<Gallery
android:id="@+id/myGallery"
android:layout_width="fill_parent"
android:layout_height="wrap_content"
android:gravity="center_vertical"
android:spacing="3px" />
</LinearLayout>
<?xml version="1.0" encoding="utf-8"?>
<LinearLayout xmlns:android="http://schemas.android.com/apk/res/android"
    android:layout_width="wrap_content"
    android:layout_height="wrap_content"
    android:background="#FFFFFF"
    android:orientation="horizontal" >

    <ImageView
        android:id="@+id/iv"
        android:layout_width="wrap_content"
        android:layout_height="wrap_content"
        android:scaleType="center" />

</LinearLayout>
package net.loonggg.gallery2;

import java.lang.reflect.Field;
import java.util.ArrayList;
import java.util.HashMap;
import java.util.List;
import java.util.Map;

import android.app.Activity;
import android.os.Bundle;
import android.view.View;
import android.view.ViewGroup.LayoutParams;
import android.widget.AdapterView;
import android.widget.AdapterView.OnItemClickListener;
import android.widget.Gallery;
import android.widget.ImageSwitcher;
import android.widget.ImageView;
import android.widget.SimpleAdapter;
import android.widget.ViewSwitcher.ViewFactory;

public class MainActivity extends Activity {
private ImageSwitcher is;
private Gallery gallery;
private SimpleAdapter adapter;
private List<Map<String, Integer>> list = new ArrayList<Map<String, Integer>>();

@Override
public void onCreate(Bundle savedInstanceState) {
super.onCreate(savedInstanceState);
setContentView(R.layout.main);
is = (ImageSwitcher) findViewById(R.id.is);
is.setFactory(new ViewFactoryImpl());
initAdapter();
gallery = (Gallery) findViewById(R.id.myGallery);
gallery.setAdapter(adapter); // 为gallery设置合适的适配器
gallery.setOnItemClickListener(new OnItemClickListenerImpl());

}

public class OnItemClickListenerImpl implements OnItemClickListener { // gallery的点击事件

@Override
public void onItemClick(AdapterView<?> parent, View view, int position,
long id) {
Map<String, Integer> map = (Map<String, Integer>) parent
.getAdapter().getItem(position);
is.setImageResource(map.get("image"));
}

}

public void initAdapter() { // 这个方法的功能是:从R.java文件中获取图片资源的id,如果资源图片数量比较多,用数组的方法一一定义,就不太合适,这种方法最好了。
Field[] fields = R.drawable.class.getDeclaredFields();
for (int x = 0; x < fields.length; x++) {
if (fields[x].getName().startsWith("ispic_")) { // 根据图片的名称取出想要的图片
Map<String, Integer> map = new HashMap<String, Integer>();
try {
map.put("image", fields[x].getInt(R.drawable.class));
} catch (Exception e) {
e.printStackTrace();
}
list.add(map);
}
}
adapter = new SimpleAdapter(MainActivity.this, list,
R.layout.grid_item, new String[] { "image" },
new int[] { R.id.iv });
}

public class ViewFactoryImpl implements ViewFactory {

@Override
public View makeView() {
ImageView iv = new ImageView(MainActivity.this);
iv.setBackgroundColor(0xFFFFFFFF);
iv.setScaleType(ImageView.ScaleType.CENTER);
iv.setLayoutParams(new ImageSwitcher.LayoutParams(
LayoutParams.FILL_PARENT, LayoutParams.WRAP_CONTENT));
return iv;
}

}
}
一,创建倒影效果
这个基本思路是:
1,创建一个源图一样的图,利用martrix将图片旋转180度。这个倒影图的高是源图的一半。
Matrix matrix = new Matrix();

// 1表示放大比例,不放大也不缩小。
// -1表示在y轴上相反,即旋转180度。
matrix.preScale(1, -1);

Bitmap reflectionBitmap = Bitmap.createBitmap(
    srcBitmap,
    0,
    srcBitmap.getHeight() / 2,  // top为源图的一半
    srcBitmap.getWidth(),       // 宽度与源图一样
    srcBitmap.getHeight() / 2,  // 高度与源图的一半
    matrix,
    false);
2,创建一个最终效果的图,即源图 + 间隙 + 倒影。
final int REFLECTION_GAP = 5;

Bitmap bitmapWithReflection = Bitmap.createBitmap(
       reflectionWidth,
       srcHeight + reflectionHeight + REFLECTION_GAP,
       Config.ARGB_8888);
3,依次将源图、倒影图绘制在最终的bitmap上面。
Canvas canvas = new Canvas(bitmapWithReflection);

// Draw the original bitmap.
canvas.drawBitmap(srcBitmap, 0, 0, null);

// Draw the reflection bitmap.
canvas.drawBitmap(reflectionBitmap, 0, srcHeight + REFLECTION_GAP, null);
4,创建LinearGradient,从而给定一个由上到下的渐变色。
Paint paint = new Paint();
paint.setAntiAlias(true);
LinearGradient shader = new LinearGradient(
        0,
        srcHeight,
        0,
        bitmapWithReflection.getHeight() + REFLECTION_GAP,
        0x70FFFFFF,
        0x00FFFFFF,
        TileMode.MIRROR);
paint.setShader(shader);
paint.setXfermode(new PorterDuffXfermode(android.graphics.PorterDuff.Mode.DST_IN));

// Draw the linear shader.
canvas.drawRect(
        0,
        srcHeight,
        srcWidth,
        bitmapWithReflection.getHeight() + REFLECTION_GAP,
        paint);
二,扩展Gallery
扩展系统的gallery,我们需要重写两个方法,getChildStaticTransformation()和getChildDrawingOrder(),同时,要使这两个方法能被调用,必须执行如下两行代码,文档上面是有说明的。
// Enable set transformation.
this.setStaticTransformationsEnabled(true);
// Enable set the children drawing order.
this.setChildrenDrawingOrderEnabled(true);
- getChildDrawingOrder的实现
@Override
protected int getChildDrawingOrder(int childCount, int i)
{
    // Current selected index.
    int selectedIndex = getSelectedItemPosition() - getFirstVisiblePosition();
    if (selectedIndex < 0)
    {
        return i;
    }

    if (i < selectedIndex)
    {
        return i;
    }
    else if (i >= selectedIndex)
    {
        return childCount - 1 - i + selectedIndex;
    }
    else
    {
        return i;
    }
}
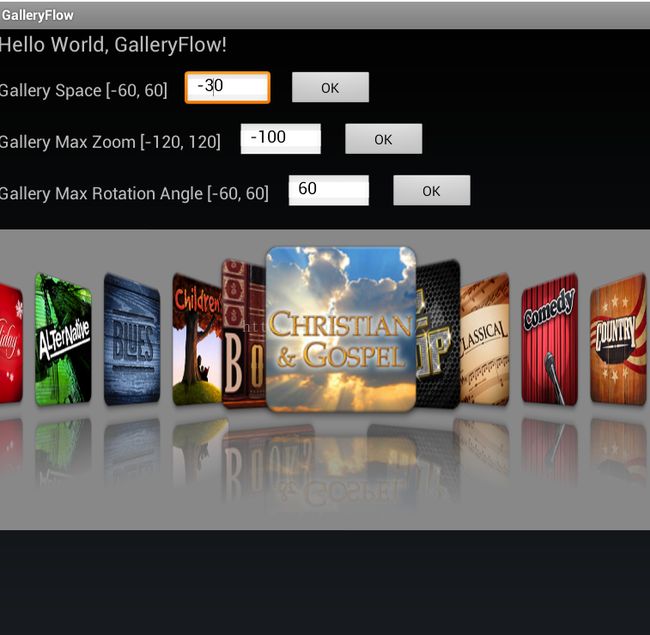
这里为什么要计算drawing order,因为从上图中看到,我们的效果是:中间左边的顺序是 0, 1, 2,右边的child覆盖左边的child,而在中间右边的顺序正好相反,左边的覆盖右边的,所以我们要重写这个方法,而gallery自身的实现,不是这种效果。
- getChildStaticTransformation的实现
@Override
protected boolean getChildStaticTransformation(View child, Transformation t)
{
    super.getChildStaticTransformation(child, t);

    final int childCenter = getCenterOfView(child);
    final int childWidth  = child.getWidth();

    int rotationAngle = 0;
    t.clear();
    t.setTransformationType(Transformation.TYPE_MATRIX);

    // If the child is in the center, we do not rotate it.
    if (childCenter == mCoveflowCenter)
    {
        transformImageBitmap(child, t, 0);
    }
    else
    {
        // Calculate the rotation angle.
        rotationAngle = (int)(((float)(mCoveflowCenter - childCenter) / childWidth) * mMaxRotationAngle);

        // Make the angle is not bigger than maximum.
        if (Math.abs(rotationAngle) > mMaxRotationAngle)
        {
            rotationAngle = (rotationAngle < 0) ? -mMaxRotationAngle : mMaxRotationAngle;
        }

        transformImageBitmap(child, t, rotationAngle);
    }

    return true;
}
这个方法就是根据child来计算它的transformation(变换),我们需要去修改它里面的matrix,从而达到旋转的效果。根据位置和角度来计算的matrix的方法写在另外一个方法transformImageBitmap中实现。
- transformImageBitmap()的实现
private void transformImageBitmap(View child, Transformation t, int rotationAngle)
{
    mCamera.save();

    final Matrix imageMatrix = t.getMatrix();
    final int imageHeight = child.getHeight();
    final int imageWidth  = child.getWidth();
    final int rotation    = Math.abs(rotationAngle);

    // Zoom on Z axis.
    mCamera.translate(0, 0, mMaxZoom);

    if (rotation < mMaxRotationAngle)
    {
        float zoomAmount = (float)(mMaxZoom + rotation * 1.5f);
        mCamera.translate(0, 0, zoomAmount);
    }

    // Rotate the camera on Y axis.
    mCamera.rotateY(rotationAngle);
    // Get the matrix from the camera, in fact, the matrix is S (scale) transformation.
    mCamera.getMatrix(imageMatrix);

    // The matrix final is T2 * S * T1, first translate the center point to (0, 0),
    // then scale, and then translate the center point to its original point.
    // T * S * T

    // S * T1
    imageMatrix.postTranslate((imageWidth / 2), (imageHeight / 2));
    // (T2 * S) * T1
    imageMatrix.preTranslate(-(imageWidth / 2), -(imageHeight / 2));

    mCamera.restore();
}
这里,简单说明一个,
第一,先在Z轴上平称,其实就是得到一个缩放矩阵变换,我这里简写为 S。
第二,是利用camera这个类来生成matrix,其实mCamera.rotateY就是围绕Y轴旋转。这里生成了一个旋转矩阵,记为 R 。经过这两步,此时调用mCamera.getMatrix(imageMatrix); 从Camera中得到matrix,此时这个矩阵中包含了S * R。
第三,最关键是下面两句
// S * T1
 imageMatrix.postTranslate((imageWidth / 2), (imageHeight / 2));
 // (T2 * S) * T1
 imageMatrix.preTranslate(-(imageWidth / 2), -(imageHeight / 2));
由于这里涉及到旋转与缩放,缩放操作其实应该是针对Child中点进行了,这里就是作一个平衡操作,我们必须是先平移,再缩放,再平移回原来位置,所以,我们最终的矩阵变换应该是这样的:
M = T * (S * R) * T1 (这里在T1表示与T相反)。
三,完整代码
GalleryFlow.java
import android.content.Context;
import android.graphics.Camera;
import android.graphics.Matrix;
import android.util.AttributeSet;
import android.view.View;
import android.view.animation.Transformation;
import android.widget.Gallery;

public class GalleryFlow extends Gallery
{
    /**
     * The camera class is used to 3D transformation matrix.
     */
    private Camera mCamera = new Camera();

    /**
     * The max rotation angle.
     */
    private int mMaxRotationAngle = 60;

    /**
     * The max zoom value (Z axis).
     */
    private int mMaxZoom = -120;

    /**
     * The center of the gallery.
     */
    private int mCoveflowCenter = 0;

    public GalleryFlow(Context context)
    {
        this(context, null);
    }

    public GalleryFlow(Context context, AttributeSet attrs)
    {
        this(context, attrs, 0);
    }

    public GalleryFlow(Context context, AttributeSet attrs, int defStyle)
    {
        super(context, attrs, defStyle);

        // Enable set transformation.
        this.setStaticTransformationsEnabled(true);
        // Enable set the children drawing order.
        this.setChildrenDrawingOrderEnabled(true);
    }

    public int getMaxRotationAngle()
    {
        return mMaxRotationAngle;
    }

    public void setMaxRotationAngle(int maxRotationAngle)
    {
        mMaxRotationAngle = maxRotationAngle;
    }

    public int getMaxZoom()
    {
        return mMaxZoom;
    }

    public void setMaxZoom(int maxZoom)
    {
        mMaxZoom = maxZoom;
    }

    @Override
    protected int getChildDrawingOrder(int childCount, int i)
    {
        // Current selected index.
        int selectedIndex = getSelectedItemPosition() - getFirstVisiblePosition();
        if (selectedIndex < 0)
        {
            return i;
        }

        if (i < selectedIndex)
        {
            return i;
        }
        else if (i >= selectedIndex)
        {
            return childCount - 1 - i + selectedIndex;
        }
        else
        {
            return i;
        }
    }

    @Override
    protected void onSizeChanged(int w, int h, int oldw, int oldh)
    {
        mCoveflowCenter = getCenterOfCoverflow();
        super.onSizeChanged(w, h, oldw, oldh);
    }

    private int getCenterOfView(View view)
    {
        return view.getLeft() + view.getWidth() / 2;
    }

    @Override
    protected boolean getChildStaticTransformation(View child, Transformation t)
    {
        super.getChildStaticTransformation(child, t);

        final int childCenter = getCenterOfView(child);
        final int childWidth  = child.getWidth();

        int rotationAngle = 0;
        t.clear();
        t.setTransformationType(Transformation.TYPE_MATRIX);

        // If the child is in the center, we do not rotate it.
        if (childCenter == mCoveflowCenter)
        {
            transformImageBitmap(child, t, 0);
        }
        else
        {
            // Calculate the rotation angle.
            rotationAngle = (int)(((float)(mCoveflowCenter - childCenter) / childWidth) * mMaxRotationAngle);

            // Make the angle is not bigger than maximum.
            if (Math.abs(rotationAngle) > mMaxRotationAngle)
            {
                rotationAngle = (rotationAngle < 0) ? -mMaxRotationAngle : mMaxRotationAngle;
            }

            transformImageBitmap(child, t, rotationAngle);
        }

        return true;
    }

    private int getCenterOfCoverflow()
    {
        return (getWidth() - getPaddingLeft() - getPaddingRight()) / 2 + getPaddingLeft();
    }

    private void transformImageBitmap(View child, Transformation t, int rotationAngle)
    {
        mCamera.save();

        final Matrix imageMatrix = t.getMatrix();
        final int imageHeight = child.getHeight();
        final int imageWidth  = child.getWidth();
        final int rotation    = Math.abs(rotationAngle);

        // Zoom on Z axis.
        mCamera.translate(0, 0, mMaxZoom);

        if (rotation < mMaxRotationAngle)
        {
            float zoomAmount = (float)(mMaxZoom + rotation * 1.5f);
            mCamera.translate(0, 0, zoomAmount);
        }

        // Rotate the camera on Y axis.
        mCamera.rotateY(rotationAngle);
        // Get the matrix from the camera, in fact, the matrix is S (scale) transformation.
        mCamera.getMatrix(imageMatrix);

        // The matrix final is T2 * S * T1, first translate the center point to (0, 0),
        // then scale, and then translate the center point to its original point.
        // T * S * T

        // S * T1
        imageMatrix.postTranslate((imageWidth / 2), (imageHeight / 2));
        // (T2 * S) * T1
        imageMatrix.preTranslate(-(imageWidth / 2), -(imageHeight / 2));

        mCamera.restore();
    }
}
BitmapUtil.java
package com.lee.gallery3d.utils;

import android.graphics.Bitmap;
import android.graphics.Bitmap.Config;
import android.graphics.Canvas;
import android.graphics.LinearGradient;
import android.graphics.Matrix;
import android.graphics.Paint;
import android.graphics.PixelFormat;
import android.graphics.PorterDuffXfermode;
import android.graphics.Shader.TileMode;
import android.graphics.drawable.Drawable;

public class BitmapUtil
{
    public static Bitmap createReflectedBitmap(Bitmap srcBitmap)
    {
        if (null == srcBitmap)
        {
            return null;
        }

        // The gap between the reflection bitmap and original bitmap.
        final int REFLECTION_GAP = 4;

        int srcWidth  = srcBitmap.getWidth();
        int srcHeight = srcBitmap.getHeight();
        int reflectionWidth  = srcBitmap.getWidth();
        int reflectionHeight = srcBitmap.getHeight() / 2;

        if (0 == srcWidth || srcHeight == 0)
        {
            return null;
        }

        // The matrix
        Matrix matrix = new Matrix();
        matrix.preScale(1, -1);

        try
        {
            // The reflection bitmap, width is same with original's, height is half of original's.
            Bitmap reflectionBitmap = Bitmap.createBitmap(
                    srcBitmap,
                    0,
                    srcHeight / 2,
                    srcWidth,
                    srcHeight / 2,
                    matrix,
                    false);

            if (null == reflectionBitmap)
            {
                return null;
            }

            // Create the bitmap which contains original and reflection bitmap.
            Bitmap bitmapWithReflection = Bitmap.createBitmap(
                    reflectionWidth,
                    srcHeight + reflectionHeight + REFLECTION_GAP,
                    Config.ARGB_8888);

            if (null == bitmapWithReflection)
            {
                return null;
            }

            // Prepare the canvas to draw stuff.
            Canvas canvas = new Canvas(bitmapWithReflection);

            // Draw the original bitmap.
            canvas.drawBitmap(srcBitmap, 0, 0, null);

            // Draw the reflection bitmap.
            canvas.drawBitmap(reflectionBitmap, 0, srcHeight + REFLECTION_GAP, null);

            Paint paint = new Paint();
            paint.setAntiAlias(true);
            LinearGradient shader = new LinearGradient(
                    0,
                    srcHeight,
                    0,
                    bitmapWithReflection.getHeight() + REFLECTION_GAP,
                    0x70FFFFFF,
                    0x00FFFFFF,
                    TileMode.MIRROR);
            paint.setShader(shader);
            paint.setXfermode(new PorterDuffXfermode(android.graphics.PorterDuff.Mode.DST_IN));

            // Draw the linear shader.
            canvas.drawRect(
                    0,
                    srcHeight,
                    srcWidth,
                    bitmapWithReflection.getHeight() + REFLECTION_GAP,
                    paint);

            return bitmapWithReflection;
        }
        catch (Exception e)
        {
            e.printStackTrace();
        }

        return null;
    }
}