一、准备所需要的软件包
Apache http://www.apache.org/
Mysql http://www.mysql.com/
Php http://www.php.net
Rrdtool http://oss.oetiker.ch/rrdtool/
Net-snmp http://www.net-snmp.org/
Cacti http://www.cacti.net/
其中apache、mysql、php通过yum安装
二、安装所需要的软件
1.安装LAMP
[root@cacti ~]# yum -y install httpd mysql-server php php-mysql mysql-devel
[root@cacti ~]# chkconfig httpd on
[root@cacti ~]# chkconfig mysqld on
[root@cacti ~]# /etc/init.d/httpd start
[root@cacti ~]# /etc/init.d/mysqld start
ps:安装mysql时要安装mysql-devel和 MySQL-shared-compat
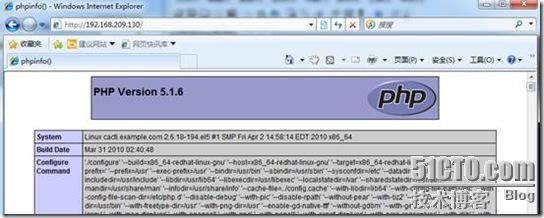
安装完成后,可通过以下程序测试,
[root@cacti html]# cat inex.php
<?php
phpinfo();
?>
2.安装rrdtool
Rrdtool安装需要cairo、libxml2、pango库支持,可通过yum安装
下载地址:http://oss.oetiker.ch/rrdtool/pub/
[root@cacti ~]# yum -y install cairo-devel libxml2-devel pango-devel
[root@cacti ~]# tar zxvf rrdtool-1.4.7.tar.tar
[root@cacti ~]# cd rrdtool-1.4.7
[root@cacti rrdtool-1.4.7]# ./configure --prefix=/usr/local/rrdtool
[root@cacti rrdtool-1.4.7]# make && make install
[root@cacti rrdtool-1.4.7]# ln -s /usr/local/rrdtool/bin/* /usr/local/bin/
ps:要装gcc编译器
测试安装成功没有 rrdtool -v // 安装版本的信息
ps:测试rrd里面是否有数据命令:rrdtool fetch test.rrd AVERAGE
如果没有则要看回snmpd是否能通
3.安装net-snmp
[root@cacti ~]# tar zxvf net-snmp-5.6.1.1.tar.gz
[root@cacti ~]# cd net-snmp-5.6.1.1
[root@cacti net-snmp-5.6.1.1]# ./configure --prefix=/usr/local/net-snmp
编译后会有选项要选择:
default-snmp-version="2" --with-sys-location="China" --with-sys-contact="Email:[email protected]" --with-logfile="/usr/local/net-snmp/log/snmpd.log" --with-persistent-directory="/var/net-snmp"
--ps:参数包括了 将要安装的文件路径 允许用新的重写可用的模块默认的版本设备的地址信息设备的联系人信息日志文件 永久数据存放目录
温馨提示:在这里如果我们不指定版本、设备地址、设备联系人、log文件及永久数据目录的话那么在接下来的配置时会让我们进行交互选择,刚开始安装时这几个选项把我整蒙了
配置最后(大概一分钟左右)会生成configure的摘要信息,也许会有warning不过不用理他
---------------------------------------------------------
Net-SNMP configuration summary:
---------------------------------------------------------
SNMP Versions Supported: 1 2c 3
Net-SNMP Version: 5.3.3
Building for: linux
Network transport support: Callback Unix TCP UDP
SNMPv3 Security Modules: usm
Agent MIB code: mibII ucd_snmp snmpv3mibs notification notification-log-mib target agent_mibs agentx disman/event-mib disman/schedule utilities host
SNMP Perl modules: disabled
Embedded perl support: disabled
Authentication support: MD5 SHA1
Encryption support: DES AES
WARNING: New version of the Event MIB which may be subtly different from the original implementation - configure with 'disman/old-event-mib' for the previous version
[root@cacti net-snmp-5.6.1.1]# make && make install
[root@cacti net-snmp-5.6.1.1]# cp EXAMPLE.conf /usr/local/net-snmp/share/snmp/snmpd.conf
注意有些帖子会写的是/etc/snmp/snmpd.conf或者/etc/snmpd.conf也可以不过后面的设置也要相对的修改
将snmpd.conf
#原来的
com2sec local localhost COMMUNITY
com2sec mynetwork NETWORK/24 COMMUNITY
#修改后的
com2sec local localhost public
com2sec mynetwork 192.168.8.30 public
com2sec mynetwork 192.168.11.29 public
设置net-snmp自启动
在/etc/rc.local文件的末尾加上
/usr/local/net-snmp/sbin/snmpd -c /usr/local/net-snmp/share/snmp/snmpd.conf &
设置环境变量 (可以不设置)
在/etc/profile文件 的export命令前加
PATH=/usr/local/net-snmp/bin:/usr/local/net-snmp/sbin:$PATH
测试一个是否有这个服务:service snmpd status //查看snmpd的状态
再查看端口是否启动: netstat -an | grep 161 //查看端口是否启动
本地通过localhost测试
snmpwalk -v 2c -c public localhost if
正常结果
IF-MIB::ifIndex.1 = INTEGERE:1
IF-MIB::ifIndex.2 = INTEGERE:2
IF-MIB::ifIndex.3 = INTEGERE:3
IF-MIB::ifIndex.4 = INTEGERE:4
IF-MIB::ifIndex.5 = INTEGERE:5
IF-MIB::ifIndex.6 = INTEGERE:6
IF-MIB::ifIndex.7 = INTEGERE:7
IF-MIB::ifIndex.8 = INTEGERE:8
IF-MIB::ifIndex.9 = INTEGERE:9
IF-MIB::ifIndex.10 = INTEGERE:10
IF-MIB::ifIndex.11 = INTEGERE:11
IF-MIB::ifIndex.12 = INTEGERE:12
IF-MIB::ifDescr.1 = STRING: lo
IF-MIB::ifDescr.2 = STRING: peth0
本地IP测试
snmpwalk -v 2c -c public 192.168.8.30 if
正常结果
IF-MIB::ifIndex.1 = INTEGERE:1
IF-MIB::ifIndex.2 = INTEGERE:2
IF-MIB::ifIndex.3 = INTEGERE:3
IF-MIB::ifIndex.4 = INTEGERE:4
IF-MIB::ifIndex.5 = INTEGERE:5
IF-MIB::ifIndex.6 = INTEGERE:6
IF-MIB::ifIndex.7 = INTEGERE:7
IF-MIB::ifIndex.8 = INTEGERE:8
IF-MIB::ifIndex.9 = INTEGERE:9
IF-MIB::ifIndex.10 = INTEGERE:10
IF-MIB::ifIndex.11 = INTEGERE:11
IF-MIB::ifIndex.12 = INTEGERE:12
IF-MIB::ifDescr.1 = STRING: lo
IF-MIB::ifDescr.2 = STRING: peth0
4.安装cacti
[root@cacti ~]# tar zxvf cacti-0.8.7i-PIA-3.1.tar.gz
[root@cacti ~]# mv cacti-0.8.7i-PIA-3.1/* /var/www/html/
#将cacti中的内容移到 web目录
[root@cacti ~]# chown -R apache:apache /var/www/html/
[root@cacti ~]# mysql -uroot
#连接到mysql创建数据库
mysql> create database cacti;
#创建cacti数据库
mysql> insert into mysql.user(host,user,password) values ('localhost','cacti',password('cacti123'));
#建立用户cacti,密码cacti123
mysql> flush privileges;
#重载mysql授权表
mysql> grant all on cacti.* to cacti@'localhost' identified by 'cacti123';
#把数据库cacti授权于用户cacti
[root@cacti ~]# cd /var/www/html/
[root@cacti html]# mysql -ucacti -pcacti123 cacti<cacti.sql #将cacti数据库导入
修改网站配置文件,使用正确连接数据库参数
[root@cacti html]# vim include/config.php
$database_type = "mysql";
$database_default = "cacti";
$database_hostname = "localhost";
$database_username = "cacti";
$database_password = "cacti123";
$database_port = "3306";
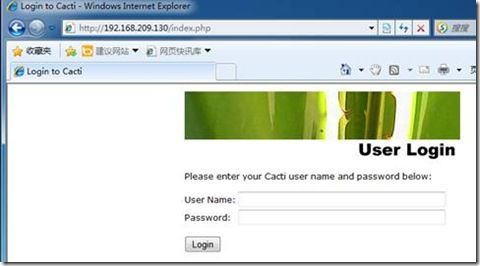
使用浏览器打开http://192.168.209.130/install/
会看到安装向导,点下两个NEXT之后,出现以下:
默认用户名和密码admin,第一次登录会要求更改密码
5.设置cacti数据采集轮询时间
[root@cacti ~]# crontab –e
*/5 * * * * env LANG=C /usr/bin/php /var/www/html/poller.php
三、常用插件安装
最新版本cacti-0.8.7i-PIA-3.1 集成了plugin架构扩展,所以可以直接开启后就可以安装其他插件
打开“Console”-----“User Management”---“admin”——“Realm Permissions”,选择以下后,单保存”save”
之后会在“console”中的“Configuration”看到一个
Monitor安装(以图形方式显示设备状态)
[root@cacti ~]# tar zxvf monitor-v1.3-1.tgz
[root@cacti ~]# mv monitor /var/www/html/plugins/
[root@cacti ~]# cd /var/www/html/plugins/monitor/
[root@cacti monitor]# mysql -ucacti –pcacti123 cacti<monitor.sql
打开Cacti的web页面“Plugin Management”激活插件
Setting安装(用于邮件报警)
[root@cacti ~]# tar zxvf settings-v0.71-1.tgz
[root@cacti ~]# mv settings /var/www/html/plugins
打开Cacti的web页面“Plugin Management”激活插件
打开“console”-----“Settings”可以找到以下
Thold安装(用于设备异常预警、阀值报警)
[root@cacti ~]# tar zxvf thold-v0.4.9-3.tgz
[root@cacti ~]# mv thold /var/www/html/plugins/
打开Cacti的web页面“Plugin Management”激活插件
Cacti轮询时间
Cacti默认的轮询时间为5分钟,可通过安装spine将时间变成一分钟
下载:http://cacti.net/spine_download.php
1.安装spine
[root@cacti ~]# tar zxvf cacti-spine-0.8.7i.tar.gz
[root@cacti ~]# cd cacti-spine-0.8.7i
[root@cacti cacti-spine-0.8.7i]# ./configure --prefix=/usr/local/cacti-spine --with-snmp=/usr/local/net-snmp/
[root@cacti cacti-spine-0.8.7i]# make && make install
[root@cacti cacti-spine-0.8.7i]# cd /usr/local/cacti-spine/etc/
[root@cacti etc]# cp spine.conf.dist spine.conf
[root@cacti etc]# vim spine.conf
DB_Host localhost
DB_Database cacti
DB_User cacti
DB_Pass cacti123
DB_Port 3306
DB_PreG 0
这里修改对应的mysql用户名和密码,以及连接参数
打开“console”----“settings”----“Paths” 中填写spine的路径,然后“save”
2.选择轮询模式
打开“console”----“settings”----“Poller”---“save”
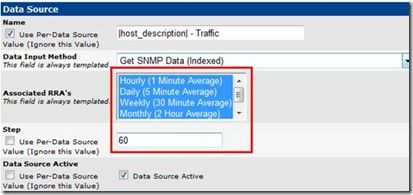
添加“每分钟”流量视图
打开“console”---“Data Templates”——“Interface - Traffic”
其他模板做相应修改。
最后修改crontab中的
* * * * * env LANG=C /usr/bin/php /var/www/html/poller.php>/dev/null 2>&1


