wpf之mvvm
初次接触的新名词--MVVM,听着好高大上的名字。经查阅,发现也没有想象中的那么难。
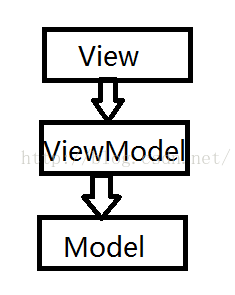
mvvm【模型-视图-视图模型(Model-View-ViewModel)】是由MVP【模型-视图-表现类(Model-View-Presenter)】发展而来,MVP则是由MVC【模型-视图-控制器(ModelView Controller)】发展而来。由此看来,mvvm其实也不是新知识。
View:是UI界面,就是用wpf的xaml实现的界面,负责与用户交互,接收用户输入,把数据展现给用户。
ViewModel:一个C#类,负责收集需要绑定的数据和命令,实现View和Model之间的信息转换,处理UI逻辑。
Model:就是系统中的对象,可包含属性和行为。
mvvm示例
本次要做的Demo是计算两个数之和。
简单的界面如图所示:

Xaml代码:
<span style="font-family:KaiTi_GB2312;font-size:24px;"><Window x:Class="MVVM.MainWindow"
        xmlns="http://schemas.microsoft.com/winfx/2006/xaml/presentation"
        xmlns:x="http://schemas.microsoft.com/winfx/2006/xaml"
        Title="MainWindow" Height="350" Width="656">
    <Grid Width="624">
		<TextBox Height="23" HorizontalAlignment="Left" Margin="41,90,0,0" Name="txtNum1" VerticalAlignment="Top" Width="120" Text="{Binding Num1}"/>

		<TextBox Height="25" HorizontalAlignment="Left" Margin="195,88,0,0" Name="txtNum2" VerticalAlignment="Top" Width="120" Text="{Binding Num2}"/>

		<Label Content="+" Height="28" HorizontalAlignment="Left" Margin="167,88,0,0" Name="lable1" VerticalAlignment="Top"/>

		<TextBox Height="25" HorizontalAlignment="Left" Margin="364,88,0,0" Name="txtResult" VerticalAlignment="Top" Width="120" Text="{Binding Result}"/>

		<Button  Content="=" Height="23" HorizontalAlignment="Left" Margin="328,90,0,0" Name="btnEqual" VerticalAlignment="Top" Width="28" Command="{Binding CaculateCommand}"/>

		<Button Content="Clear" Height="26" HorizontalAlignment="Left" Margin="501,88,0,0" Name="btnClear" VerticalAlignment="Top" Width="45" Command="{Binding ClearCommand}"/>
    </Grid>
</Window>
</span>
此处代码的重点在于Binding,用绑定来实现和后台的交互。这样,若后台代码修改后,只要绑定的名称不变,就不会影响到界面。
Xaml的后台cs:
<span style="font-family:KaiTi_GB2312;font-size:24px;">/// <summary>
    /// MainWindow.xaml 的交互逻辑
    /// </summary>
    public partial class MainWindow : Window
    {
        //构造方法
        public MainWindow()
        {
            InitializeComponent();
            //将View的DataContext设为CaculatorViewModel实例
            this.DataContext = new CaculatorViewModel();	//ViewModel通过View类的DataContext属性绑定到View

        }
    }
</span>
View通过DataContext实现与ViewModel的交互。
Model层代码:
<span style="font-family:KaiTi_GB2312;font-size:24px;">//Model层的类
    public class CaculatorModel
    {
        public int Num1 { get; set; }   //参数一
        public int Num2 { get; set; }   //参数二
        public int Result { get; set; } //计算结果
    }
</span>
重量级的部分马上呈现。
ICommand类型的基类,用来实现View和ViewModel之间Command的绑定。
<span style="font-family:KaiTi_GB2312;font-size:24px;">//ICommand类型的基类DelegateCommand
    //目的是绑定命令属性。这个类的作用是实现了ICommand接口,WPF中实现了ICommand接口的类,才能作为命令绑定到UI。
    public class DelegateCommand:ICommand
    {
        //
        private Action<object> executeCommand;

        public Action<object> ExecuteCommand
        {
            get { return executeCommand; }
            set { executeCommand = value; }
        }


        //
        private Func<object, bool> canExecuteCommand;

        public Func<object, bool> CanExecuteCommand
        {
            get { return canExecuteCommand; }
            set { canExecuteCommand = value; }
        }


        //
        public event EventHandler CanExecuteChanged;

        //是继承ICommand必须实现的方法,表示Command调用时判断是否能执行
        public bool CanExecute(object parameter)
        {
            if (CanExecuteCommand!=null)
            {
                return this.CanExecuteCommand(parameter);
            }
            else
            {
                return true;
            }
        }


        //是继承ICommand必须实现的方法,表示Command调用时具体执行逻辑
        public void Execute(object parameter)
        {
            if (this.ExecuteCommand!=null)
            {
                this.ExecuteCommand(parameter);
            }
        }

        public void RaiseCanExecuteChanged() {
            if (CanExecuteCommand!=null)
            {
                CanExecuteChanged(this, EventArgs.Empty);
            }
        }


        public DelegateCommand(Action<object> executeCommand, Func<object, bool> canExecuteCommand)
        {
            this.executeCommand = executeCommand;
            this.canExecuteCommand = canExecuteCommand;
        }
    }</span>
ViewModel:
<span style="font-family:KaiTi_GB2312;font-size:24px;">//ViewModel的基类
    public class ViewModelBase:INotifyPropertyChanged
    {
        //ViewModelBase实现了接口INotifyPropertyChanged, 在该接口中有一个PropertyChanged事件, 当ViewModel中的Property改变时,允许触发PropertyChanged事件,继而重新绑定数据到UI上。

        //目的是绑定数据属性。这个类的作用是实现了INotifyPropertyChanged接口。WPF中类要实现这个接口,其属性成员才具备通知UI的能力

        public event PropertyChangedEventHandler PropertyChanged;

        public void RaisePropertyChanged(string propertyName)
        {
            if (this.PropertyChanged!=null)
            {
                this.PropertyChanged(this, new PropertyChangedEventArgs(propertyName));
            }
        }
    }</span>
所有的具体的ViewModel类都要继承ViewModel基类。
<span style="font-family:KaiTi_GB2312;font-size:24px;">//ViewModel具体的实现
    public class CaculatorViewModel : ViewModelBase
    {
        #region Fields  字段

        private int num1;
        private int num2;
        private int result;
        private CaculatorModel model;

        #endregion

        #region Properties  属性
        public int Num1
        {
            get { return num1; }
            set
            {
                num1 = value;
                this.RaisePropertyChanged("Num1");
            }
        }

        public int Num2
        {
            get { return num2; }
            set
            {
                num2 = value;
                this.RaisePropertyChanged("Num2");
            }
        }

        public int Result {
            get { return result; }
            set
            {
                result = value;
                this.RaisePropertyChanged("Result");
            }
        }
        #endregion

        #region Commands  命令
        public ICommand CaculateCommand { get; set; }
        public ICommand ClearCommand { get; set; }
        #endregion

        #region Methods  方法
        //相加的方法
        public void Add(object param) {
            Result = Num1 + Num2;
        }

        //清空的方法
        public void Clear(object param) {
            Result = 0;
            Num1 = 0;
            Num2 = 0;
        }

        //初始化Model数据
        public void InitilizeModelData() {
            var model = new CaculatorModel()
            {
                Num1 = 1,
                Num2 = 1,
                Result = 2
            };

            Num1 = model.Num1;
            Num2 = model.Num2;
            Result = model.Result;
        }

        //构造方法
        public CaculatorViewModel() {
            CaculateCommand = new DelegateCommand(Add, null);
            //CaculateCommand = new DelegateCommand(Reduce, null);
            ClearCommand = new DelegateCommand(Clear, null);

            InitilizeModelData();
        }

        //相减的方法
        //public void Reduce(object param)
        //{
        //    Result = Num1 - Num2;
        //}
        #endregion
    }</span>
若用户想将加法运算改为减法运算,我们只需要在ViewModel中添加一个减法运算的方法,在View中重新绑定一下就OK了。