android学习笔记之绘图篇
![]() android学习笔记之跟随手指点击的小球
android学习笔记之跟随手指点击的小球
为了实现一个跟随手指的小球,我们将会在指定位置绘制一个小球,这个位置可以动态改变。当用户通过手指在屏幕上拖动时,程序监听到这个手机动作,,并通知该组件重绘即可。
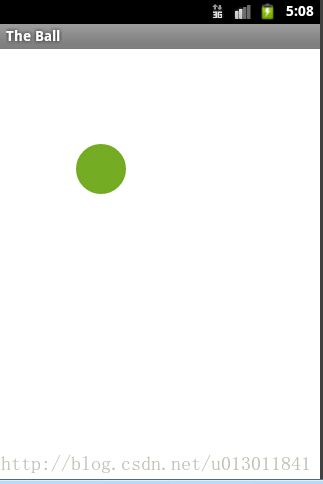
这在第二章直接给出这么一大段乱七八糟的程序,实在不能理解这是在做什么,所以建议大家还是不要去看这些辅导书,直接看谷歌给的安卓API开发文档就好, 先预览一下最终的成果:
实现的效果就是你手指点在哪里,小球就跟随到哪。
一开始我是参考疯狂安卓讲义里面的代码写的程序,但是给出的源代码可以通过,但是我自己写的就会遇到问题意外退出,实在不知道哪里出了问题,只能自己从原理一步步学起。
下面是安卓讲义的源代码,这段代码理解起来也不是很难,但是确实在API文档里面已经就不推荐使用这种方法了,而是使用ShapeDrawable,所以这种方法还是参考参考一下就可以了。
package org.crazyit.customview;

import android.content.Context;
import android.graphics.Canvas;
import android.graphics.Color;
import android.graphics.Paint;
import android.view.View;


public class DrawView extends View
{
	public float currentX = 40;
	public float currentY = 50;
	/**
	 * @param context
	 */
	public DrawView(Context context)
	{
		super(context);
		// TODO Auto-generated constructor stub
	}
	@Override
	public void onDraw (Canvas canvas)
	{
		super.onDraw(canvas);
		//创建画笔
		Paint p = new Paint();
		//设置画笔的颜色
		p.setColor(Color.RED);
		//绘制一个小圆(作为小球)
		canvas.drawCircle(currentX , currentY , 15 , p);
	}
}
package org.crazyit.customview;

import org.crazyit.customview.R;
import org.crazyit.customview.R.layout;

import android.app.Activity;
import android.os.Bundle;
import android.view.MotionEvent;
import android.view.View;
import android.view.View.OnTouchListener;
import android.widget.LinearLayout;


public class CustomView extends Activity
{
	@Override
	public void onCreate(Bundle savedInstanceState)
	{
		super.onCreate(savedInstanceState);
		setContentView(R.layout.main);
		//获取布局文件中的LinearLayout容器
		LinearLayout root = (LinearLayout)findViewById(R.id.root);
		//创建DrawView组件
		final DrawView draw = new DrawView(this);
		//设置自定义组件的最大宽度、高度
		draw.setMinimumWidth(300);
		draw.setMinimumHeight(500);
		//为draw组件绑定Touch事件
		draw.setOnTouchListener(new OnTouchListener()
		{
			@Override
			public boolean onTouch(View arg0, MotionEvent event)
			{
				//修改draw组件的currentX、currentY两个属性
				draw.currentX = event.getX();
				draw.currentY = event.getY();
				//通知draw组件重绘
				draw.invalidate();
				//返回true表明处理方法已经处理该事件
				return true;
			}
		});
		root.addView(draw);
	}
}
虽然是一个很简单的功能,但是不一定每个人都能很好的理解安卓的机制,学习的时候不要光做出东西就可以了,搞懂背后的原理机制才是最重要的。
打开谷歌的API文档,选择API GUIDES(API引导),选择(动画与绘图)
可以看到安卓的两种绘图方式。
意思就是说,你写一个应用程序时,你应该重点考虑的是你要画些什么东西,不同的绘图任务最好要用不同的方法来实现。当然了我们要的是2D绘图,所以选择的是Canvas and Drawables的方法。
安卓给用户界面提供了很多种View控件,你可以改变这些控件的外观或者行为。除此之外,你还可以自定义2D渲染或者纹理按钮以及一帧帧的动画。
Canvas and Drawables
Android提供了一套画2D图的API,你可以随便画什么图形到画布上都可以,或者修改现有的View来定制它们的外观。当画2D图形,一般有两种方法:
a): 使用你的Layout里的View对象来画图或者画动画。在这种方式下是由系统默认的方式来画的。
b):直接画到画布(Canvas)上,这样的话你要自己调用OnDraw方法。
如果你要画一个简单的静态图形,请选择a方法。
一般做游戏之类的选b,因为程序都需要定期重画自身。
ShapeDrawable继承自Drawable, 如果你要动态地画一些二维图形中,ShapeDrawable对象可以满足您的需求,
package com.example.myapp;

import android.os.Bundle;
import android.view.MotionEvent;
import android.view.View;
import android.view.View.OnTouchListener;
import android.app.Activity;


public class MainActivity extends Activity {

	CustomDrawableView mCustomDrawableView;

	@Override
	protected void onCreate(Bundle savedInstanceState) {
		super.onCreate(savedInstanceState);
		mCustomDrawableView=new CustomDrawableView(this);
		mCustomDrawableView.setOnTouchListener(new OnTouchListener() {

			@Override
			public boolean onTouch(View v, MotionEvent event) {
				// TODO Auto-generated method stub
				mCustomDrawableView.x=(int) event.getX();
				mCustomDrawableView.y=(int) event.getY();
				mCustomDrawableView.invalidate();
				return true;
			}
		});
		setContentView(mCustomDrawableView);

	}
}
package com.example.myapp;

import android.content.Context;
import android.graphics.Canvas;
import android.graphics.drawable.ShapeDrawable;
import android.graphics.drawable.shapes.OvalShape;
import android.view.View;

public class CustomDrawableView extends View
{
    int x=10;
    int y=10;
    int width = 50;
    int height = 50;

	private ShapeDrawable mDrawable;

	public CustomDrawableView(Context context)
	{
		super(context);


	    mDrawable = new ShapeDrawable(new OvalShape());
	    mDrawable.getPaint().setColor(0xff74AC23);
	};

	protected void onDraw(Canvas canvas)
	{
	    mDrawable.setBounds(x, y, x + width, y + height);
		mDrawable.draw(canvas);
	}
}
上面程序的思路基本上是这样的
- 新建一个CustomDrawableView类,这个类继承自View,该类里面定义了x,y以便重画的时候使用,建立一个构造函数,还有一个OnDraw()函数,OnDraw函数在刷新的时候自动调用。
- 当手指点击屏幕的时候,监听器对象OnTouchListener监听到触摸事件,然后把事件发生的X和Y坐标值传递给CustomDrawableView对象。
- 完了以后mCustomDrawableView.invalidate()调用一下刷新,自动调用OnDraw函数重新画一次。
- 最后再setContentView(mCustomDrawableView);把重画好的对象显示在Activity里面。
在小球的后面绘制轨迹
其中有三点比较重要的是
- 以什么方式建立画布,上面的例子就是用画一个圆形的方式来建立一个画布。
- 建立完画布以后,你还可以选择在画布上继续画。
- 在画布上画的画会一直存在,除非你重画。
package com.example.myapp;

import android.content.Context;
import android.graphics.Canvas;
import android.graphics.Color;
import android.graphics.Paint;
import android.graphics.Paint.Style;
import android.graphics.Path;
import android.graphics.drawable.ShapeDrawable;
import android.graphics.drawable.shapes.OvalShape;
import android.view.View;

public class CustomDrawableView extends View
{
    int x=10;
    int y=10;
    int width = 20;
    int height = 20;
    Paint mPaint=new Paint();
    Path mPath=new Path();

	private ShapeDrawable mDrawable;

	public CustomDrawableView(Context context)
	{
		super(context);
	    mDrawable = new ShapeDrawable(new OvalShape());
	    mDrawable.getPaint().setColor(0xff74AC23);
	    mPaint.setColor(Color.BLUE);
	    mPaint.setAntiAlias(true);
	    mPaint.setStyle(Style.STROKE);
	    mPaint.setStrokeWidth(2);
	    mPath.moveTo(x, y);
	};

	protected void onDraw(Canvas canvas)
	{
	    mDrawable.setBounds(x, y, x + width, y + height);
		mDrawable.draw(canvas);
		mPath.lineTo(x, y);
		canvas.drawPath(mPath, mPaint);
		mPath.moveTo(x, y);
	}

}
package com.example.myapp;

import android.os.Bundle;
import android.view.MotionEvent;
import android.view.View;
import android.view.View.OnTouchListener;
import android.app.Activity;


public class MainActivity extends Activity {

	CustomDrawableView mCustomDrawableView;

	@Override
	protected void onCreate(Bundle savedInstanceState) {
		super.onCreate(savedInstanceState);
		mCustomDrawableView=new CustomDrawableView(this);
		mCustomDrawableView.setOnTouchListener(new OnTouchListener() {

			@Override
			public boolean onTouch(View v, MotionEvent event) {
				// TODO Auto-generated method stub
				mCustomDrawableView.x=(int) event.getX();
				mCustomDrawableView.y=(int) event.getY();
				mCustomDrawableView.invalidate();
				return true;
			}
		});
		setContentView(mCustomDrawableView);

	}
}
参考文献:
1、 疯狂Android讲义 , 李刚
2、 Documentation for android SDK , google


