Red5学习笔记(一):入门及配置
Red5作为开源的Flash流媒体服务器,提供类似于FMS的功能,值得我们学习和研究一下。本文是我学习Red5的学习笔记,记录在学习Red5过程中碰到的问题、解决办法以及Red5的安装等,本文仅对碰到的问题及解决办法进行详细描述,并不能算是Red5的教程。
下载安装完Red5后,找到Red5的安装目录,在Red5的文件列表中,webapps文件夹是用来放使用者的应用程序,doc文件夹是一些文档和模板等,red5.bat是用来启动Red5(Windows操作系统下)。下面开始创建一个Red5应用程序。
创建一个新的应用,可以直接在webapps文件夹下创建,也可以在磁盘的其他位置创建,在其他位置创建需要把生成的WEB-INF目录下的文件拷贝到webapps下,为了方面我直接在webapps下创建程序。
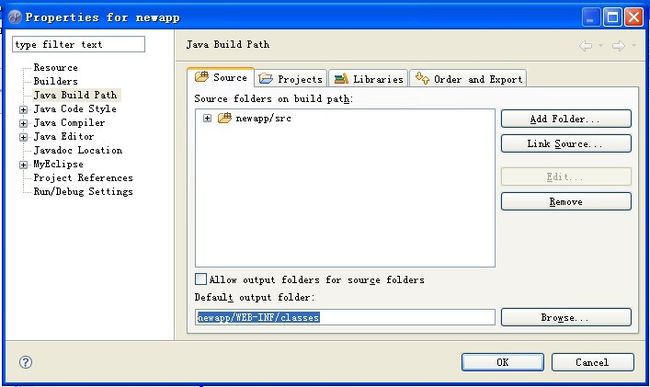
使用Eclipse创建一个JavaProject,项目名为newapp,项目存放位置为Red5的webapps目录下;然后拷贝Red5中doc/templates/myapp下的WEB-INF目录到newapp项目下,另外在该项目上“点右键--properties--Java Build Path--Source”,在Default output floder下指定该项目的输出文件为newapp/WEB-INF/classes,如下图:
另外在上图的Libraries标签下,点击“Add External JARs”选择Red5目录下的red5.jar来引入对red5的引用。
下面先创建一个应用程序,在Eclipse中项目的src目录上点右键创建一个Class,包指定为my.red5.first,类命名为Application,并继承自ApplicationAdapter。下面是该类的内容(暂时先创建个空的类):
package my.red5.first; import org.red5.server.adapter.ApplicationAdapter; public class Application extends ApplicationAdapter { }
doc/templates下提供的myapp是一个Red5项目配置模板,把这些文件放到newapp项目中后,我们需要对其做一些修改:
1、red5-web.properties文件第一行的webapp.contextPath的值改成“/newapp”;
2、red5-web.xml文件中bean“web.handler”的class属性指定为“my.red5.first.Application”,bean“myhandler.service”可删掉;
3、web.xml中webAppRootKey指定为“/newapp”;代码如下:
<context-param> <param-name>webAppRootKey</param-name> <param-value>/newapp</param-value> </context-param>
4、最后一点配置在web.xml中,也是我在这上面耗得时间最长的,因为templates下提供的myapp模板应该是之前v0.6版本的,在v0.7上,日志的那块配置有些问题,需要修改一下,把下面一段代码给出的配置删除掉
<context-param> <param-name>log4jConfigLocation</param-name> <param-value>/WEB-INF/log4j.properties</param-value> </context-param> <listener> <listener-class>org.springframework.web.util.Log4jConfigListener</listener-class> </listener> <listener> <listener-class>org.springframework.web.context.ContextLoaderListener</listener-class> </listener>
另外在web.xml中新增下面一段配置
<listener> <listener-class>org.red5.logging.ContextLoggingListener</listener-class> </listener> <filter> <filter-name>LoggerContextFilter</filter-name> <filter-class>org.red5.logging.LoggerContextFilter</filter-class> </filter> <filter-mapping> <filter-name>LoggerContextFilter</filter-name> <url-pattern>/*</url-pattern> </filter-mapping>
到此,Red5的配置就完成了,我们需要测试一下,运行red5.bat,启动起来后,在浏览器中输入http://localhost:5080/来访问Red5发布的网页,然后找到Demo,选择一个Demo进入,在Demo的链接地址处输入rtmp://localhost/newapp,点击链接按钮,如果后天的“5”编程了绿色,说明链接成功了,如果没有反应,那就检查一下哪个地方是否设错了。
本文只是说明了Red5的配置,没有涉及到具体的应用,下一篇说一下Red5中使用日志。
