LTE Module User Documentation(翻译1)——背景、使用概述、基本的仿真程序和配置LTE模型参数
LTE用户文档
(如有不当的地方,欢迎指正!)
1.背景
假定读者已经熟悉 ns-3 simulator ,能运行一般的仿真程序。如果不是的话,强烈推荐读者参考 [ns3tutorial].
2. 使用概述
ns-3 LTE 模块是一个软件库,允许仿真LTE网络,一些情况下还可以仿真核心网 Evolved Packet Core (EPC)。仿真过程通常涉及以下几个步骤:
- 定义仿真场景。
- 编写程序,重建期望的仿真场景拓扑/架构,通过使用 ns3::LteHelper API(定义在 src/lte/helper/lte-helper.h 中)访问 ns-3 LTE 模型库。
-
指定 objects 的配置参数,通过使用 input files(通过 ns3::ConfigStore)或直接在仿真程序中编写。
- 配置仿真器期望的输出。
- 运行仿真。
3. 基本的仿真程序
下面是一个最简单的仿真程序,只能允许 LTE-only 仿真(没有EPC)。
1. 初始模板:
#include <ns3/core-module.h> #include <ns3/network-module.h> #include <ns3/mobility-module.h> #include <ns3/lte-module.h>

using namespace ns3; int main (int argc, char *argv[]) { // the rest of the simulation program follows
2. 创建一个 LteHelper 对象:
Ptr<LteHelper> lteHelper = CreateObject<LteHelper> ();
这会实例化一些常见对象(例如信道对象),并提供方法用于添加 eNBs 和UEs 然后配置它们。
3. 为 eNB(s) 和 UEs 创建 Node 对象:
![]()

![]()

![]()
![]()
NodeContainer enbNodes; enbNodes.Create (1); NodeContainer ueNodes; ueNodes.Create (2);
注意上述节点实例此时并没有安装 LTE 协议栈;它们还是空节点。
4. 为所有节点配置移动性模型:
MobilityHelper mobility; mobility.SetMobilityModel ("ns3::ConstantPositionMobilityModel"); mobility.Install (enbNodes); mobility.SetMobilityModel ("ns3::ConstantPositionMobilityModel"); mobility.Install (ueNodes);
上述代码会将所有节点放置在坐标 (0,0,0)。请参考 ns-3 移动性模型文档学习如何设置自己想要的位置或者配置节点运动。
5. 在 eNB(s) 上安装 LTE 协议栈:
NetDeviceContainer enbDevs; enbDevs = lteHelper->InstallEnbDevice (enbNodes);
6. 在 UEs 上安装LTE协议栈:
NetDeviceContainer ueDevs; ueDevs = lteHelper->InstallUeDevice (ueNodes);
7. 连接 UEs 到 一个 eNB。这会根据 eNB 配置来配置每个 UE ,并在 eNB 和 UE 之间创建 RRC 连接。
lteHelper->Attach (ueDevs, enbDevs.Get (0));
8.在每个 UE 和它所连接的 eNB 之间激活数据无线承载:
enum EpsBearer::Qci q = EpsBearer::GBR_CONV_VOICE; EpsBearer bearer (q); lteHelper->ActivateDataRadioBearer (ueDevs, bearer);
该方法也激活了该承载的两种饱和业务生成器,分别用于上行和下行。
9.设置仿真停止时间:
Simulator::Stop (Seconds (0.005));
3 配置 LTE 模型参数
所有与LTE 模型相关的参数都可以通过 ns-3 属性系统管理。关于实现它的所有可能方法(例如环境变量, C++ API, GtkConfigStore...)的详细信息请参考[ns3tutorial] 和 [ns3manual] 。
接下来,我们开始简短总结如何使用 input files 和 ns-3 ConfigStore 来实现它。首先,你需要把下列程序放入到代码中,在 main () 开始的后面:
CommandLine cmd; cmd.Parse (argc, argv); ConfigStore inputConfig; inputConfig.ConfigureDefaults (); // parse again so you can override default values from the command line
cmd.Parse (argc, argv);
要想上述代码工作,确保包含头文件 #include "ns3/cinfug-store.h"。现在创建一个文本文件命名为(例如)input-defaults.txt 指定你想使用的一些属性的新的默认值:
default ns3::LteHelper::Scheduler "ns3::PfFfMacScheduler"
default ns3::LteHelper::PathlossModel "ns3::FriisSpectrumPropagationLossModel"
default ns3::LteEnbNetDevice::UlBandwidth "25"
default ns3::LteEnbNetDevice::DlBandwidth "25"
default ns3::LteEnbNetDevice::DlEarfcn "100"
default ns3::LteEnbNetDevice::UlEarfcn "18100"
default ns3::LteUePhy::TxPower "10"
default ns3::LteUePhy::NoiseFigure "9"
default ns3::LteEnbPhy::TxPower "30"
default ns3::LteEnbPhy::NoiseFigure "5"
假定你的仿真程序称为 src/lte/examples/lte-sim-with-input,可以通过以下方式传递属性设置到仿真程序中:
./waf --command-template="%s --ns3::ConfigStore::Filename=input-defaults.txt --ns3::ConfigStore::Mode=Load --ns3::ConfigStore::FileFormat=RawText" --run src/lte/examples/lte-sim-with-input
而且,你可以使用下列命令生成模板输入文件:
./waf --command-template="%s --ns3::ConfigStore::Filename=input-defaults.txt --ns3::ConfigStore::Mode=Save --ns3::ConfigStore::FileFormat=RawText" --run src/lte/examples/lte-sim-with-input
注意上述代码会将所有的默认值(注册在你特定建立的仿真器中)放入到输入文件 input-defaults.txt 中,还包括一些非 LTE 属性。
我的仿真过程:
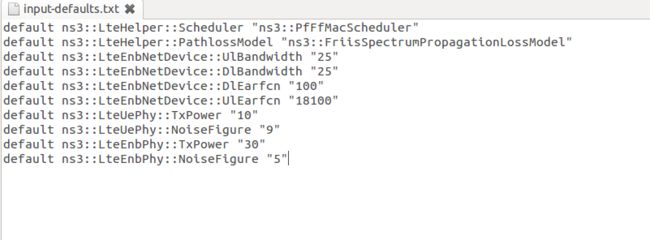
首先创建一个输入文件 input-defaults.txt ,如下:
其次,按照前面的步骤编写一个最简单的 LTE 程序 “lte-sim-with-input.cc”。代码如下:
 1 #include "ns3/core-module.h"
 2 #include "ns3/network-module.h"
 3 #include "ns3/mobility-module.h"
 4 #include "ns3/lte-module.h"
 5 #include "ns3/config-store.h"
 6 #include <ns3/buildings-helper.h>
 7 //#include "ns3/gtk-config-store.h"
 8
 9 using namespace ns3; 10
11 int main (int argc, char *argv[]) 12 { 13  CommandLine cmd; 14  cmd.Parse (argc, argv); 15
16   //注意,先load 再 save! 17   // to save a template default attribute file run it like this: 18   // ./waf --command-template="%s --ns3::ConfigStore::Filename=input-defaults.txt --ns3::ConfigStore::Mode=Save --ns3::ConfigStore::FileFormat=RawText" --run src/lte/examples/lte-sim-with-input 19   //
20   // to load a previously created default attribute file 21   // ./waf --command-template="%s --ns3::ConfigStore::Filename=input-defaults.txt --ns3::ConfigStore::Mode=Load --ns3::ConfigStore::FileFormat=RawText" --run src/lte/examples/lte-sim-with-input
22
23  ConfigStore inputConfig; 24  inputConfig.ConfigureDefaults (); 25
26   // Parse again so you can override default values from the command line
27  cmd.Parse (argc, argv); 28
29   Ptr<LteHelper> lteHelper = CreateObject<LteHelper> (); 30
31   // Uncomment to enable logging 32 // lteHelper->EnableLogComponents (); 33
34   // Create Nodes: eNodeB and UE
35  NodeContainer enbNodes; 36  NodeContainer ueNodes; 37   enbNodes.Create (1); 38   ueNodes.Create (1); 39
40   // Install Mobility Model
41  MobilityHelper mobility; 42   mobility.SetMobilityModel ("ns3::ConstantPositionMobilityModel"); 43  mobility.Install (enbNodes); 44  BuildingsHelper::Install (enbNodes); 45 // mobility.SetMobilityModel ("ns3::ConstantPositionMobilityModel"); 46 // mobility.Install (ueNodes); 47 // BuildingsHelper::Install (ueNodes);
48
49   mobility.SetPositionAllocator ("ns3::RandomDiscPositionAllocator", 50                                  "X", StringValue ("100.0"), 51                                  "Y", StringValue ("100.0"), 52                                  "Rho", StringValue ("ns3::UniformRandomVariable[Min=0|Max=30]")); 53   mobility.SetMobilityModel ("ns3::RandomWalk2dMobilityModel", 54                              "Mode", StringValue ("Time"), 55                              "Time", StringValue ("2s"), 56                              "Speed", StringValue ("ns3::ConstantRandomVariable[Constant=1.0]"), 57                              "Bounds", StringValue ("0|200|0|200")); 58  mobility.Install(ueNodes); 59  BuildingsHelper::Install (ueNodes); 60
61   // Create Devices and install them in the Nodes (eNB and UE)
62  NetDeviceContainer enbDevs; 63  NetDeviceContainer ueDevs; 64   // Default scheduler is PF, uncomment to use RR 65   //lteHelper->SetSchedulerType ("ns3::RrFfMacScheduler");
66
67   enbDevs = lteHelper->InstallEnbDevice (enbNodes); 68   ueDevs = lteHelper->InstallUeDevice (ueNodes); 69
70   // Attach a UE to a eNB
71   lteHelper->Attach (ueDevs, enbDevs.Get (0)); 72
73   // Activate a data radio bearer
74   enum EpsBearer::Qci q = EpsBearer::GBR_CONV_VOICE; 75  EpsBearer bearer (q); 76   lteHelper->ActivateDataRadioBearer (ueDevs, bearer); 77   //lteHelper->EnableTraces ();
78
79   Simulator::Stop (Seconds (1.05)); 80
81   // configure all the simulation scenario here...
82   lteHelper->EnablePhyTraces (); 83   lteHelper->EnableMacTraces (); 84   lteHelper->EnableRlcTraces (); 85   lteHelper->EnablePdcpTraces (); 86
87  Simulator::Run (); 88
89   // GtkConfigStore config; 90   // config.ConfigureAttributes ();
91
92  Simulator::Destroy (); 93   return 0; 94 }
然后在终端执行"load"命令,传递属性设置到仿真程序中 :
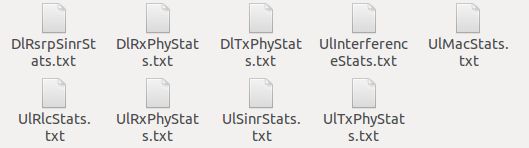
执行完成后, 会增加以下关键性能指标(KPI)文件:![]()
注意:由于程序“lte-sim-with-input.cc”是 LTE only 程序,没有 EPC,所以 DlPdcpStats.txt 和 UlPdcpStats.txt 内容为空。
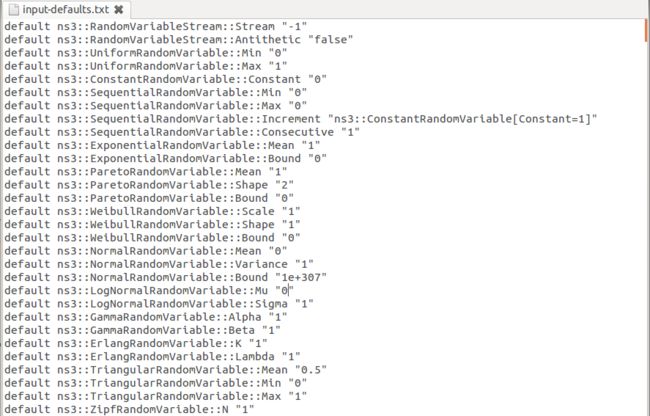
接着在终端执行 "save" 命令,生成模板输入文件 :
执行完成后,input-defaults.txt 增加了很多属性,部分内容截图如下:
参考文献
https://www.nsnam.org/docs/models/html/lte-user.html