Maven Myeclipse2014配置
下载安装for windows
下载地址官网:
http://maven.apache.org/download.cgi
安装方法:
1. Unzip the distributionarchive, i.e. apache-maven-3.2.5-bin.zip to the directory you wish to installMaven 3.2.5. These instructions assume you chose C:\Program Files\ApacheSoftware Foundation. The subdirectory apache-maven-3.2.5 will be created fromthe archive.
2. Add the unpackeddistribution's bin directory to your user PATH environment variable by openingup the system properties (WinKey + Pause), selecting the "Advanced"tab, and the "Environment Variables" button, then adding or selectingthe PATH variable in the user variables with the value C:\Program Files\ApacheSoftware Foundation\apache-maven-3.2.5\bin.
3. Optional: In the samedialog, add the MAVEN_OPTS environment variable in the user variables tospecify JVM properties, e.g. the value -Xms256m -Xmx512m. This environmentvariable can be used to supply extra options to Maven.
4. In the same dialog, make surethat JAVA_HOME exists in your user variables or in the system variables and itis set to the location of your JDK, e.g. C:\Program Files\Jav\jdk1.7.0_51.
5. Open a new command prompt(Winkey + R then type cmd) and run mvn --version to verify that it is correctlyinstalled.
简单的说就是解压然后配置环境变量path
;C:\ProgramFiles\Apache Software Foundation\apache-maven-3.2.5-bin\apache-maven-3.2.5\bin
Cmd输入: >mvn–version --测试是否成功
下载项目到下边的目录:
C:\Users\hpo\.m2
Helloworld:
创建maven0703项目
F:\DingSai\maven\maven0703\src\java\com\Hello.java
编译源代码:E:\maven\maven0703>mvn compile
如果首次运行该命令mvn compile,花一些时间去把最新的工具包(Maven 把它叫作artifacts)下载到你的本地仓库
命令执行完毕后创建一个target文件,并且把Java文件编译成class文件:
F:\DingSai\maven\maven0703\target\classes\com\Hello.class
在输入mvn package 对象项目进行打包
执行完毕后, 会在target文件夹下面生成一jar包:maven0703-1.0.0.jar
然后在输入java -cp target/maven0703-1.0.0.jar com.liu.maven.Hello
打包成工程:mvn eclipse:eclipse
Myeclipse 下载编译maven项目
Maven添加本地仓库:
打开本地存放maven目录 例如:D:\maven\apache-maven-3.2.1,打开conf文件夹下的settings.xml文件,找到第53行,把注释去掉,修改成:<localRepository>${user.home}/.m2/repository</localRepository>
myeclipse 和maven配置
windows>preferences>Myeclipse>Maven4MyEclipse>Installations>Add>选择maven路径>OK
安装插件:
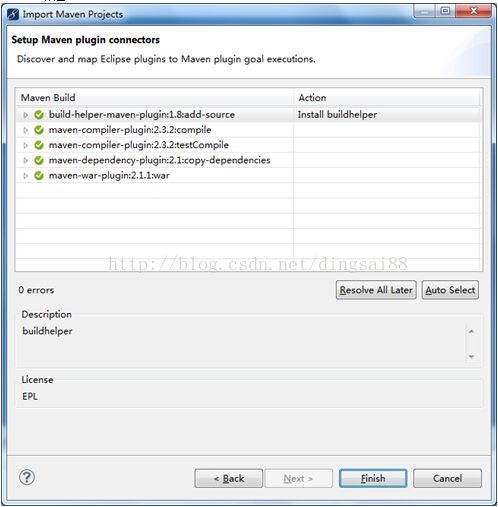
重启

Maven4Myeclipse>Downloadsources
Maven4Myeclipse>DownloadJavadoc
RunAs >Maven Build > 配制成org.apache.maven.plugins:maven-compiler-plugin:2.3.2:compile
RunAs> Maven Install (打包成jar)
解压打包好的jar包就可以使用了。
Maven命令说明
mvncompile:编译源代码,生成对应的CLASS文件
mvntest-compile:编译测试代码,生成对应的CLASS文件
mvntest:运行测试,生成对应的CLASS文件,执行流程可见流程如图3
mvnpackage:打包,生成JAR文件,只能本程序用,或者拷贝到其它项目使用,执行流程可见流程如图3
mvninstall :打包,生成JAR文件,并在本地仓库生成JAR和POM文件,供其它Maven项目共享;
mvnclean :清除产生的项目
mvntest -skipping compile -skipping test-compile:只测试而不编译,也不测试编译,-skipping 的灵活运用,当然也可以用于其他组合命令
mvneclipse:eclipse :生成eclipse项目
mvneclipse:clean :清除eclipse的一些系统设置
导出成eclipse项目
2)创建WEB项目: mvn archetype:create -DgroupId=com.ding -DartifactId=JavaWeb -DarchetypeArtifactId=maven-arc hetype-webapp
命令说明:
archetype( 内建插件,他的create任务将建立项目骨架 ): archetype:create
groupId 项目的java包结构:com.ding
artifactId 项目的名称:JavaWeb
archetypeArtifactId( 项目骨架的类型 ):
* maven-archetype-archetype
* maven-archetype-j2ee-simple
* maven-archetype-mojo
* maven-archetype-portlet
* maven-archetype-profiles (currently under development)
* maven-archetype-quickstart
* maven-archetype-simple (currently under development)
* maven-archetype-site
* maven-archetype-site-simple
* maven-archetype-webapp