Android学习笔记(十) 主题样式的设置
对话框的类为android.app.Dialog,通过android.app.AlertDialog.Builder类来建立,在建立的过程可以进行多项设置:
可以设置标题,图标,提示信息,最多三个按钮,单选项,多选项,甚至可以直接设置一个view;
通过Builder来建立
setIcon( ) 和 setTitle ( ) : 用于设置图标和标题
setMessage ( ) : 用于设置提示信息
setPositiveButton ( ) ,setNetralButton ( ) 和 setNegativeButton ( ) : 用于设置左 中 右按钮
setView ( ) :用于设置一个view
这些函数的返回值都是Builder,设置完成后调用create ( ) 进行创建。
----------------------通过AndroidManifest,xml设置样式-------------------------------------------------
还是通过程序实例进行解读:
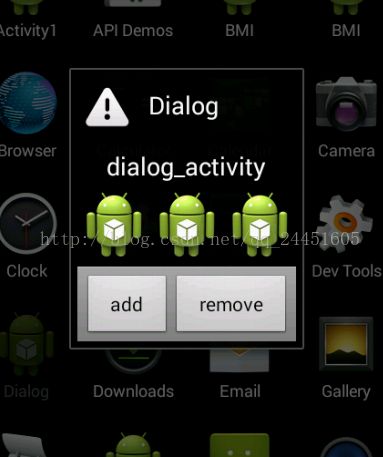
首先是利用android内置的主题样式,比如Dialog,和普通的活动相似,但是它更像一个对话框
而且背景是透明的
下面通过代码进行讲解:
首先是布局文件:
<?xml version="1.0" encoding="utf-8"?>


<LinearLayout xmlns:android="http://schemas.android.com/apk/res/android"
        android:layout_width="match_parent" android:layout_height="match_parent"
        android:orientation="vertical"
        android:padding="4dp" android:gravity="center_horizontal">

    <!-- 对文本的设置,可能大家比较陌生的是textAppearance的设定,也就是对文本外观的设定,
     ?代表设置的是一个系统自带的外观,?判断外观是否存在,如果存在的话使用,不存在的话使用默认 -->
    <TextView android:id="@+id/text"
        android:layout_width="wrap_content" android:layout_height="wrap_content"
        android:gravity="center_vertical|center_horizontal"
        android:textAppearance="?android:attr/textAppearanceMedium"
        android:text="@string/dialog_activity_text"/>

    <!-- 一个嵌套的线性布局,用来放置后来添加的小机器人,使用"wrap_content"可以使窗框自动调节大小 ,padding 属性是指其中的控件距离一个方向的距离-->
    <LinearLayout android:id="@+id/inner_content"
            android:layout_width="wrap_content"
            android:layout_height="wrap_content"
            android:orientation="horizontal"
            android:paddingTop="4dp" android:paddingBottom="4dp">
    </LinearLayout>

    <!-- 通过style属性设置样式,layout_wight是设置控件的权值,在控件剩余时会根据权值分割空间
           , 当measurewiththeLargestChild开启后带权值的元素会拥有最大子元素的最小尺寸-->
    <LinearLayout style="?android:attr/buttonBarStyle"
        android:layout_width="match_parent"
        android:layout_height="wrap_content"
        android:measureWithLargestChild="true">
        <Button style="?android:attr/buttonBarButtonStyle" android:id="@+id/add"
            android:layout_width="wrap_content" android:layout_height="wrap_content"
            android:layout_weight="1"
            android:text="@string/dialog_activity_add" />
        <Button style="?android:attr/buttonBarButtonStyle" android:id="@+id/remove"
            android:layout_width="wrap_content" android:layout_height="wrap_content"
            android:layout_weight="1"
            android:text="@string/dialog_activity_remove" />
    </LinearLayout>
</LinearLayout>
java主程序:
package com.android.study;

import android.app.Activity;
import android.os.Bundle;
import android.view.View;
import android.view.Window;
import android.view.View.OnClickListener;
import android.widget.Button;
import android.widget.ImageView;
import android.widget.LinearLayout;

public class Dialog extends Activity {

    @Override
	protected void onCreate(Bundle savedInstanceState) {

        super.onCreate(savedInstanceState);
        //启用窗体的某一拓展功能
        requestWindowFeature(Window.FEATURE_LEFT_ICON);
        setContentView(R.layout.main );
        getWindow().setTitle("This is just a test");
       //设置左标题处的图标
        getWindow().setFeatureDrawableResource(Window.FEATURE_LEFT_ICON,
                android.R.drawable.ic_dialog_alert);

        Button button = (Button)findViewById(R.id.add);
        button.setOnClickListener(mAddContentListener);
        button = (Button)findViewById(R.id.remove);
        button.setOnClickListener(mRemoveContentListener);
    }

    private OnClickListener mAddContentListener = new OnClickListener() {
        public void onClick(View v) {
            LinearLayout layout = (LinearLayout)findViewById(R.id.inner_content);
            //设置图片显示控件,并设置格式
            ImageView iv = new ImageView(Dialog.this);
            iv.setImageDrawable(getResources().getDrawable(R.drawable.ic_launcher));
            iv.setPadding(4, 4, 4, 4);
            layout.addView(iv);
        }
    };

    private OnClickListener mRemoveContentListener = new OnClickListener() {
        public void onClick(View v) {
            LinearLayout layout = (LinearLayout)findViewById(R.id.inner_content);
            int num = layout.getChildCount();
                if (num > 0) {
                layout.removeViewAt(num-1);
            }
        }
    };
}
还有其他的主题可以参见我的另一篇介绍主题的博客: 点我点我点我
-------------------------------自定义样式---------------------------------------------------------------------
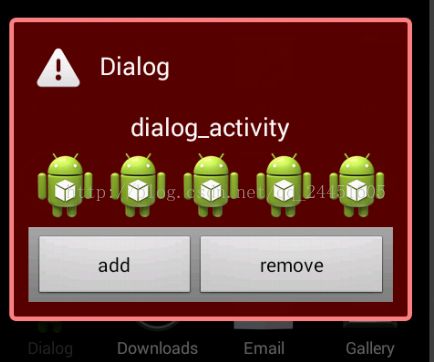
就通过上面例子的一个延展来讲解:
首先要使用自定义的主题,先要修改AndroidManifest的主题变为自定义主题的名字,自定义的主题放在resource里,有的时候如果发现代码报错或者程序不能正常运行,可以通过修改当前sdk的适用版本来调试,一般默认的版本是8
<?xml version="1.0" encoding="utf-8"?>
<manifest xmlns:android="http://schemas.android.com/apk/res/android"
      package="com.android.study"
      android:versionCode="1"
      android:versionName="1.0">
    <uses-sdk
       android:minSdkVersion="11"
       android:targetSdkVersion="17" />
    <application android:label="@string/app_name" android:icon="@drawable/ic_launcher">
        <activity android:name="Dialog"
                  android:label="@string/app_name"
                  android:theme="@style/Theme.CustomDialog">
            <intent-filter>
                <action android:name="android.intent.action.MAIN" />
                <category android:name="android.intent.category.LAUNCHER" />
            </intent-filter>
        </activity>
    </application>
</manifest>
主题是通过style资源文件是通过继承原有的主题来实现的,为了避免许多无谓的代码。
<?xml version="1.0" encoding="utf-8"?>
<resources>
    <style name="Theme.CustomDialog"
           parent="@android:style/Theme.Dialog">
        <item name="android:windowBackground">
            @layout/shape
        </item>
    </style>
</resources>
继承父类后,重新定义了背景,背景是通过一个布局文件实现的
<?xml version="1.0" encoding="utf-8"?>
    <shape xmlns:android="http://schemas.android.com/apk/res/android">
        <solid android:color="#f0600000"/>
        <stroke android:width="3dp"
                     android:color="#ffff8080"/>
        <corners android:radius="3dp" />
        <padding android:left="10dp" android:top="10dp"
                       android:right="10dp" android:bottom="10dp" />
    </shape>
下面来介绍shape中的一些属性:
solid:是实心填充
stroke : 是设置边框
corners : 设置边角的圆滑曲度
padding : 四周的留白
gradient : 设置颜色的渐变
-------------------------窗口透明样式的设置-----------------------------------------------------
其实就是自定义当中一个应用实例:
首先同样的配置AndroidManifest,设置主题:
<?xml version="1.0" encoding="utf-8"?>
<manifest xmlns:android="http://schemas.android.com/apk/res/android"
      package="com.android.study"
      android:versionCode="1"
      android:versionName="1.0">
    <uses_sdk
        android:minSdkVersion="11"
    />
    <application android:label="@string/app_name" android:icon="@drawable/ic_launcher">
        <activity android:name="TranslucentActivity"
                  android:label="@string/app_name"
                  android:theme="@style/Theme.Translucent">
            <intent-filter>
                <action android:name="android.intent.action.MAIN" />
                <category android:name="android.intent.category.LAUNCHER" />
            </intent-filter>
        </activity>
    </application>
</manifest>
然后要写主题了,同样是在资源里写style,只不过在设置背景颜色时要设置透明度
<?xml version="1.0" encoding="utf-8"?>

<resources>
    <style name="Theme.Translucent" parent="android:style/Theme.Translucent">
        <item name="android:windowBackground">@layout/translucent_background</item>
        <item name="android:windowNoTitle">true</item>
        <item name="android:colorForeground">#fff</item>
    </style>
</resources>
其中的透明背景图通过布局文件写,透明度的设定,详细可以参见我的另一篇博客
点我点我点我嘛
<?xml version="1.0" encoding="utf-8"?>
<shape xmlns:android="http://schemas.android.com/apk/res/android">
    <solid android:color="#e0000000"/>
</shape>
Java主程序很简单,只是对布局文件进行投放:
package com.android.study;

import android.app.Activity;
import android.os.Bundle;

public class TranslucentActivity extends Activity {
    @Override
        protected void onCreate(Bundle savedInstanceState)
        {
        super.onCreate(savedInstanceState);
        setContentView(R.layout.main);
    }
}

