学习TI DVSDK过程记录(一):视频数据从哪里来到哪里去 2012-08-18 15:01:14

学习TI DVSDK过程记录(一):视频数据从哪里来到哪里去 2012-08-18 15:01:14

分类: 嵌入式

作者:[email protected]
博客:http://www.cnblogs.com/tinz
 
 
本文的copyright归[email protected]所有,使用GPL发布,可以自由拷贝,转载。但转载请保持文档的完整性,注明原作者及原链接,严禁用于任何商业用途。
========================================================
本文讨论的是基于DVSDK3,硬件平台是勤泽的ZMV6467。
 
DVSDK TI为达芬奇平台的开发者提供了一套完善的视频软件开发套件。DVSDK功能非常强大,它将很多视频编解码的细节都隐藏起来了,使用者只需要
关系应用就可以,但是DVSDK的强大又使得它变得异常的庞大,让使用者摸不着头脑,或者根本不知道怎样开始开发。接下来的TI DVSDK学习记录文章
将会一步步分析DVSDK,将我学习使用DVSDK进行开发的过程中碰到的问题或者相关的经验一一写出,文章中不会涉及到如何构建编译环境,如何编译
DVSDK的问题,如需了解这方面的问题可以参考TI官方文档或联系勤泽。 文章如有错误敬请提出。
 
以视频采集应用的开发过程,提出以下问题:
1.视频怎样来,来自哪里?
2.采集到视频数据要怎样处理?(显示/压缩/存放/发送)
3.视频数据怎样直接显示出来?
4.视频数据怎样压缩?
5.视频数据怎样存放?
6.视频数据如何发送?
 
 下面就开始一一来解决这些问题:
 
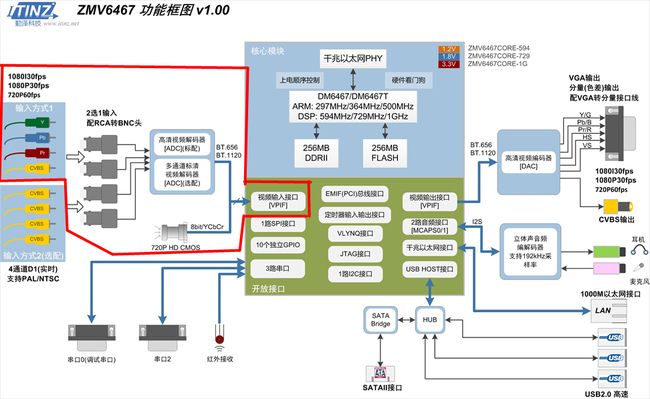
先从硬件功能框图看一下视频的输入通道,红色框部分:

学习TI DVSDK过程记录(一):视频数据从哪里来到哪里去 2012-08-18 15:01:14_第1张图片

 
 DM6467支持BT.656/BT.1120/RAW的数据输入,最高可以支持1080P30FPS,如果需要支持1080P60fps,可以使用1GHz版本的DM6467T。
1)模拟高清分量输入,经过视频解码器后输出符合BT.1120的数据,然后再通过VPIF接口进入CPU。
2)模拟标清信号输入,经过视频解码器后输出符合BT.656的数据,然后再通过VPIF接口进入CPU。
3)数字摄像头(eg.cmos),直接通过VPIF接口进入CPU。这里要注意,因为DM6467只支持YUVPSemi4:2:0格式的数据显示和编码(H.264),所以数字摄像头输出的YCBCR或RGB数据再
进入CPU后需要进行转换(颜色空间的问题,可以参考本博客前面的文章),这个转换可以通过ARM,也可以通过DSP来进行,勤泽的软件已经附带了一个DSP的转换核,
可以直接转换cmos的YCBCR数据进行显示和编码。
 
数据进入CPU后,接下来就是要获取数据了,这部分的只使用到ARM端。
数据流向:
[video decoder driver] ----> [vpif_caputre driver] ---->[V4L2 driver]--->[应用层]
这里我们先不去关心video decoder driver 和  vpif_caputre driver,因为这两个不影响我们分析DVSDK。
 
这里的V4L2 driver和我们平常使用的V4L2驱动没什么区别,就是提供了一些访问视频设备的接口,但是TI为了
简化对V4L2的操作,方便用户更快的编写出视频应用程序,所以他们在V4L2的基础上又封装了一层叫做DMAI的东西。DMAI是什么呢?
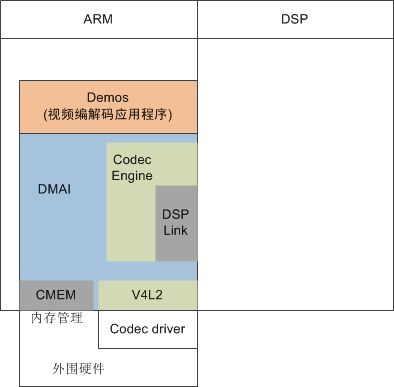
因为接下来会有更多的新名词冒出,所以这里我们先看一下DVSDK的一个简单的构成框图,这个框图在后面会不断扩大:
 

学习TI DVSDK过程记录(一):视频数据从哪里来到哪里去 2012-08-18 15:01:14_第2张图片

 
从框图可以看出DMAI将视频编解码器(CE)、内存管理(CMEM)和V4L2的访问操作都统一到一套接口上了,这样视频编解码应用程序的开发
者只需要关系数据的业务应用而不需要去理会逻辑层的东西。
 
但是作为底层的开发人员,我们还是有必要去看看DMAI到底是怎样和CE/V4L2/CMEM进行交互,并且把它们封装起来的,然后到最后再看怎样使
用DMAI进行应用程序的开发。
 
1.DMAI与VL42的交互(DMAI版本:2_20_00_15)。
在dmai_2_20_00_15/packages/ti/sdo/dmai/linux/dm6467目录下有一个Capture.c的文件,Capture.c包含了所有对V4L2的操作封装。现在来看一下
文件中的一个函数,这个函数用于创建一个 视频捕获设备的操作句柄
View Code
复制代码
1 /* ***************************************************************************** 2 * Capture_create 3 ***************************************************************************** */ 4 Capture_Handle Capture_create(BufTab_Handle hBufTab, Capture_Attrs * attrs) 5 { 6 struct v4l2_capability cap; 7 struct v4l2_cropcap cropCap; 8 struct v4l2_crop crop; 9 struct v4l2_format fmt; 10 enum v4l2_buf_type type; 11 Capture_Handle hCapture; 12 VideoStd_Type videoStd; 13 Int32 width, height; 14 Uint32 pixelFormat; 15 16 assert(attrs); 17 Dmai_clear(fmt); 18 19 /* Allocate space for state object */ 20 hCapture = calloc( 1, sizeof (Capture_Object)); 21 22 if (hCapture == NULL) { 23 Dmai_err0( " Failed to allocate space for Capture Object\n " ); 24 return NULL; 25 } 26 27 /* User allocated buffers by default */ 28 hCapture->userAlloc = TRUE; 29 30 /* Open video capture device */ 31 /* 打开V4L2视频输入设备 */ 32 hCapture->fd = open(attrs->captureDevice, O_RDWR, 0 ); 33 34 if (hCapture->fd == - 1 ) { 35 Dmai_err2( " Cannot open %s (%s)\n ", attrs-> captureDevice, 36 strerror(errno)); 37 cleanup(hCapture); 38 return NULL; 39 } 40 41 /* See if an input is connected, and if so which standard */ 42 /* 检测V4L2设备当前是否有视频信号输入,输入信号的标准 */ 43 if (Capture_detectVideoStd(hCapture, &videoStd, attrs) < 0 ) { 44 cleanup(hCapture); 45 return NULL; 46 } 47 48 hCapture->videoStd = videoStd; 49 50 if (VideoStd_getResolution(videoStd, &width, &height) < 0 ) { 51 cleanup(hCapture); 52 Dmai_err0( " Failed to get resolution of capture video standard\n " ); 53 return NULL; 54 } 55 56 /* Query for capture device capabilities */ 57 /* 这里就是调用ioctl直接操作v4l2设备了,查询设备的特性 */ 58 if (ioctl(hCapture->fd, VIDIOC_QUERYCAP, &cap) == - 1 ) { 59 cleanup(hCapture); 60 if (errno == EINVAL) { 61 Dmai_err1( " %s is no V4L2 device\n ", attrs-> captureDevice); 62 cleanup(hCapture); 63 return NULL; 64 } 65 Dmai_err2( " Failed VIDIOC_QUERYCAP on %s (%s)\n ", attrs-> captureDevice, 66 strerror(errno)); 67 cleanup(hCapture); 68 return NULL; 69 } 70 71 if (!(cap.capabilities & V4L2_CAP_VIDEO_CAPTURE)) { 72 Dmai_err1( " %s is not a video capture device\n ", attrs-> captureDevice); 73 cleanup(hCapture); 74 return NULL; 75 } 76 77 if (!(cap.capabilities & V4L2_CAP_STREAMING)) { 78 Dmai_err1( " %s does not support streaming i/o\n ", attrs-> captureDevice); 79 cleanup(hCapture); 80 return NULL; 81 } 82 83 fmt.type = V4L2_BUF_TYPE_VIDEO_CAPTURE; 84 /* 获取V4L2设备的帧格式 */ 85 if (ioctl(hCapture->fd, VIDIOC_G_FMT, &fmt) == - 1 ) { 86 Dmai_err2( " Failed VIDIOC_G_FMT on %s (%s)\n ", attrs-> captureDevice, 87 strerror(errno)); 88 cleanup(hCapture); 89 return NULL; 90 } 91 92 fmt.fmt.pix.width = width; 93 fmt.fmt.pix.height = height; 94 fmt.type = V4L2_BUF_TYPE_VIDEO_CAPTURE; 95 96 switch(attrs-> colorSpace) { 97 case ColorSpace_UYVY: 98 fmt.fmt.pix.pixelformat = V4L2_PIX_FMT_UYVY; 99 break ; 100 case ColorSpace_YUV420PSEMI: 101 fmt.fmt.pix.pixelformat = V4L2_PIX_FMT_NV12; 102 break ; 103 case ColorSpace_YUV422PSEMI: 104 fmt.fmt.pix.pixelformat = V4L2_PIX_FMT_NV16; 105 break ; 106 default : 107 Dmai_err1( " Unsupported color format %g\n ", attrs-> colorSpace); 108 cleanup(hCapture); 109 return NULL; 110 } 111 112 if ((videoStd == VideoStd_BAYER_CIF) || (videoStd == VideoStd_BAYER_VGA) || 113 (videoStd == VideoStd_BAYER_1280)) { 114 fmt.fmt.pix.pixelformat = V4L2_PIX_FMT_SBGGR8; 115 } 116 117 fmt.fmt.pix.bytesperline = BufferGfx_calcLineLength(fmt.fmt.pix.width, 118 attrs-> colorSpace); 119 fmt.fmt.pix.sizeimage = BufferGfx_calcSize(attrs->videoStd, attrs-> colorSpace); 120 121 // printf("DMAI: pix.bytesperline= %d, pix.sizeimage= %d\r\n",fmt.fmt.pix.bytesperline,fmt.fmt.pix.sizeimage); 122 pixelFormat = fmt.fmt.pix.pixelformat; 123 124 if ((videoStd == VideoStd_CIF) || (videoStd == VideoStd_SIF_PAL) || 125 (videoStd == VideoStd_SIF_NTSC) || (videoStd == VideoStd_D1_PAL) || 126 (videoStd == VideoStd_D1_NTSC) || (videoStd == VideoStd_1080I_30) || 127 (videoStd == VideoStd_1080I_25)) { 128 fmt.fmt.pix.field = V4L2_FIELD_INTERLACED; 129 } else { 130 fmt.fmt.pix.field = V4L2_FIELD_NONE; 131 } 132 133 /* 设置V4L2输入设备的帧格式 */ 134 if (ioctl(hCapture->fd, VIDIOC_S_FMT, &fmt) == - 1 ) { 135 printf( " Failed VIDIOC_S_FMT on %s (%s)\n ", attrs-> captureDevice, 136 strerror(errno)); 137 cleanup(hCapture); 138 return NULL; 139 } 140 141 if ((fmt.fmt.pix.width != width) || (fmt.fmt.pix.height != height)) { 142 Dmai_err4( " Failed to set resolution %d x %d (%d x %d)\n " , width, 143 height, fmt.fmt.pix.width, fmt.fmt.pix.height); 144 cleanup(hCapture); 145 return NULL; 146 } 147 148 if (pixelFormat != fmt.fmt.pix.pixelformat) { 149 Dmai_err2( " Pixel format 0x%x not supported. Received 0x%x\n " , 150 pixelFormat, fmt.fmt.pix.pixelformat); 151 cleanup(hCapture); 152 return NULL; 153 } 154 155 Dmai_dbg3( " Video input connected size %dx%d pitch %d\n " , 156 fmt.fmt.pix.width, fmt.fmt.pix.height, fmt.fmt.pix.bytesperline); 157 158 /* Query for video input cropping capability */ 159 160 if (attrs->cropWidth > 0 && attrs->cropHeight > 0 ) { 161 162 cropCap.type = V4L2_BUF_TYPE_VIDEO_CAPTURE; 163 if (ioctl(hCapture->fd, VIDIOC_CROPCAP, &cropCap) == - 1 ) { 164 Dmai_err2( " VIDIOC_CROPCAP failed on %s (%s)\n ", attrs-> captureDevice, 165 strerror(errno)); 166 cleanup(hCapture); 167 return NULL; 168 } 169 170 if (attrs->cropX & 0x1 ) { 171 Dmai_err1( " Crop width (%ld) needs to be even\n ", attrs-> cropX); 172 cleanup(hCapture); 173 return NULL; 174 } 175 176 crop.type = V4L2_BUF_TYPE_VIDEO_CAPTURE; 177 crop.c.left = attrs-> cropX; 178 crop.c.top = attrs-> cropY; 179 crop.c.width = attrs-> cropWidth; 180 crop.c.height = hCapture->topOffset ? attrs->cropHeight + 4 + 2 : 181 attrs-> cropHeight; 182 183 Dmai_dbg4( " Setting capture cropping at %dx%d size %dx%d\n " , 184 crop.c.left, crop.c.top, crop.c.width, crop.c.height); 185 186 /* Crop the image depending on requested image size */ 187 if (ioctl(hCapture->fd, VIDIOC_S_CROP, &crop) == - 1 ) { 188 Dmai_err2( " VIDIOC_S_CROP failed on %s (%s)\n ", attrs-> captureDevice, 189 strerror(errno)); 190 cleanup(hCapture); 191 return NULL; 192 } 193 } 194 195 if (hBufTab == NULL) { 196 hCapture->userAlloc = FALSE; 197 198 /* The driver allocates the buffers */ 199 /* 调用CMEM创建要用到的视频缓冲区 */ 200 if (_Dmai_v4l2DriverAlloc(hCapture-> fd, 201 attrs-> numBufs, 202 V4L2_BUF_TYPE_VIDEO_CAPTURE, 203 &hCapture-> bufDescs, 204 & hBufTab, 205 hCapture-> topOffset, 206 attrs->colorSpace) < 0 ) { 207 Dmai_err1( " Failed to allocate capture driver buffers on %s\n " , 208 attrs-> captureDevice); 209 cleanup(hCapture); 210 return NULL; 211 } 212 } 213 else { 214 /* Make the driver use the user supplied buffers */ 215 /* 如果调用者已经创建好缓冲区,那只需要加入相应的队列管理就可以 */ 216 if (_Dmai_v4l2UserAlloc(hCapture-> fd, 217 attrs-> numBufs, 218 V4L2_BUF_TYPE_VIDEO_CAPTURE, 219 &hCapture-> bufDescs, 220 hBufTab, 221 0, attrs->colorSpace) < 0 ) { 222 Dmai_err1( " Failed to intialize capture driver buffers on %s\n " , 223 attrs-> captureDevice); 224 cleanup(hCapture); 225 return NULL; 226 } 227 } 228 229 hCapture->hBufTab = hBufTab; 230 231 /* Start the video streaming */ 232 type = V4L2_BUF_TYPE_VIDEO_CAPTURE; 233 234 /* 配置完后,启动V4L2设备 */ 235 if (ioctl(hCapture->fd, VIDIOC_STREAMON, &type) == - 1 ) { 236 Dmai_err2( " VIDIOC_STREAMON failed on %s (%s)\n ", attrs-> captureDevice, 237 strerror(errno)); 238 cleanup(hCapture); 239 return NULL; 240 } 241 242 hCapture->started = TRUE; 243 244 return hCapture; 245 }
复制代码

 从上面的代码可以看出,DMAI的函数将大量的对V4L2的控制操作都封装起来了,使用者只需要传入缓冲区列表和视频采集参数就可以创建一个视频采集设备。设备采集到

数据后,会将数据填充到使用者提供的缓冲区,使用者只需要取出相应的缓冲区就可以得到视频数据。在上面的函数中,调用了一个_Dmai_v4l2DriverAlloc()函数,这个函数

的作用是分配视频缓冲区,它最终是调用CMEM进行内存分配的,下面一起看看这个函数的具体实现。


2.DMAI与CMEM的交互。

查看dmai_2_20_00_15/packages/ti/sdo/dmai/linux/dm6467/_VideoBuf.c

_Dmai_v4l2DriverAlloc()
复制代码
1 /* ***************************************************************************** 2 * _Dmai_v4l2DriverAlloc 3 ***************************************************************************** */ 4 Int _Dmai_v4l2DriverAlloc(Int fd, Int numBufs, enum v4l2_buf_type type, 5 struct _VideoBufDesc ** bufDescsPtr, 6 BufTab_Handle * hBufTabPtr, Int topOffset, 7 ColorSpace_Type colorSpace) 8 { 9 BufferGfx_Attrs gfxAttrs = BufferGfx_Attrs_DEFAULT; 10 struct v4l2_requestbuffers req; 11 struct v4l2_format fmt; 12 _VideoBufDesc * bufDesc; 13 Buffer_Handle hBuf; 14 Int bufIdx; 15 Int8 * virtPtr; 16 17 Dmai_clear(fmt); 18 fmt.type = type; 19 20 if (ioctl(fd, VIDIOC_G_FMT, &fmt) == - 1 ) { 21 Dmai_err1( " VIDIOC_G_FMT failed (%s)\n " , strerror(errno)); 22 return Dmai_EFAIL; 23 } 24 25 Dmai_clear(req); 26 req.count = numBufs; 27 req.type = type; 28 req.memory = V4L2_MEMORY_MMAP; 29 30 /* Allocate buffers in the capture device driver */ 31 /* 申请建立V4L2的视频缓冲区管理队列 */ 32 if (ioctl(fd, VIDIOC_REQBUFS, &req) == - 1 ) { 33 Dmai_err1( " VIDIOC_REQBUFS failed (%s)\n " , strerror(errno)); 34 return Dmai_ENOMEM; 35 } 36 37 if (req.count < numBufs || ! req.count) { 38 Dmai_err0( " Insufficient device driver buffer memory\n " ); 39 return Dmai_ENOMEM; 40 } 41 42 /* Allocate space for buffer descriptors */ 43 *bufDescsPtr = calloc(numBufs, sizeof (_VideoBufDesc)); 44 45 if (*bufDescsPtr == NULL) { 46 Dmai_err0( " Failed to allocate space for buffer descriptors\n " ); 47 return Dmai_ENOMEM; 48 } 49 50 gfxAttrs.dim.width = fmt.fmt.pix.width; 51 gfxAttrs.dim.height = fmt.fmt.pix.height; 52 gfxAttrs.dim.lineLength = fmt.fmt.pix.bytesperline; 53 gfxAttrs.colorSpace = colorSpace; 54 gfxAttrs.bAttrs.reference = TRUE; 55 56 /* 调用CMEM建立缓冲区 */ 57 *hBufTabPtr = BufTab_create(numBufs, fmt.fmt.pix.sizeimage, 58 BufferGfx_getBufferAttrs(& gfxAttrs)); 59 60 if (*hBufTabPtr == NULL) { 61 return Dmai_ENOMEM; 62 } 63 64 /* 将建立好的缓冲区放到队列中并且配置好相关属性 */ 65 for (bufIdx = 0; bufIdx < numBufs; bufIdx++ ) { 66 bufDesc = &(* bufDescsPtr)[bufIdx]; 67 68 /* Ask for information about the driver buffer */ 69 Dmai_clear(bufDesc-> v4l2buf); 70 bufDesc->v4l2buf.type = type; 71 bufDesc->v4l2buf.memory = V4L2_MEMORY_MMAP; 72 bufDesc->v4l2buf.index = bufIdx; 73 74 /* 查找队列中的缓冲区 */ 75 if (ioctl(fd, VIDIOC_QUERYBUF, &bufDesc->v4l2buf) == - 1 ) { 76 Dmai_err1( " Failed VIDIOC_QUERYBUF (%s)\n " , strerror(errno)); 77 return Dmai_EFAIL; 78 } 79 80 /* 修改缓冲区的属性 */ 81 82 /* Map the driver buffer to user space */ 83 virtPtr = mmap(NULL, 84 bufDesc-> v4l2buf.length, 85 PROT_READ | PROT_WRITE, 86 MAP_SHARED, 87 fd, 88 bufDesc->v4l2buf.m.offset) + topOffset; 89 90 if (virtPtr == MAP_FAILED) { 91 Dmai_err1( " Failed to mmap buffer (%s)\n " , strerror(errno)); 92 return Dmai_EFAIL; 93 } 94 95 /* Initialize the Buffer with driver buffer information */ 96 hBuf = BufTab_getBuf(* hBufTabPtr, bufIdx); 97 98 Buffer_setNumBytesUsed(hBuf, fmt.fmt.pix.bytesperline * 99 fmt.fmt.pix.height); 100 Buffer_setUseMask(hBuf, gfxAttrs.bAttrs.useMask); 101 Buffer_setUserPtr(hBuf, virtPtr); 102 103 /* Initialize buffer to black */ 104 _Dmai_blackFill(hBuf); 105 106 Dmai_dbg3( " Driver buffer %d mapped to %#x has physical address " 107 " %#lx\n " , bufIdx, (Int) virtPtr, Buffer_getPhysicalPtr(hBuf)); 108 109 bufDesc->hBuf = hBuf; 110 111 /* Queue buffer in device driver */ 112 /* 将缓冲区放回队列中 */ 113 if (ioctl(fd, VIDIOC_QBUF, &bufDesc->v4l2buf) == - 1 ) { 114 Dmai_err1( " VIODIOC_QBUF failed (%s)\n " , strerror(errno)); 115 return Dmai_EFAIL; 116 } 117 } 118 119 return Dmai_EOK; 120 }
复制代码

继续分析Buffer_create()函数

查看dmai_2_20_00_15/packages/ti/sdo/dmai/Buffer.c。

Buffer_create()
复制代码
1 /* ***************************************************************************** 2 * Buffer_create 3 ***************************************************************************** */ 4 Buffer_Handle Buffer_create(Int32 size, Buffer_Attrs * attrs) 5 { 6 Buffer_Handle hBuf; 7 UInt32 objSize; 8 9 if (attrs == NULL) { 10 Dmai_err0( " Must provide attrs\n " ); 11 return NULL; 12 } 13 14 if (attrs->type != Buffer_Type_BASIC && 15 attrs->type != Buffer_Type_GRAPHICS) { 16 17 Dmai_err1( " Unknown Buffer type (%d)\n ", attrs-> type); 18 return NULL; 19 } 20 21 objSize = attrs->type == Buffer_Type_GRAPHICS ? sizeof (_BufferGfx_Object) : 22 sizeof (_Buffer_Object); 23 24 hBuf = (Buffer_Handle) calloc( 1 , objSize); 25 26 if (hBuf == NULL) { 27 Dmai_err0( " Failed to allocate space for Buffer Object\n " ); 28 return NULL; 29 } 30 31 _Buffer_init(hBuf, size, attrs); 32 33 if (!attrs-> reference) { 34 35 /* 这里就是调用了CMEM的接口进行缓冲区的创建 */ 36 hBuf->userPtr = (Int8*)Memory_alloc(size, &attrs-> memParams); 37 38 if (hBuf->userPtr == NULL) { 39 printf( " Failed to allocate memory.\n " ); 40 free(hBuf); 41 return NULL; 42 } 43 44 /* 获取缓冲区的物理地址 */ 45 hBuf->physPtr = Memory_getBufferPhysicalAddress(hBuf-> userPtr, 46 size, NULL); 47 48 Dmai_dbg3( " Alloc Buffer of size %u at 0x%x (0x%x phys)\n " , 49 (Uns) size, (Uns) hBuf->userPtr, (Uns) hBuf-> physPtr); 50 } 51 52 hBuf->reference = attrs-> reference; 53 54 return hBuf; 55 }
复制代码


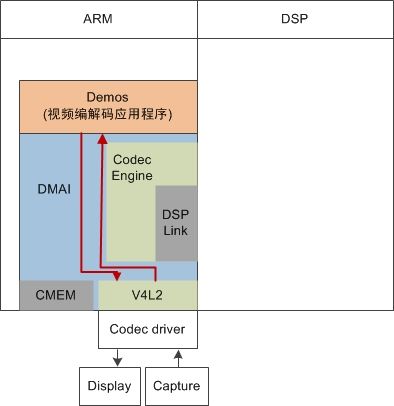
数据已经得到了,它们就放在通过CMEM创建的缓冲区里,那么验证或使用这些数据的一种最简单又有效的方式就是将它们直接

显示出来。再来看一下DVSDK的框图:


学习TI DVSDK过程记录(一):视频数据从哪里来到哪里去 2012-08-18 15:01:14_第3张图片

框图的两条红线表示数据的流向,需要将数据显示出来只需要两部,第一步创建V4L2的显示出输出设备,第二创建显示缓冲区并将采集到的数据放到缓冲区内。

创建V4L2的显示设备和创建VL42的采集设备很相似,请查看dmai_2_20_00_15/packages/ti/sdo/dmai/linux/dm6467/Display_v4l2.c

Display_v4l2_create()
复制代码
1 /* ***************************************************************************** 2 * Display_v4l2_create 3 ***************************************************************************** */ 4 Display_Handle Display_v4l2_create(BufTab_Handle hBufTab, Display_Attrs * attrs) 5 { 6 struct v4l2_format fmt; 7 enum v4l2_buf_type type; 8 Display_Handle hDisplay; 9 10 assert(attrs); 11 12 Dmai_clear(fmt); 13 14 /* delayStreamon not supported for this platform */ 15 if (attrs->delayStreamon == TRUE) { 16 Dmai_err0( " Support for delayed VIDIOC_STREAMON not implemented\n " ); 17 return NULL; 18 } 19 20 /* Allocate space for state object */ 21 hDisplay = calloc( 1, sizeof (Display_Object)); 22 23 if (hDisplay == NULL) { 24 Dmai_err0( " Failed to allocate space for Display Object\n " ); 25 return NULL; 26 } 27 28 hDisplay->userAlloc = TRUE; 29 30 /* Open video capture device */ 31 hDisplay->fd = open(attrs->displayDevice, O_RDWR, 0 ); 32 33 if (hDisplay->fd == - 1 ) { 34 Dmai_err2( " Cannot open %s (%s)\n " , 35 attrs-> displayDevice, strerror(errno)); 36 cleanup(hDisplay); 37 return NULL; 38 } 39 40 if(Display_detectVideoStd(hDisplay, attrs) != Dmai_EOK) { 41 Dmai_err0( " Display_detectVideoStd Failed\n " ); 42 cleanup(hDisplay); 43 return NULL; 44 } 45 /* Determine the video image dimensions */ 46 fmt.type = V4L2_BUF_TYPE_VIDEO_OUTPUT; 47 48 if (ioctl(hDisplay->fd, VIDIOC_G_FMT, &fmt) == - 1 ) { 49 Dmai_err0( " Failed to determine video display format\n " ); 50 cleanup(hDisplay); 51 return NULL; 52 } 53 54 fmt.type = V4L2_BUF_TYPE_VIDEO_OUTPUT; 55 switch(attrs-> colorSpace) { 56 case ColorSpace_UYVY: 57 fmt.fmt.pix.pixelformat = V4L2_PIX_FMT_UYVY; 58 break ; 59 case ColorSpace_YUV420PSEMI: 60 fmt.fmt.pix.pixelformat = V4L2_PIX_FMT_NV12; 61 break ; 62 case ColorSpace_YUV422PSEMI: 63 fmt.fmt.pix.pixelformat = V4L2_PIX_FMT_NV16; 64 break ; 65 default : 66 Dmai_err1( " Unsupported color format %g\n ", attrs-> colorSpace); 67 cleanup(hDisplay); 68 return NULL; 69 }; 70 71 if (hBufTab == NULL) { 72 fmt.fmt.pix.bytesperline = Dmai_roundUp(BufferGfx_calcLineLength(fmt.fmt.pix.width, 73 attrs->colorSpace), 32 ); 74 fmt.fmt.pix.sizeimage = BufferGfx_calcSize(attrs->videoStd, attrs-> colorSpace); 75 #if 1 76 } else { 77 /* This will help user to pass lineLength to display driver. */ 78 Buffer_Handle hBuf; 79 BufferGfx_Dimensions dim; 80 81 hBuf = BufTab_getBuf(hBufTab, 0 ); 82 BufferGfx_getDimensions(hBuf, & dim); 83 if((dim.height > fmt.fmt.pix.height) || 84 (dim.width > fmt.fmt.pix.width)) { 85 Dmai_err2( " User buffer size check failed %dx%d\n " , 86 dim.height, dim.width); 87 cleanup(hDisplay); 88 return NULL; 89 } 90 fmt.fmt.pix.bytesperline = dim.lineLength; 91 fmt.fmt.pix.sizeimage = Buffer_getSize(hBuf); 92 } 93 #endif 94 Dmai_dbg4( " Video output set to size %dx%d pitch %d imageSize %d\n " , 95 fmt.fmt.pix.width, fmt.fmt.pix.height, 96 fmt.fmt.pix.bytesperline, fmt.fmt.pix.sizeimage); 97 98 if ((attrs->videoStd == VideoStd_CIF) || (attrs->videoStd == VideoStd_SIF_PAL) || 99 (attrs->videoStd == VideoStd_SIF_NTSC) || (attrs->videoStd == VideoStd_D1_PAL) || 100 (attrs->videoStd == VideoStd_D1_NTSC) || (attrs->videoStd == VideoStd_1080I_30) || 101 (attrs->videoStd == VideoStd_1080I_25)) { 102 fmt.fmt.pix.field = V4L2_FIELD_INTERLACED; 103 } else { 104 fmt.fmt.pix.field = V4L2_FIELD_NONE; 105 } 106 107 if (ioctl(hDisplay->fd, VIDIOC_S_FMT, &fmt) == - 1 ) { 108 Dmai_err2( " Failed VIDIOC_S_FMT on %s (%s)\n ", attrs-> displayDevice, 109 strerror(errno)); 110 cleanup(hDisplay); 111 return NULL; 112 } 113 114 /* Should the device driver allocate the display buffers? */ 115 if (hBufTab == NULL) { 116 hDisplay->userAlloc = FALSE; 117 118 if (_Dmai_v4l2DriverAlloc(hDisplay-> fd, 119 attrs-> numBufs, 120 V4L2_BUF_TYPE_VIDEO_OUTPUT, 121 &hDisplay-> bufDescs, 122 & hBufTab, 123 0, attrs->colorSpace) < 0 ) { 124 Dmai_err1( " Failed to allocate display driver buffers on %s\n " , 125 attrs-> displayDevice); 126 cleanup(hDisplay); 127 return NULL; 128 } 129 } 130 else { 131 hDisplay->userAlloc = TRUE; 132 133 if (_Dmai_v4l2UserAlloc(hDisplay-> fd, 134 attrs-> numBufs, 135 V4L2_BUF_TYPE_VIDEO_OUTPUT, 136 &hDisplay-> bufDescs, 137 hBufTab, 138 0, attrs->colorSpace) < 0 ) { 139 Dmai_err1( " Failed to intialize display driver buffers on %s\n " , 140 attrs-> displayDevice); 141 cleanup(hDisplay); 142 return NULL; 143 } 144 } 145 146 /* Start the video streaming */ 147 type = V4L2_BUF_TYPE_VIDEO_OUTPUT; 148 149 if (ioctl(hDisplay->fd, VIDIOC_STREAMON, &type) == - 1 ) { 150 Dmai_err2( " VIDIOC_STREAMON failed on %s (%s)\n ", attrs-> displayDevice, 151 strerror(errno)); 152 cleanup(hDisplay); 153 return NULL; 154 } 155 156 hDisplay->started = TRUE; 157 hDisplay->hBufTab = hBufTab; 158 hDisplay->displayStd = Display_Std_V4L2; 159 160 return hDisplay; 161 }
复制代码

创建显示设备不需要检查视频标准,因为输出的标准是有调用者决定的。


显示设备创建好了,那怎样将采集到的数据显示出来呢?TI提供了一个叫encode的demo程序,大家可以在dvsdk_demos_3_10_00_16中找到。

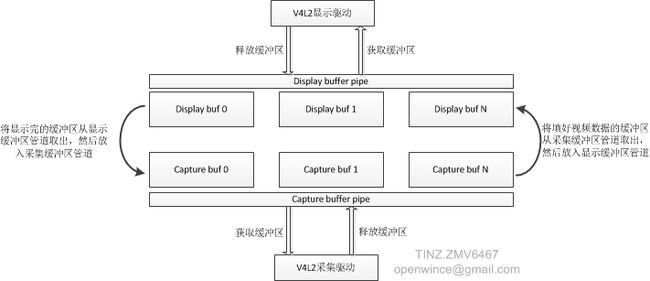
这个demo中很巧妙的将视频采集缓冲区和视频显示缓冲区管理起来,接下来一下分析一下。


学习TI DVSDK过程记录(一):视频数据从哪里来到哪里去 2012-08-18 15:01:14_第4张图片

因为单个显示缓冲和采集缓冲区的大小是一样的,所以可以直接进行交互。

下面截取demo中的代码片段,看一下这个缓冲区的交互的具体实现。


capture and display buffer
复制代码
1 /* 采集及显示线程中的循环 */ 2 while (! gblGetQuit()) { 3 4 /* 获取采集缓冲区 */ 5 if (Capture_get(hCapture, &hCapBuf) < 0 ) { 6 ERR( " Failed to get capture buffer\n " ); 7 cleanup(THREAD_FAILURE); 8 } 9 10 /* 获取显示缓冲区 */ 11 if (Display_get(hDisplay, &hDisBuf) < 0 ) { 12 ERR( " Failed to get display buffer\n " ); 13 cleanup(THREAD_FAILURE); 14 } 15 16 /* 叠加字幕 */ 17 if (envp-> osd) { 18 /* Get the current transparency */ 19 trans = UI_getTransparency(envp-> hUI); 20 21 if (trans != oldTrans) { 22 /* Change the transparency in the palette */ 23 for (i = 0; i < 4; i++ ) { 24 bConfigParams.palette[i][ 3] = trans; 25 } 26 27 /* Reconfigure the blending job if transparency has changed */ 28 if (Blend_config(hBlend, NULL, hBmpBuf, hCapBuf, hCapBuf, 29 &bConfigParams) < 0 ) { 30 ERR( " Failed to configure blending job\n " ); 31 cleanup(THREAD_FAILURE); 32 } 33 } 34 35 /* 36 * Because the whole screen is shown even if -r is used, 37 * reset the dimensions while Blending to make sure the OSD 38 * always ends up in the same place. After blending, restore 39 * the real dimensions. 40 */ 41 BufferGfx_getDimensions(hCapBuf, & srcDim); 42 BufferGfx_resetDimensions(hCapBuf); 43 44 /* 45 * Lock the screen making sure no changes are done to 46 * the bitmap while we render it. 47 */ 48 hBmpBuf = UI_lockScreen(envp-> hUI); 49 50 /* Execute the blending job to draw the OSD */ 51 /* 直接叠加在采集缓冲区的数据上 */ 52 if (Blend_execute(hBlend, hBmpBuf, hCapBuf, hCapBuf) < 0 ) { 53 ERR( " Failed to execute blending job\n " ); 54 cleanup(THREAD_FAILURE); 55 } 56 57 UI_unlockScreen(envp-> hUI); 58 59 BufferGfx_setDimensions(hCapBuf, & srcDim); 60 } 61 62 /* Color convert the captured buffer from 422Psemi to 420Psemi */ 63 /* 在进行H264编码前需要进行 422 到 420的颜色空间转换,hDstBuf是从视频编码缓冲区队列中得到的一个缓冲区 */ 64 if (Ccv_execute(hCcv, hCapBuf, hDstBuf) < 0 ) { 65 ERR( " Failed to execute color conversion job\n " ); 66 cleanup(THREAD_FAILURE); 67 } 68 69 /* Send color converted buffer to video thread for encoding */ 70 /* 转换后将这个缓冲区放回视频编码缓冲区队列中 */ 71 if (Fifo_put(envp->hOutFifo, hDstBuf) < 0 ) { 72 ERR( " Failed to send buffer to display thread\n " ); 73 cleanup(THREAD_FAILURE); 74 } 75 76 BufferGfx_resetDimensions(hCapBuf); 77 78 /* Send the preview to the display device driver */ 79 /* 将采集缓冲区放到显示缓冲区队列中 */ 80 if (Display_put(hDisplay, hCapBuf) < 0 ) { 81 ERR( " Failed to put display buffer\n " ); 82 cleanup(THREAD_FAILURE); 83 } 84 85 BufferGfx_resetDimensions(hDisBuf); 86 87 /* Return a buffer to the capture driver */ 88 /* 将显示缓冲区放到采集缓冲区队列中 */ 89 if (Capture_put(hCapture, hDisBuf) < 0 ) { 90 ERR( " Failed to put capture buffer\n " ); 91 cleanup(THREAD_FAILURE); 92 } 93 94 /* Incremement statistics for the user interface */ 95 /* 帧计数加1 */ 96 gblIncFrames(); 97 98 /* Get a buffer from the video thread */ 99 /* 从视频编码缓冲区队列中得到一个缓冲区,用于下一次颜色空间转换使用 */ 100 fifoRet = Fifo_get(envp->hInFifo, & hDstBuf); 101 102 if (fifoRet < 0 ) { 103 ERR( " Failed to get buffer from video thread\n " ); 104 cleanup(THREAD_FAILURE); 105 } 106 107 /* Did the video thread flush the fifo? */ 108 if (fifoRet == Dmai_EFLUSH) { 109 cleanup(THREAD_SUCCESS); 110 } 111 }
复制代码


到此为止,已经可以知道了数据是从哪里来到哪里去了,但是数据来了,肯定没那么容易就放它走,下一章将会讲到将采集到的数据如何编码并且保存。再加点预告,后面会讲到将编码后的数据通过live555发送出去,实现rtsp视频服务器。

你可能感兴趣的:(学习TI DVSDK过程记录(一):视频数据从哪里来到哪里去 2012-08-18 15:01:14)