SpringMVC(4)数据绑定-1
在SpringMVC(3)URL请求到Action的映射规则我们介绍了请求是如何映射到一个action上的,下一步当然是如何获取到请求中的数据,这就引出了本篇所要讲的内容—数据绑定。
首先看一下都有哪些绑定数据的注解:
1.@RequestParam,绑定单个请求数据,可以是URL中的数据,表单提交的数据或上传的文件;
2.@PathVariable,绑定URL模板变量值;
3.@CookieValue,绑定Cookie数据;
4.@RequestHeader,绑定请求头数据;
5.@ModelAttribute,绑定数据到Model;
6.@SessionAttributes,绑定数据到Session;
7.@RequestBody,用来处理Content-Type不是application/x-www-form-urlencoded编码的内容,例如application/json, application/xml等;
8.@RequestPart,绑定“multipart/data”数据,并可以根据数据类型进项对象转换;
下面我们来看如何使用:
1.@RequestParam:
为了验证文件绑定我们需要先做以下工作:
a.把commons-fileupload-1.3.1.jar和commons-io-2.4.jar两个jar包添加到我们项目。
b.配置我们项目中的springservlet-config.xml文件使之支持文件上传,内容如下:
<!-- 支持上传文件 -->
<bean id="multipartResolver" class="org.springframework.web.multipart.commons.CommonsMultipartResolver">
    <!-- 设置上传文件的最大尺寸为1MB -->
    <property name="maxUploadSize">
        <value>1048576</value>
    </property>
    <property name="defaultEncoding">
        <value>UTF-8</value>
    </property>
</bean>
其中maxUploadSize用于限制上传文件的最大大小,也可以不做设置,这样就代表上传文件的大小木有限制。defaultEncoding用于设置上传文件的编码格式,用于解决上传的文件中文名乱码问题。
下面就看具体如何使用:
添加一个DataBindController,里面有2个paramBind的action分别对应get和post请求:
package com.demo.web.controllers; import javax.servlet.http.HttpServletRequest; import org.springframework.stereotype.Controller; import org.springframework.web.bind.ServletRequestUtils; import org.springframework.web.bind.annotation.RequestMapping; import org.springframework.web.bind.annotation.RequestMethod; import org.springframework.web.bind.annotation.RequestParam; import org.springframework.web.multipart.MultipartFile; import org.springframework.web.multipart.MultipartHttpServletRequest; import org.springframework.web.servlet.ModelAndView; @Controller @RequestMapping(value = "/databind") public class DataBindController { @RequestMapping(value="/parambind", method = {RequestMethod.GET}) public ModelAndView paramBind(){ ModelAndView modelAndView = new ModelAndView(); modelAndView.setViewName("parambind"); return modelAndView; } @RequestMapping(value="/parambind", method = {RequestMethod.POST}) public ModelAndView paramBind(HttpServletRequest request, @RequestParam("urlParam") String urlParam, @RequestParam("formParam") String formParam, @RequestParam("formFile") MultipartFile formFile){ //如果不用注解自动绑定,我们还可以像下面一样手动获取数据
         String urlParam1 = ServletRequestUtils.getStringParameter(request, "urlParam", null); String formParam1 = ServletRequestUtils.getStringParameter(request, "formParam", null); MultipartFile formFile1 = ((MultipartHttpServletRequest) request).getFile("formFile"); ModelAndView modelAndView = new ModelAndView(); modelAndView.addObject("urlParam", urlParam); modelAndView.addObject("formParam", formParam); modelAndView.addObject("formFileName", formFile.getOriginalFilename()); modelAndView.addObject("urlParam1", urlParam1); modelAndView.addObject("formParam1", formParam1); modelAndView.addObject("formFileName1", formFile1.getOriginalFilename()); modelAndView.setViewName("parambindresult"); return modelAndView; } }
在views文件夹中添加parambind.jsp和parambindresult.jsp两个视图,内容分别如下:
<%@ page language="java" contentType="text/html; charset=UTF-8" pageEncoding="UTF-8"%>
<!DOCTYPE html PUBLIC "-//W3C//DTD HTML 4.01 Transitional//EN" "http://www.w3.org/TR/html4/loose.dtd">
<html>
<head>
<meta http-equiv="Content-Type" content="text/html; charset=UTF-8">
<title>Insert title here</title>
</head>
<body>
    <form action="parambind?urlParam=AAA" method="post" enctype="multipart/form-data">
        <input type="text" name="formParam" /><br/>
        <input type="file" name="formFile" /><br/>
        <input type="submit" value="Submit" />
    </form>
</body>
</html>
<%@ page language="java" contentType="text/html; charset=UTF-8" pageEncoding="UTF-8"%>
<!DOCTYPE html PUBLIC "-//W3C//DTD HTML 4.01 Transitional//EN" "http://www.w3.org/TR/html4/loose.dtd">
<html>
<head>
<meta http-equiv="Content-Type" content="text/html; charset=UTF-8">
<title>Insert title here</title>
</head>
<body> 自动绑定数据:<br/><br/> ${urlParam}<br/> ${formParam}<br/> ${formFileName}<br/><br/><br/><br/> 手动获取数据:<br/><br/> ${urlParam1}<br/> ${formParam1}<br/> ${formFileName1}<br/>
</body>
</html>
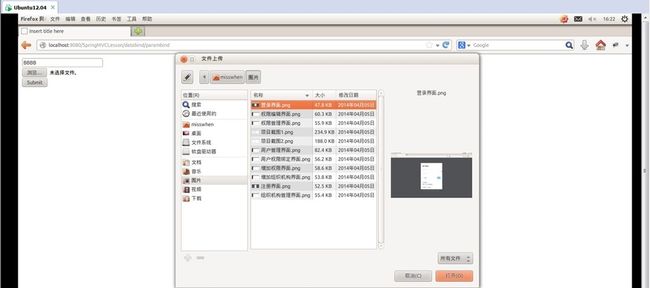
运行项目,输入内容,选择上传文件:
提交查看结果:
可以看到绑定的数据已经获取到了。
上面我们演示了如何把数据绑定到单个变量,但在实际应用中我们通常需要获取的是model对象,别担心,我们不需要把数据绑定到一个个变量然后在对model赋值,只需要把model加入相应的action参数(这里不需要指定绑定数据的注解)Spring MVC会自动进行数据转换并绑定到model对象上,一切就是这么简单。测试如下:
添加一个AccountModel类作为测试的model:
package com.demo.web.models; public class AccountModel { private String username; private String password; public void setUsername(String username){ this.username=username; } public void setPassword(String password){ this.password=password; } public String getUsername(){ return this.username; } public String getPassword(){ return this.password; } }
在DataBindController里面添加2个modelAutoBind的action分别对应get和post请求:
@RequestMapping(value="/modelautobind", method = {RequestMethod.GET}) public String modelAutoBind(HttpServletRequest request, Model model){ model.addAttribute("accountmodel", new AccountModel()); return "modelautobind"; } @RequestMapping(value="/modelautobind", method = {RequestMethod.POST}) public String modelAutoBind(HttpServletRequest request, Model model, AccountModel accountModel){ model.addAttribute("accountmodel", accountModel); return "modelautobindresult"; }
在views文件夹中添加modelautobind.jsp和modelautobindresult.jsp 2个视图用于提交数据和展示提交的数据:
modelautobind.jsp:
<%@ page language="java" contentType="text/html; charset=UTF-8" pageEncoding="UTF-8"%>
<!DOCTYPE html PUBLIC "-//W3C//DTD HTML 4.01 Transitional//EN" "http://www.w3.org/TR/html4/loose.dtd">

<%@ taglib prefix="form" uri="http://www.springframework.org/tags/form" %>

<html>
<head>
<meta http-equiv="Content-Type" content="text/html; charset=UTF-8">
<title>Insert title here</title>
</head>
<body>
    <form:form modelAttribute="accountmodel" method="post"> 用户名:<form:input path="username"/><br/> 密 码:<form:password path="password"/><br/>
        <input type="submit" value="Submit" />
    </form:form>
</body>
</html>
modelautobindresult.jsp :
<%@ page language="java" contentType="text/html; charset=UTF-8" pageEncoding="UTF-8"%>
<!DOCTYPE html PUBLIC "-//W3C//DTD HTML 4.01 Transitional//EN" "http://www.w3.org/TR/html4/loose.dtd">
<html>
<head>
<meta http-equiv="Content-Type" content="text/html; charset=UTF-8">
<title>Insert title here</title>
</head>
<body> 用户名:${accountmodel.username}<br/> 密 码:${accountmodel.password} </body>
</html>
运行测试:
用户名 输入AAA 密码 输入BBB,提交:
可以看到结果显示正确,说明自动绑定成功。
注:
1.关于@RequestParam的参数,这是一个@RequestParam的完整写法@RequestParam(value="username", required=true, defaultValue="AAA")。
value表示要绑定请求中参数的名字;
required表示请求中是否必须有这个参数,默认为true这是如果请求中没有要绑定的参数则返回404;
defaultValue表示如果请求中指定的参数值为空时的默认值;
要绑定的参数如果是值类型必须要有值否则抛异常,如果是引用类型则默认为null(Boolean除外,默认为false);
2.在刚才添加的2个action中可以看到返回类型和以前的不一样了由ModelAndView变成了String,这是由于Spring MVC 提供Model、ModelMap、Map让我们可以直接添加渲染视图需要的模型数据,在返回时直接指定对应视图名称就可以了。同时Map是继承于ModelMap的,而Model和ModelMap是继承于ExtendedModelMap的。
3.在刚才添加的视图modelautobind.jsp中可以看到<form:form、<form:input 等标签,这是Spring MVC提供的表单标签,借助于这些标签我们可以很方便的把模型数据绑定到表单上面(当然你也可以选择继续使用原生的HTML表单标签),要使用Spring MVC只要在视图中添加引用 <%@ taglib prefix="form" uri="http://www.springframework.org/tags/form" %>即可,关于Spring MVC表单标签的具体内容会在以后的文章中作介绍。


