11g RAC完全安装图解(VM Workstation8.0+Centos5.5)01-Grid安装
Created By Cryking 转载请注明出处,谢谢
环境:
VMware Workstation8.0 +Centos 5.5(32位)+Oracle 11.2.0.1.0
两个节点crydb01(节点1)和crydb02(节点2)
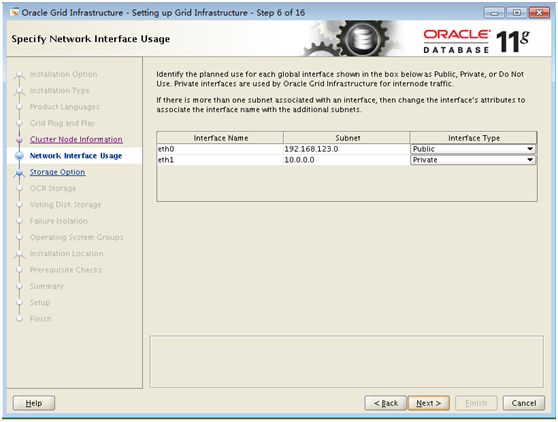
一、设置主机名及 网络环境配置
在节点1上:
设置主机名
# hostname crydb01
# vi /etc/sysconfig/network
NETWORKING=yes
NETWORKING_IPV6=yes
HOSTNAME=crydb01
GATEWAY=192.168.123.1
# vi /etc/hosts
127.0.0.1 localhost.localdomain localhost
#Public IP
192.168.123.109 crydb01
192.168.123.108 crydb02
#Private IP
10.0.0.100 crydb01-pri
10.0.0.101 crydb02-pri
#VIP
192.168.123.209 crydb01-vip
192.168.123.208 crydb02-vip
#scan-ip
192.168.123.200 crydb-scan
::1 localhost6.localdomain6 localhost6
# vi /etc/sysconfig/network-scripts/ifcfg-eth0
DEVICE=eth0
BOOTPROTO=static
ONBOOT=yes
IPADDR=192.168.123.109
NETMASK=255.255.255.0
GATEWAY=192.168.123.1
HWADDR=00:0c:29:6c:59:9c节点1的虚拟机添加网卡:
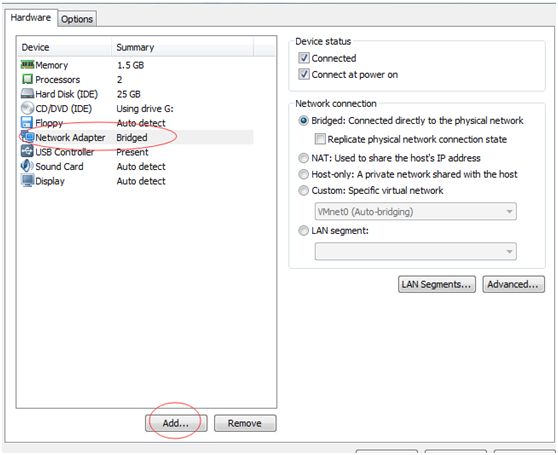

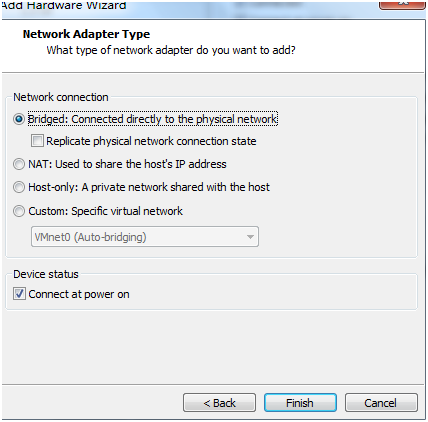
添加完网卡后重启系统并设置eth1的ip:
# reboot
# vi /etc/sysconfig/network-scripts/ifcfg-eth1
DEVICE=eth1
BOOTPROTO=static
ONBOOT=yes
IPADDR=10.0.0.100
NETMASK=255.255.255.0
HWADDR=00:0c:29:6c:59:a6
# service network restart
在节点2上:
# hostname crydb02
# vi /etc/sysconfig/network
NETWORKING=yes
NETWORKING_IPV6=yes
HOSTNAME=crydb02
GATEWAY=192.168.123.1

# vi /etc/hosts
127.0.0.1               localhost.localdomain localhost
#Public IP
192.168.123.109 crydb01
192.168.123.108 crydb02
#Private IP
10.0.0.100      crydb01-pri
10.0.0.101      crydb02-pri
#VIP
192.168.123.209 crydb01-vip
192.168.123.208 crydb02-vip
#scan-ip
192.168.123.200 scan
::1             localhost6.localdomain6 localhost6

# vi /etc/sysconfig/network-scripts/ifcfg-eth0
DEVICE=eth0
BOOTPROTO=static
ONBOOT=yes
IPADDR=192.168.123.108
NETMASK=255.255.255.0
GATEWAY=192.168.123.1
HWADDR=00:0c:29:6c:59:9c
重复上面的添加网卡过程,然后重启系统,然后:
# vi /etc/sysconfig/network-scripts/ifcfg-eth1
DEVICE=eth1
BOOTPROTO=static
ONBOOT=yes
IPADDR=10.0.0.101
NETMASK=255.255.255.0
HWADDR=00:0c:29:85:3b:3f
二、 用户及用户组设置
分别在两个节点上以root用户进行如下操作:
# groupadd -g 500 oinstall
# groupadd -g 501 dba
# groupadd -g 1020 asmadmin
# groupadd -g 1022 asmoper
# groupadd -g 1021 asmdba
# useradd -u 1100 -g oinstall -G dba,asmadmin,asmdba,asmoper -d /home/grid -s /bin/bash grid
# useradd -u 1101 -g oinstall -G dba,asmdba -d /home/oracle -s /bin/bash oracle
# passwd grid
# passwd oracle
# mkdir -p /u01/app/11.2.0/grid
# mkdir -p /u01/app/grid
# mkdir -p /u01/app/oracle
# chown grid:oinstall /u01/app/11.2.0/grid
# chown grid:oinstall /u01/app/grid
# chown oracle:oinstall /u01/app/oracle
# chmod -R 775 /u01/
三、配置用户SSH等效性
先配置Oracle用户SSH等效性.
在节点1上:
[oracle@crydb01 ~]$ su - oracle
[oracle@crydb01 ~]$ mkdir ./ssh
[oracle@crydb01 ~]$ chmod 700 ./ssh
[oracle@crydb01 ~]$ /usr/bin/ssh-keygen -t rsa
Generating public/private rsa key pair.
Enter file in which to save the key (/home/oracle/.ssh/id_rsa):
Created directory '/home/oracle/.ssh'.
Enter passphrase (empty for no passphrase):
Enter same passphrase again:
Your identification has been saved in /home/oracle/.ssh/id_rsa.
Your public key has been saved in /home/oracle/.ssh/id_rsa.pub.
The key fingerprint is:
d1:85:66:a2:78:65:8c:db:81:f6:90:52:21:4b:b2:6b oracle@crydb01
[oracle@crydb01 ~]$ /usr/bin/ssh-keygen -t dsa
Generating public/private dsa key pair.
Enter file in which to save the key (/home/oracle/.ssh/id_dsa):
Enter passphrase (empty for no passphrase):
Enter same passphrase again:
Your identification has been saved in /home/oracle/.ssh/id_dsa.
Your public key has been saved in /home/oracle/.ssh/id_dsa.pub.
The key fingerprint is:
0f:10:50:57:c5:2f:06:b2:61:52:5a:61:5b:18:9c:1d oracle@crydb01
[oracle@crydb01 ssh]$ cat ~/.ssh/id_rsa.pub >>~/.ssh/authorized_keys
[oracle@crydb01 ssh]$ cat ~/.ssh/id_dsa.pub >>~/.ssh/authorized_keys
[oracle@crydb01 ~]$ chmod 600 ~/.ssh/authorized_keys
在节点2上进行同样操作:
[root@crydb02 ~]# su - oracle
[oracle@crydb02 ~]$ mkdir ./ssh
[oracle@crydb02 ~]$ chmod 700 ./ssh
[oracle@crydb02 ~]$ /usr/bin/ssh-keygen -t rsa
Generating public/private rsa key pair.
Enter file in which to save the key (/home/oracle/.ssh/id_rsa):
/home/oracle/.ssh/id_rsa already exists.
Overwrite (y/n)? y
Enter passphrase (empty for no passphrase):
Enter same passphrase again:
Your identification has been saved in /home/oracle/.ssh/id_rsa.
Your public key has been saved in /home/oracle/.ssh/id_rsa.pub.
The key fingerprint is:
ff:6b:3e:b5:39:80:2b:37:88:d6:fe:cf:c6:b5:3b:ec oracle@crydb02
[oracle@crydb02 ~]$ /usr/bin/ssh-keygen -t dsa
Generating public/private dsa key pair.
Enter file in which to save the key (/home/oracle/.ssh/id_dsa):
/home/oracle/.ssh/id_dsa already exists.
Overwrite (y/n)? y
Enter passphrase (empty for no passphrase):
Enter same passphrase again:
Your identification has been saved in /home/oracle/.ssh/id_dsa.
Your public key has been saved in /home/oracle/.ssh/id_dsa.pub.
The key fingerprint is:
aa:b8:46:02:60:aa:83:72:df:43:d1:1a:b6:56:a9:14 oracle@crydb02
再回到节点1上:
[oracle@crydb01 ~]$ cat ~/.ssh/id_rsa.pub >>~/.ssh/authorized_keys
[oracle@crydb01 ~]$ cat ~/.ssh/id_dsa.pub >>~/.ssh/authorized_keys
[oracle@crydb01 ssh]$ ssh crydb02 cat ~/.ssh/id_rsa.pub >>~/.ssh/authorized_keys
oracle@crydb02's password: [oracle@crydb01 ssh]$ ssh crydb02 cat ~/.ssh/id_dsa.pub >>~/.ssh/authorized_keys oracle@crydb02's password:
[oracle@crydb01 ssh]$ scp ~/.ssh/authorized_keys crydb02:~/.ssh/authorized_keys
oracle@crydb02's password:
验证在节点2上:
[oracle@crydb02 ~]$ ssh crydb01 date
[oracle@crydb02 ~]$ ssh crydb02 date
在节点1上:
[oracle@crydb01 ~]$ ssh crydb01 date
[oracle@crydb01 ~]$ ssh crydb02 date
如果都不用输入密码则配置成功.
注意:如果确认已按上面的执行,但配置总是不成功的时候,请确保两个节点的/home/oracle的权限一致,或直接使用root在所有节点执行chmod -R 700 /home/oracle.
在grid用户下也重复进行上面的配置.
这样SSH用户等效性就配置完成了.
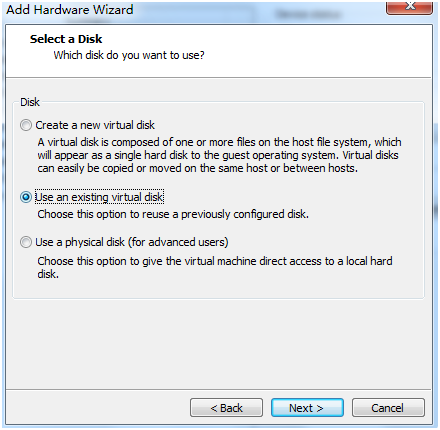
四、 创建共享磁盘
如图:
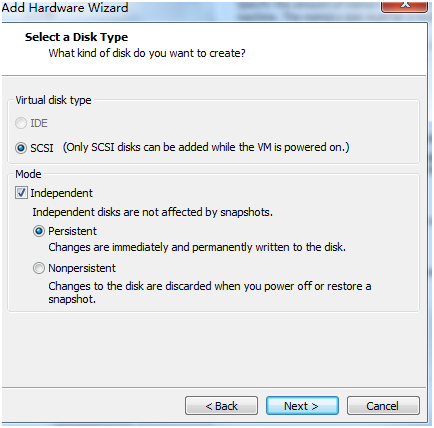
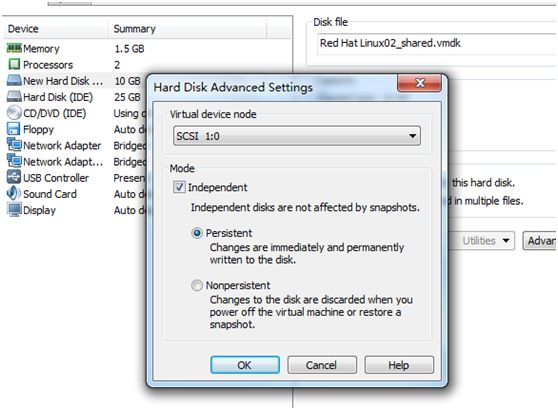
这里我只给了10G磁盘,勾选上立即分配所有空间,分配后点击增加的磁盘,在右边选择高级设置(Advanced),如下:
关闭节点1的系统
[root@crydb01 ~]# halt
编辑crydb01的虚拟机文件(*.vmx):
新增的磁盘内容如下:
…
scsi1.present = “TRUE”
scsi1:0.present = “TRUE”
scsi1:0.fileName = “Red Hat Linux02_shared.vmdk”
scsi1:0.mode = “independent-persistent”
scsi1:0.redo = “”
在最后加上:
diskLib.dataCacheMaxSize=0
diskLib.dataCacheMaxReadAheadSize=0
diskLib.dataCacheMinReadAheadSize=0
diskLib.dataCachePageSize=4096
diskLib.maxUnsyncedWrites="0"

disk.locking="FALSE"
scsi1.sharedBus="virtual"
scsi1.virtualDev = "lsilogic"
启动节点1,发现没问题后再在节点2的虚拟机上进行如下操作:

这里注意选使用现有的虚拟磁盘

然后关闭节点2的虚拟机后,进行和节点1一样的磁盘高级设置:
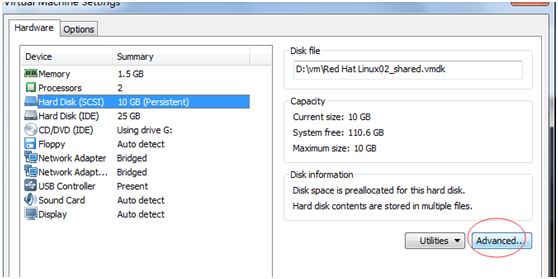

这里虚拟驱动代码要和节点1的保持一致.
然后编辑节点2的虚拟机文件(*.vmx),添加和节点1一样的内容.
期间发生一个问题,就是新增的SCSI盘系统总是无法认到,后来在vmx文件中添加这一行后就正常了:
scsi1.virtualDev = “lsilogic”
回到节点1,以root登录:
[root@crydb01 ~]# fdisk -l

Disk /dev/hda: 26.8 GB, 26843545600 bytes
255 heads, 63 sectors/track, 3263 cylinders
Units = cylinders of 16065 * 512 = 8225280 bytes

   Device Boot      Start         End      Blocks   Id  System
/dev/hda1   *           1          13      104391   83  Linux
/dev/hda2              14        1044     8281507+  83  Linux
/dev/hda3            1045        3002    15727635   83  Linux
/dev/hda4            3003        3263     2096482+   5  Extended
/dev/hda5            3003        3263     2096451   82  Linux swap / Solaris

Disk /dev/sda: 10.7 GB, 10737418240 bytes
255 heads, 63 sectors/track, 1305 cylinders
Units = cylinders of 16065 * 512 = 8225280 bytes

Disk /dev/sda doesn't contain a valid partition table
可以看到新加的磁盘/dev/sda,对它进行分区,如下:
[root@crydb01 ~]# fdisk /dev/sda
Device contains neither a valid DOS partition table, nor Sun, SGI or OSF disklabel
Building a new DOS disklabel. Changes will remain in memory only,
until you decide to write them. After that, of course, the previous
content won't be recoverable.


The number of cylinders for this disk is set to 1305. There is nothing wrong with that, but this is larger than 1024, and could in certain setups cause problems with: 1) software that runs at boot time (e.g., old versions of LILO) 2) booting and partitioning software from other OSs (e.g., DOS FDISK, OS/2 FDISK) Warning: invalid flag 0x0000 of partition table 4 will be corrected by w(rite) Command (m for help): n Command action e extended p primary partition (1-4) p Partition number (1-4): 1 First cylinder (1-1305, default 1): Using default value 1 Last cylinder or +size or +sizeM or +sizeK (1-1305, default 1305): Using default value 1305 Command (m for help): p Disk /dev/sda: 10.7 GB, 10737418240 bytes 255 heads, 63 sectors/track, 1305 cylinders Units = cylinders of 16065 * 512 = 8225280 bytes Device Boot Start End Blocks Id System /dev/sda1 1 1305 10482381 83 Linux Command (m for help): w The partition table has been altered! Calling ioctl() to re-read partition table. Syncing disks. [root@crydb01 rpm]# partprobe
再去到节点2上查看:
[root@crydb02 ~]# fdisk -l

Disk /dev/hda: 26.8 GB, 26843545600 bytes
255 heads, 63 sectors/track, 3263 cylinders
Units = cylinders of 16065 * 512 = 8225280 bytes

   Device Boot      Start         End      Blocks   Id  System
/dev/hda1   *           1          13      104391   83  Linux
/dev/hda2              14        1044     8281507+  83  Linux
/dev/hda3            1045        3002    15727635   83  Linux
/dev/hda4            3003        3263     2096482+   5  Extended
/dev/hda5            3003        3263     2096451   82  Linux swap / Solaris

Disk /dev/sda: 10.7 GB, 10737418240 bytes
255 heads, 63 sectors/track, 1305 cylinders
Units = cylinders of 16065 * 512 = 8225280 bytes

   Device Boot      Start         End      Blocks   Id  System
/dev/sda1               1        1305    10482381   83  Linux
说明已经成功建立共享磁盘.
五、 集群配置检查
如下检查响应的rpm包是否安装:
[root@crydb01 dev]# rpm -qa | grep -i binutils-2.*
binutils-2.17.50.0.6-14.el5
…
如果没有就需要安装.
安装11g RAC需要的依赖包列表(也可在Concept上去找):
    binutils-2.17.50.0.6
    compat-libstdc++-33-3.2.3
    compat-libstdc++-33-3.2.3 (32 bit)
    elfutils-libelf-0.125
    elfutils-libelf-devel-0.125
    elfutils-libelf-devel-static-0.125
    gcc-4.1.2
    gcc-c++-4.1.2
    glibc-2.5-24
    glibc-2.5-24 (32 bit)
    glibc-common-2.5
    glibc-devel-2.5
    glibc-devel-2.5 (32 bit)
    glibc-headers-2.5
    ksh-20060214
    libaio-0.3.106
    libaio-0.3.106 (32 bit)
    libaio-devel-0.3.106
    libaio-devel-0.3.106 (32 bit)
    libgcc-4.1.2
    libgcc-4.1.2 (32 bit)
    libstdc++-4.1.2
    libstdc++-4.1.2 (32 bit)
    libstdc++-devel 4.1.2
    make-3.81
    pdksh-5.2.14
    sysstat-7.0.2
    unixODBC-2.2.11
    unixODBC-2.2.11 (32 bit)
    unixODBC-devel-2.2.11
    unixODBC-devel-2.2.11 (32 bit)
在节点1上执行检查:
[root@crydb01 oracle]# su - grid
[grid@crydb01 grid]$ ./grid/runcluvfy.sh stage -pre crsinst -n crydb01,crydb02 -fixup -verbose
Performing pre-checks for cluster services setup

Checking node reachability...

Check: Node reachability from node "crydb01"
  Destination Node                      Reachable?
  ------------------------------------  ------------------------
  crydb01                               yes
  crydb02                               yes
Result: Node reachability check passed from node "crydb01"
...
仔细检查各个未通过的项目并解决.
注:如两个节点时间不同步,则可能出现
PRVF-5415 : Check to see if NTP daemon is running failed
在两个节点上启动ntpd服务: service ntpd start
如果还出现:
PRVF-5436 : The NTP daemon running on one or more nodes lacks the slewing option
则分别在两个节点上编辑文件如下(添加-x):
# vi /etc/sysconfig/ntpd
# Drop root to id 'ntp:ntp' by default. OPTIONS="-x -u ntp:ntp -p /var/run/ntpd.pid" # Set to 'yes' to sync hw clock after successful ntpdate SYNC_HWCLOCK=no # Additional options for ntpdate NTPDATE_OPTIONS=""
这里我有个Result: Swap space check failed,不用理它.
验证OS和硬件:
$ ./runcluvfy.sh stage -post hwos -n crydb01,crydb02 -verbose
...
Post-check for hardware and operating system setup was successful
六、用户环境配置
在两个节点上关闭防火墙:
/etc/rc.d/init.d/iptables stop
分别在两个节点上:
# su - grid
$ vi .bash_profile
# .bash_profile

# Get the aliases and functions
if [ -f ~/.bashrc ]; then
        . ~/.bashrc
fi
ORACLE_SID=+ASM1;export ORACLE_SID
GRID_BASE=/u01/app/grid;export GRID_BASE
ORACLE_BASE=$GRID_BASE;export ORACLE_BASE

GRID_HOME=/u01/app/11.2.0/grid; export GRID_HOME
ORACLE_HOME=$GRID_HOME;export ORACLE_HOME

NLS_DATE_FORMAT="YYYY-MM-DD HH24:MI:SS";export NLS_DATE_FORMAT

TNS_ADMIN=$GRID_HOME/network/admin;export TNS_ADMIN

CLASSPATH=$GRID_HOME/JRE
CLASSPATH=${CLASSPATH}:$GRID_HOME/jdbc/lib/ojdbc6.jar
CLASSPATH=${CLASSPATH}:$GRID_HOME/jlib
CLASSPATH=${CLASSPATH}:$GRID_HOME/rdbms/jlib
CLASSPATH=${CLASSPATH}:$GRID_HOME/network/jlib
export CLASSPATH

export TEMP=/tmp
export TMPDIR=/tmp
# User specific environment and startup programs

PATH=$GRID_HOME/bin:$PATH:$HOME/bin

export PATH

umask 022

:wq

$ su - oracle
$ vi .bash_profile
# Get the aliases and functions
if [ -f ~/.bashrc ]; then
        . ~/.bashrc
fi

# User specific environment and startup programs
ORACLE_UNQNAME=crydb;export ORACLE_UNQNAME
ORACLE_BASE=/u01/app/oracle;export ORACLE_BASE
ORACLE_SID=crydb01;export ORACLE_SID
ORACLE_HOME=$ORACLE_BASE/product/11.2.0/dbhome_1;export ORACLE_HOME
ORACLE_HOME_LISTNER=$ORACLE_HOME;export ORACLE_LISTNER
NLS_DATE_FORMAT="YYYY-MM-DD HH24:MI:SS"; export NLS_DATE_FORMAT
TNS_ADMIN=$ORACLE_HOME/network/admin;export TNS_ADMIN
ORACLE_TRACE=$ORACLE_BASE/diag/rdbms/$ORACLE_SID/$ORACLE_SID/trace;export ORACLE_TRACE
PATH=$ORACLE_HOME/bin:$PATH:$HOME/bin

export PATH

alias sqlplus='rlwrap sqlplus'

export TEMP=/tmp
export TMPDIR=/tmp
umask 022

:wq
设置资源限制,分别在两个节点下添加:
[root@crydb01 /]# vi /etc/security/limits.conf
# Oracle
oracle              soft    nproc   2047
oracle              hard    nproc   16384
oracle              soft    nofile  1024
oracle              hard    nofile  65536
oracle              soft    stack   10240
# Grid
grid              soft    nproc   2047
grid              hard    nproc   16384
grid              soft    nofile  1024
grid              hard    nofile  65536
grid              soft    stack   10240
在/etc/profile文件最后加上:
# Oracle
if [ $USER = "oracle" ]|| [ $USER = "grid" ]; then
if [ $SHELL = "/bin/ksh" ]; then
ulimit -p 16384
ulimit -n 65536
else
ulimit -u 16384 -n 65536
fi
umask 022
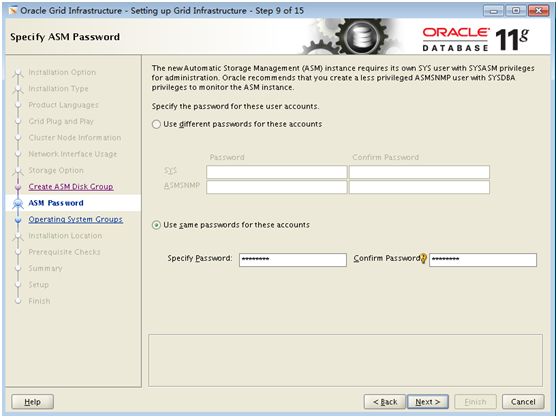
fi七、为ASM安装、配置ASMLib
提示:配置ASM不一定需要ASMLib,也可使用标准Linux I/O调用来管理裸设备.
用root在两个节点上执行:
[root@crydb01 ~]# rpm -Uvh oracleasm-2.6.18-194.el5-2.0.5-1.el5.i686.rpm \
> oracleasmlib-2.0.4-1.el5.i386.rpm \
> oracleasm-support-2.1.7-1.el5.i386.rpm
验证是否成功安装:
[root@crydb01 ~]# rpm -qa --queryformat "%{NAME}-%{VERSION}-%{RELEASE} (%{ARCH})\n"| grep oracleasm | sort
oracleasm-2.6.18-194.el5-2.0.5-1.el5 (i686)
oracleasmlib-2.0.4-1.el5 (i386)
oracleasm-support-2.1.7-1.el5 (i386)
配置ASMLib:
[root@crydb01 ~]# /usr/sbin/oracleasm configure -i
Configuring the Oracle ASM library driver.

This will configure the on-boot properties of the Oracle ASM library
driver.  The following questions will determine whether the driver is
loaded on boot and what permissions it will have.  The current values
will be shown in brackets ('[]').  Hitting <ENTER> without typing an
answer will keep that current value.  Ctrl-C will abort.

Default user to own the driver interface []: grid
Default group to own the driver interface []: asmadmin
Start Oracle ASM library driver on boot (y/n) [n]: y
Scan for Oracle ASM disks on boot (y/n) [y]: y
Writing Oracle ASM library driver configuration: done
[root@crydb01 ~]# /usr/sbin/oracleasm init
Creating /dev/oracleasm mount point: /dev/oracleasm
Loading module "oracleasm": oracleasm
Mounting ASMlib driver filesystem: /dev/oracleasm
创建ASM磁盘(只在节点1执行):
[root@crydb01 ~]# /usr/sbin/oracleasm createdisk DISK1 /dev/sda1
Writing disk header: done
Instantiating disk: done
在节点2上执行扫描磁盘:
[root@crydb02 ~]# /usr/sbin/oracleasm scandisks
Reloading disk partitions: done
Cleaning any stale ASM disks...
Scanning system for ASM disks...
Instantiating disk "DISK1"
查看下当前的ASM磁盘(分别在两个节点上执行):
[root@crydb01 ~]# /usr/sbin/oracleasm listdisks
DISK1
八、正式安装Grid
下面开始安装grid和ASM(只在节点1上执行):
在此之前需要保证X11远程显示正常(DISPLAY设置正确),我这里是直接使用的Xshell,不用配置
[grid@crydb01 ~]$ cd /home/grid/grid
[grid@crydb01 grid]$ ./runInstaller
Starting Oracle Universal Installer...

Checking Temp space: must be greater than 80 MB.   Actual 3283 MB    Passed
Checking swap space: must be greater than 150 MB.   Actual 2047 MB    Passed
Checking monitor: must be configured to display at least 256 colors.    Actual 16777216    Passed
Preparing to launch Oracle Universal Installer from /tmp/OraInstall2015-02-12_11-10-08PM. Please wait ...


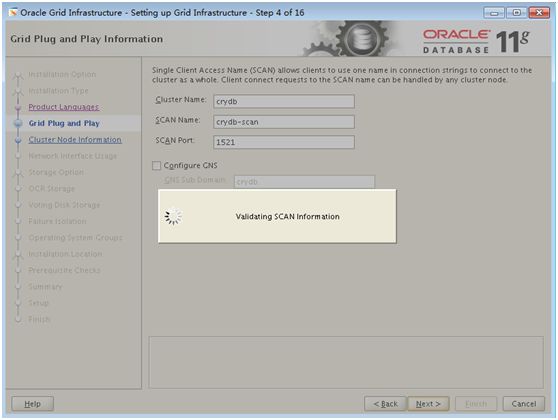
注意上图中的SCAN Name要和hosts中的一致
下面一步是添加节点并配置SSH的连通性:
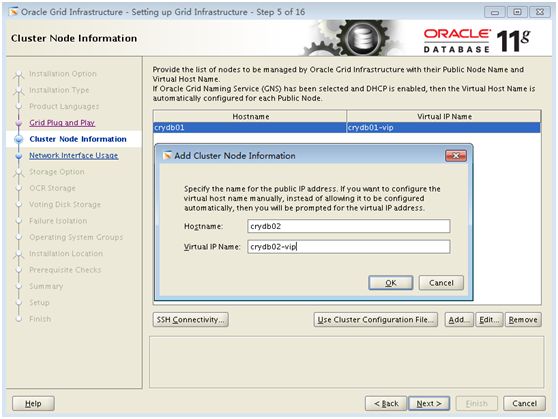
上图中点击”Setup”.

SSH连通性建立成功:

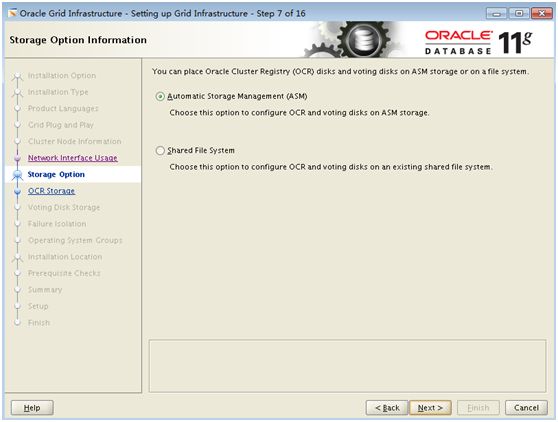
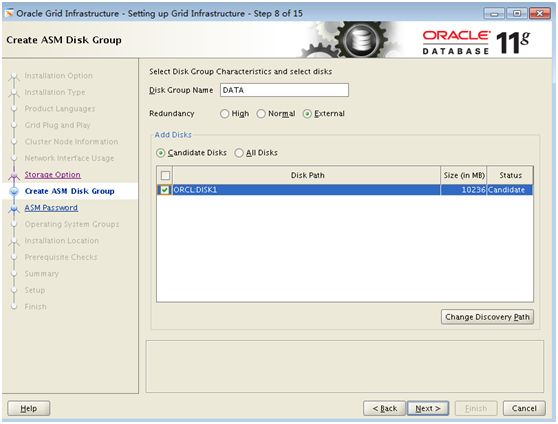
因为只创建了一块共享磁盘,所以选外部(External)
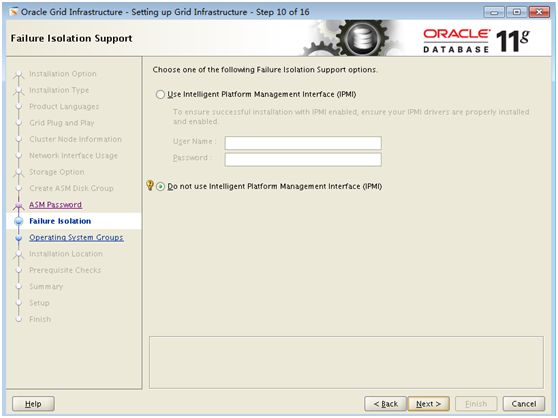
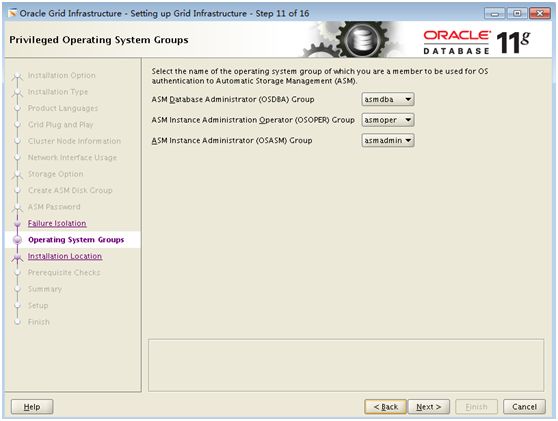
下面是先决条件检查:
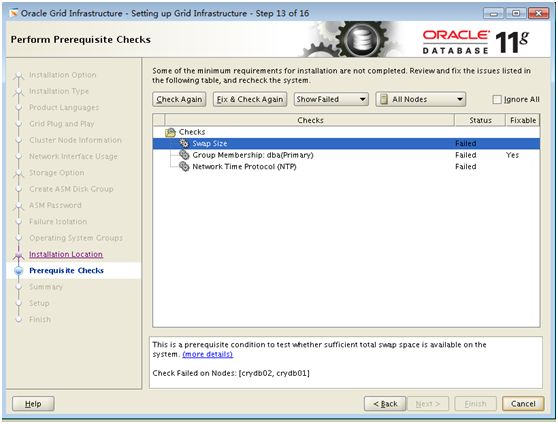
这里我的ntpd有问题,重启的时候报了:
ntpd: Synchronizing with time server: [FAILED]
后来发现是DNS配置(/etc/resolv.conf)有问题,改好后就正常了.
还有个错误(是dba组不是grid的主组导致),点击”Fix & Check Again”,找到修复脚本路径,以root登录执行下就可以了–文中上面的脚本已修改,应不会出现此错误了.
如我这里是:
[root@crydb01 ntp]# cd /tmp/CVU_11.2.0.1.0_grid/
[root@crydb01 CVU_11.2.0.1.0_grid]# ./runfixup.sh
Response file being used is :./fixup.response
Enable file being used is :./fixup.enable
Log file location: ./orarun.log
uid=1100(grid) gid=500(oinstall) groups=500(oinstall),501(dba),1020(asmadmin),1022(asmoper),1021(asmdba)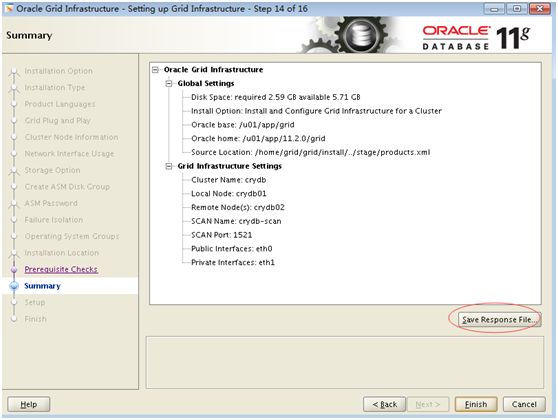
这里可以保存响应文件,方便后面做静默安装使用.
开始漫长的安装了…
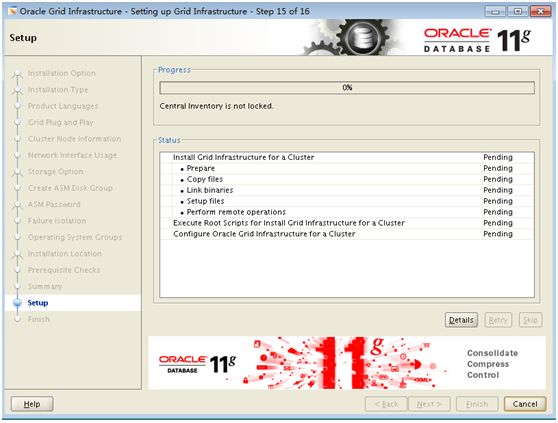
分别在节点1、2上以root执行图中提示的脚本:
[root@crydb01 CVU_11.2.0.1.0_grid]# cd /u01/app/11.2.0/grid/
[root@crydb01 grid]# ./root.sh
Running Oracle 11g root.sh script...

The following environment variables are set as: ORACLE_OWNER= grid ORACLE_HOME= /u01/app/11.2.0/grid Enter the full pathname of the local bin directory: [/usr/local/bin]: The file "dbhome" already exists in /usr/local/bin. Overwrite it? (y/n) [n]: y Copying dbhome to /usr/local/bin ... The file "oraenv" already exists in /usr/local/bin. Overwrite it? (y/n) [n]: y Copying oraenv to /usr/local/bin ... The file "coraenv" already exists in /usr/local/bin. Overwrite it? (y/n) [n]: y Copying coraenv to /usr/local/bin ... Entries will be added to the /etc/oratab file as needed by Database Configuration Assistant when a database is created Finished running generic part of root.sh script. Now product-specific root actions will be performed. 2015-02-13 00:38:49: Parsing the host name 2015-02-13 00:38:49: Checking for super user privileges 2015-02-13 00:38:49: User has super user privileges Using configuration parameter file: /u01/app/11.2.0/grid/crs/install/crsconfig_params Creating trace directory LOCAL ADD MODE Creating OCR keys for user 'root', privgrp 'root'.. Operation successful. root wallet root wallet cert root cert export peer wallet profile reader wallet pa wallet peer wallet keys pa wallet keys peer cert request pa cert request peer cert pa cert peer root cert TP profile reader root cert TP pa root cert TP peer pa cert TP pa peer cert TP profile reader pa cert TP profile reader peer cert TP peer user cert pa user cert Adding daemon to inittab CRS-4123: Oracle High Availability Services has been started. ohasd is starting ADVM/ACFS is not supported on centos-release-5-5.el5.centos CRS-2672: Attempting to start 'ora.gipcd' on 'crydb01' CRS-2672: Attempting to start 'ora.mdnsd' on 'crydb01' CRS-2676: Start of 'ora.gipcd' on 'crydb01' succeeded CRS-2676: Start of 'ora.mdnsd' on 'crydb01' succeeded CRS-2672: Attempting to start 'ora.gpnpd' on 'crydb01' CRS-2676: Start of 'ora.gpnpd' on 'crydb01' succeeded CRS-2672: Attempting to start 'ora.cssdmonitor' on 'crydb01' CRS-2676: Start of 'ora.cssdmonitor' on 'crydb01' succeeded CRS-2672: Attempting to start 'ora.cssd' on 'crydb01' CRS-2672: Attempting to start 'ora.diskmon' on 'crydb01' CRS-2676: Start of 'ora.diskmon' on 'crydb01' succeeded CRS-2676: Start of 'ora.cssd' on 'crydb01' succeeded CRS-2672: Attempting to start 'ora.ctssd' on 'crydb01' CRS-2676: Start of 'ora.ctssd' on 'crydb01' succeeded ASM created and started successfully. DiskGroup DATA created successfully. clscfg: -install mode specified Successfully accumulated necessary OCR keys. Creating OCR keys for user 'root', privgrp 'root'.. Operation successful. CRS-2672: Attempting to start 'ora.crsd' on 'crydb01' CRS-2676: Start of 'ora.crsd' on 'crydb01' succeeded CRS-4256: Updating the profile Successful addition of voting disk 23c34f816b8a4ffabf6414ab4123ef3d. Successfully replaced voting disk group with +DATA. CRS-4256: Updating the profile CRS-4266: Voting file(s) successfully replaced ## STATE File Universal Id File Name Disk group -- ----- ----------------- --------- --------- 1. ONLINE 23c34f816b8a4ffabf6414ab4123ef3d (ORCL:DISK1) [DATA] Located 1 voting disk(s). CRS-2673: Attempting to stop 'ora.crsd' on 'crydb01' CRS-2677: Stop of 'ora.crsd' on 'crydb01' succeeded CRS-2673: Attempting to stop 'ora.asm' on 'crydb01' CRS-2677: Stop of 'ora.asm' on 'crydb01' succeeded CRS-2673: Attempting to stop 'ora.ctssd' on 'crydb01' CRS-2677: Stop of 'ora.ctssd' on 'crydb01' succeeded CRS-2673: Attempting to stop 'ora.cssdmonitor' on 'crydb01' CRS-2677: Stop of 'ora.cssdmonitor' on 'crydb01' succeeded CRS-2673: Attempting to stop 'ora.cssd' on 'crydb01' CRS-2677: Stop of 'ora.cssd' on 'crydb01' succeeded CRS-2673: Attempting to stop 'ora.gpnpd' on 'crydb01' CRS-2677: Stop of 'ora.gpnpd' on 'crydb01' succeeded CRS-2673: Attempting to stop 'ora.gipcd' on 'crydb01' CRS-2677: Stop of 'ora.gipcd' on 'crydb01' succeeded CRS-2673: Attempting to stop 'ora.mdnsd' on 'crydb01' CRS-2677: Stop of 'ora.mdnsd' on 'crydb01' succeeded CRS-2672: Attempting to start 'ora.mdnsd' on 'crydb01' CRS-2676: Start of 'ora.mdnsd' on 'crydb01' succeeded CRS-2672: Attempting to start 'ora.gipcd' on 'crydb01' CRS-2676: Start of 'ora.gipcd' on 'crydb01' succeeded CRS-2672: Attempting to start 'ora.gpnpd' on 'crydb01' CRS-2676: Start of 'ora.gpnpd' on 'crydb01' succeeded CRS-2672: Attempting to start 'ora.cssdmonitor' on 'crydb01' CRS-2676: Start of 'ora.cssdmonitor' on 'crydb01' succeeded CRS-2672: Attempting to start 'ora.cssd' on 'crydb01' CRS-2672: Attempting to start 'ora.diskmon' on 'crydb01' CRS-2676: Start of 'ora.diskmon' on 'crydb01' succeeded CRS-2676: Start of 'ora.cssd' on 'crydb01' succeeded CRS-2672: Attempting to start 'ora.ctssd' on 'crydb01' CRS-2676: Start of 'ora.ctssd' on 'crydb01' succeeded CRS-2672: Attempting to start 'ora.asm' on 'crydb01' CRS-2676: Start of 'ora.asm' on 'crydb01' succeeded CRS-2672: Attempting to start 'ora.crsd' on 'crydb01' CRS-2676: Start of 'ora.crsd' on 'crydb01' succeeded CRS-2672: Attempting to start 'ora.evmd' on 'crydb01' CRS-2676: Start of 'ora.evmd' on 'crydb01' succeeded CRS-2672: Attempting to start 'ora.asm' on 'crydb01' CRS-2676: Start of 'ora.asm' on 'crydb01' succeeded CRS-2672: Attempting to start 'ora.DATA.dg' on 'crydb01' CRS-2676: Start of 'ora.DATA.dg' on 'crydb01' succeeded crydb01 2015/02/13 00:46:02 /u01/app/11.2.0/grid/cdata/crydb01/backup_20150213_004602.olr Configure Oracle Grid Infrastructure for a Cluster ... succeeded Updating inventory properties for clusterware Starting Oracle Universal Installer... Checking swap space: must be greater than 500 MB. Actual 2047 MB Passed The inventory pointer is located at /etc/oraInst.loc The inventory is located at /u01/app/oraInventory 'UpdateNodeList' was successful.
在最后出现了这个错误:
查看日志:
...
INFO: ERROR:
INFO: PRVF-4664 : Found inconsistent name resolution entries for SCAN name "crydb-scan"
INFO: ERROR:
INFO: PRVF-4657 : Name resolution setup check for "crydb-scan" (IP address: 192.168.123.200) failed
INFO: ERROR:
INFO: PRVF-4664 : Found inconsistent name resolution entries for SCAN name "crydb-scan"
INFO: Verification of SCAN VIP and Listener setup failed
...
看来是scan-ip解析的问题.原因可能是使用了hosts解析scan-ip而不是使用oracle推荐的DNS或GNS;或者配置了DNS但nslookup crydb-scan不通.
由于我这里在两个节点上ping crydb-scan是通的:
[root@crydb01 grid]# ping crydb-scan
PING crydb-scan (192.168.123.200) 56(84) bytes of data.
64 bytes from crydb-scan (192.168.123.200): icmp_seq=1 ttl=64 time=0.025 ms
64 bytes from crydb-scan (192.168.123.200): icmp_seq=2 ttl=64 time=0.018 ms
...
故可忽略此错误.
至此11g Grid安装完成:
九、安装Grid后的检查和脚本备份
安装完成后,检查crs(Cluster Ready Services)状态:
[grid@crydb01 ~]$ crsctl check crs
CRS-4638: Oracle High Availability Services is online
CRS-4537: Cluster Ready Services is online
CRS-4529: Cluster Synchronization Services is online
CRS-4533: Event Manager is online
查看集群节点:
[grid@crydb01 ~]$ olsnodes -n
crydb01 1
crydb02 2
查看ASM运行状态:
[grid@crydb01 ~]$ srvctl status asm -a
ASM is running on crydb01,crydb02
ASM is enabled.
检查OCR(Oracle Cluster Registry):
[grid@crydb01 ~]$ ocrcheck
Status of Oracle Cluster Registry is as follows :
     Version                  :          3
     Total space (kbytes)     :     262120
     Used space (kbytes)      :       2252
     Available space (kbytes) :     259868
     ID                       :  677623650
     Device/File Name         :      +DATA
                                    Device/File integrity check succeeded

                                    Device/File not configured

                                    Device/File not configured

                                    Device/File not configured

                                    Device/File not configured

     Cluster registry integrity check succeeded

     Logical corruption check bypassed due to non-privileged user
检查表决磁盘:
[grid@crydb01 ~]$ crsctl query css votedisk
##  STATE    File Universal Id                File Name Disk group
--  -----    -----------------                --------- ---------
 1. ONLINE   23c34f816b8a4ffabf6414ab4123ef3d (ORCL:DISK1) [DATA]
Located 1 voting disk(s).
一切正常.
备份root.sh脚本:
[root@crydb01 ~]# cp /u01/app/11.2.0/grid/root.sh ~/root.sh.crydb01.150213
[root@crydb02 ~]# cp /u01/app/11.2.0/grid/root.sh ~/root.sh.crydb02.150213
至此,Grid安装全部完成,下一篇将在此基础上安装Oracle数据库.