VxWorks设备驱动入门示例程序Hello Wold
VxWorks的设备驱动程序就靠着三张表来维护:我把它们叫做 Fd Table、Dev Table、Drv Table,分别表示文件描述符表、设备列表、驱动程序表。用英文表示是想说明这些表的名字与我们使用设备驱动程序时的关系:想一想,我们在调用设备驱动程序时,一般是用open、read、write、ioctl函数,调用这些函数的时候都要使用一个句柄即文件描述符,这便是fd Table即文件描述符表。文件描述符表中都有什么东西呢?可以在终端模式下用命令iosFdShow函数来查看已经使用的文件描述符内容:
->iosFdShow
fd name drv
3 /pcConsole/0 2
4 /vio/1 7
从上面的结果可以看到,Fd Table中包含有句柄号(fd),对应的设备名称(name),驱动号(drv),就是这样一个简单的表联系着另外两个重要的表:Dev Table和Drv table。
dev tabel中维护者系统中所有的设备,在命令行中敲入devs便可以查看dev Table的内容了,就是设备列表了:
->devs
drv name
0 /null
1 /tyCo/0
1 /tyCo/1
2 /pcConsole/0
2 /pcConsole/1
4 /ata0a
6 host:
7 /vio
8 /ghDev
9 xxdev
从结果中可以看到,dev table中包含两个内容:一个是驱动号(drv),一个是设备名称(name),仔细对比上面的dev tabel和fd table就可以发现,这两个表中设备名称和驱动号是对应着的。
然后再看看Drv table ,这个表叫做驱动程序表,顾名思义,这个表中维护者我们所有的驱动程序,同样,我们先在命令行里查看一下它的内容吧
-> iosDrvShow
drv create delete open close read write ioctl
1 388660 0 388660 3886a0 388eb0 388da0 3886e0
2 30bae0 0 30bae0 0 388eb0 388da0 30baf0
3 0 0 384040 3840a0 3840d0 384120 384240
4 36d3f0 36d7f0 36d030 36d490 36e180 36e1f0 36eb60
5 0 0 0 33e970 33f8b0 33f2d0 356ec0
6 348e80 349380 3499e0 349ec0 34c2f0 34c640 34c870
7 3918c0 0 3918c0 3919a0 388eb0 388da0 391a40
8 318620 0 318620 3186e0 318650 318680 3186b0
9 318840 318850 318870 3188a0 318900 318930 3188d0
从上面的表中可以看到驱动号(drv)和七个函数,他们是什么意思呢?驱动号是驱动程序的一个索引号,这个索引将三张表联系起来,任何一张表都能够通过这个索引找到彼此;Drv table后面有七个驱动函数,下面所列的数字是这些函数的地址。、
说了这么多,我们就从open说起这个驱动程序是怎么运行的吧
我们一般是这样开始打开设备的:
int fd
fd=open("/ghDev",O_RDWR,0)
read(fd,buf,sizeof(buf))
这个open怎么运行的呢?
open的第一个参数是一个设备名,系统就会首先在dev Table设备列表中寻找该设备名"/ghDev",找到之后就知道了这个设备的驱动号8,8号设备找到了怎么执行相应的open函数呢,这时候系统找到Drv table中与8号对应的驱动程序们的地址,找到与open对应的函数的入口地址318620,便将程序跳转至318620处执行。执行完后为这个已经open成功的8号设备"/ghDev"分配一个fd,并添加到fd table中去,便于应用程序继续使用该设备。在执行完open之后,接着就要对设备进行各种read\write操作,同样在drv tabel中找到相应的入口函数执行。
说到这里,入门新人可能要问了,两个疑问:
1、怎样把我的open函数、wrie函数等加到Drv Table中去呢?
2、怎么让系统把我自己的设备也列入到dev table设备列表中呢?
答案就是两个函数:iosDrvInstall()、iosDevAdd()。
iosDrvInstall()实现将驱动程序的入口点填入到驱动程序表中,其原型如下:
Int iosDrvInstall( FUNCPTR pCreate, FUNCPTR pDelete, FUNCPTR pOpen, FUNCPTR pClose, FUNCPTR pRead, FUNCPTR pWrite, FUNCPTR pIoctl )
可以看到这个iosDrvInstall正好有七个参数,分别是我们七个驱动程序的函数指针。所以把七个驱动函数写好后,用iosDrvInstall函数就可以实现把它们安装到Drv Table了。通常creat函数和open函数相同,也可以空着不写。
这个iosDrvInstall函数有一个返回值非常重要,他就是传说中的驱动号,系统就靠它维护所有设备了。
iosDevAdd()函数作用就是将设备添加到设备列表中,说白了就是你在命令行中敲入devs时,能够把你自己的设备也列上去。
怎么用这个函数呢?先看看这个函数的原型吧:
STATUS iosDevAdd
(
DEV_HDR *pDevHdr, /* pointer to device's structure */
char *name, /* name of device */
int drvnum /* no. of servicing driver, */
/* returned by iosDrvInstall() */
)
这个函数有三个参数,第一个,要求设备描述的数据结构必须以DEV_HDR结构形式的结构体开头,用于插入系统设备的链表。name任意,就是我们devs时看到的设备名,drvnum是前面iosDrvInstall的返回值,系统通过这个返回值来确定访问设备时调用哪个驱动。
这里比较难理解的就是DEV_HDR,这是VxWorks系统定义的一个结构体类型数据结构:
Typedef struct{
DL_NODE node;
Short drvnum;
Char *name;
}DEV_HDR;
里面的node是一个双向链表,便于系统维护所有设备,drvnum和name与iosDevAdd的两个drvnum和name对应。
说了这么一堆,可能越往后越迷糊了,那就上例子吧,hello world!
/***************************************************
This is a VxWorks device driver programe ,
usded for test and learn how to programe a driver
create by GH,23,Jun,2012 CAPE,AVIC
***/
#include "vxworks.h"
#include "tasklib.h"
#include "syslib.h"
#include "config.h"
#include "vmlib.h"

STATUS ghDrv(int arg);
STATUS ghDevCreate(char *devName,int arg);
int ghOpen(void);
int ghRead(void);
int ghWrite(void);
int ghIoctl(void);
int ghClose(void);


typedef struct
{
	DEV_HDR devHdr;
	int ix;
	BOOL Opened;
	BOOL RdReady;
	BOOL WrReady;
}gh_DEV;

/**************************************************
#1.Driver Install
**/

LOCAL int ghDrvNum=0;	//driver index num
STATUS ghDrv(int arg)
{
	/*1.check if the dirver has been installed or not*/
	if(ghDrvNum > 0)
		return (OK);

	/*2.Initial hardware*/
	printf("\nghDrv: #1.Initial hardware,use arg:%d\n",arg);

	/*3.Install Drv programes*/
	if((ghDrvNum = iosDrvInstall(ghOpen, NULL, ghOpen, ghClose, ghRead, ghWrite, ghIoctl))==ERROR)
		{
			return (ERROR);
		}
	printf("#1.3 install programes OK,DrvNum=%d\n",ghDrvNum);
	return (OK);

}


/**************************************************
#2.Device create
**/
STATUS ghDevCreate(char *devName,int arg)
{
	gh_DEV *pghDev;		//device discriptor

	/*1.check if the dirver has been installed or not*/
	if(ghDrvNum < 1)
	{
		//printf("#2.1 check driver error\n");
		errno=S_ioLib_NO_DRIVER;
		return (ERROR);
	}
	//printf("#2.1 check driver has been installed OK\n");

	/*2.malloc for device dscriptor,and initialize it*/
	pghDev = (gh_DEV *)malloc(sizeof(gh_DEV));
	if(pghDev == NULL)
		{
			return (ERROR);
		}
	bzero(pghDev,sizeof(gh_DEV));
	pghDev->WrReady= 1; 	/*Initial gh_Dev*/

	/*3.device initial*/
	printf("\nghDevCreate:device initial,arg = %d\n",arg);

	/*4.add device to device list*/
	if(iosDevAdd(&pghDev->devHdr,devName,ghDrvNum) == ERROR)
		{
			free((char *)pghDev);
			return (ERROR);
		}
	return (OK);
}


/**************************************************
#3.Open
**/
int ghOpen(void)
{
	/*1.get device discriptor*/
	/*
	gh_DEV *pghDev=(gh_DEV *)pghDevHdr;*/
	logMsg("\n#3.1ghOpen has entered\n",1,2,3,4,5,6);
	/*if(pghDevHdr == NULL)
		{
			//errnoSet(S_gh_NODEV);
			printf("#3.1error?\n");
			return(ERROR);
		}*/

	/*2.check if the device has been opend*/
/*(	if(pghDev->Opened)
		{
			//errnoSet(S_gh_DEVOPENED);
			printf("#3.2error?\n");
			return (ERROR);
		}
	pghDev->Opened = TRUE;
*/
	/*3.Some initial*/
	printf("\nghOpen:initial when opened\n");

	/*4.return fd*/
//	return ((int) pghDev);
}

/**************************************************
#4.read
**/
int ghRead()
{
	printf("\n4.Read function\n");
}


/**************************************************
#5.write
**/
int ghWrite()
{

	printf("\n5.write function\n");
}

/**************************************************
#6.ioctl
**/
int ghIoctl()
{

	printf("\n6.Ioctl function\n");
}


/**************************************************
#7.close
**/
int ghClose()
{

	printf("\n7.close function\n");
}
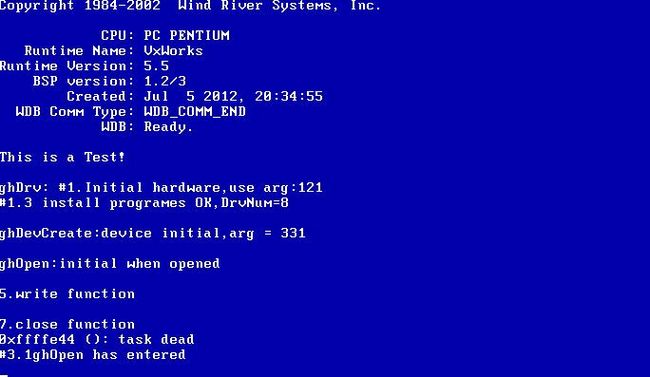
上述为驱动程序,需要应用程序来调用,可以在入口程序usrAppInit中添加相应的驱动安装和应用调用程序,demo如下:
#include "vxWorks.h"
#include "iosLib.h"


void ghdrvtest(void);


void usrAppInit (void)
    {
#ifdef	USER_APPL_INIT
	USER_APPL_INIT;		/* for backwards compatibility */
#endif

printf("This is a Test!\n");
ghDrv(121);
ghDevCreate("/ghDev",331);
ghdrvtest();
    }

void ghdrvtest(void)
{
	int fd;
	fd = open ("/ghDev", 2, 0);
    if (fd == NULL)
        printf("error open xxdev\r\n");
    write(fd, "helloworld", sizeof("helloworld"));
    close(fd);
}
效果图:
