ListActivity中的自定义列表配置选项『Android系列12』
抽空慢慢把学习笔记整理上来,这篇文章主要讲讲ListActivity,根据适配器类型,列表分为三种:ArrayAdapter,SimpleAdapter和SimpleCursorAdapter,这里只涉及SimpleAdapter,因为simpleAdapter的扩展性最好,可以定义各种各样的布局出来,可以放上ImageView(图片),还可以放上Button(按钮),CheckBox(复选框)等等。
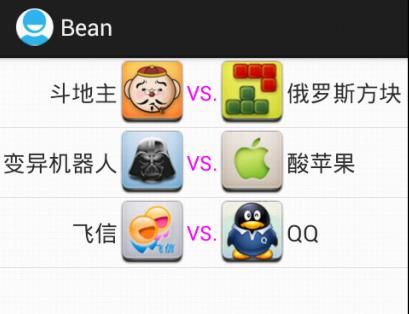
首先先看看要实现的效果是怎样的:
自己随便找几张小图标放到drawable文件夹里面,然后根据预想的布局设置布局文件,我这里的布局文件内容:
<LinearLayout xmlns:android="http://schemas.android.com/apk/res/android"
    xmlns:tools="http://schemas.android.com/tools"
    android:layout_width="match_parent"
    android:layout_height="match_parent"
    android:orientation="horizontal" >

    <TextView
        android:id="@+id/player01"
        android:layout_width="93dp"
        android:layout_height="wrap_content"
        android:layout_gravity="center_vertical"
        android:gravity="right"
        android:textSize="18dp" />

    <ImageView
        android:id="@+id/image01"
        android:layout_width="50dp"
        android:layout_height="50dp"
        android:layout_margin="2dp"
        android:contentDescription="@string/icon" />

    <TextView
        android:id="@+id/vs"
        android:layout_width="wrap_content"
        android:layout_height="wrap_content"
        android:layout_gravity="center_horizontal|center_vertical"
        android:textColor="#FF00FF"
        android:textSize="16dp" />

    <ImageView
        android:id="@+id/image02"
        android:layout_width="50dp"
        android:layout_height="50dp"
        android:layout_margin="2dp"
        android:contentDescription="@string/icon" />

    <TextView
        android:id="@+id/player02"
        android:layout_width="93dp"
        android:layout_height="wrap_content"
        android:layout_gravity="center_vertical"
        android:gravity="left"
        android:textSize="18dp" />

</LinearLayout>
命名方式有点乱,而且TextView的长度是固定的,对于不同的手机可能展示效果不一样,主要把重点搞清楚,细节先将就看吧,这里需要注意的是上面运用了两种对齐方式:android:gravity和android:layout_gravity,前者是对元素本身来说的,而后者是相对于父元素而说的,还不明白的多换换不同的值看看效果就明白了。
Main.java内容:
package com.dy.bean;

import java.util.*;
import android.os.Bundle;
import android.widget.SimpleAdapter;
import android.app.ListActivity;

public class Main extends ListActivity {

	@Override
	public void onCreate(Bundle savedInstanceState) {
		super.onCreate(savedInstanceState);

		SimpleAdapter simple = new SimpleAdapter(Main.this, getData(),
				R.layout.main, new String[] { "player01", "image01", "vs",
						"image02", "player02" }, new int[] { R.id.player01,
						R.id.image01, R.id.vs, R.id.image02, R.id.player02 });

		setListAdapter(simple);
	}

	private List<Map<String, Object>> getData() {

		List<Map<String, Object>> data = new ArrayList<Map<String, Object>>();

		Map<String, Object> map = new HashMap<String, Object>();
		map.put("player01", "斗地主");
		map.put("image01", R.drawable.dz);
		map.put("vs", "VS.");
		map.put("image02", R.drawable.fk);
		map.put("player02", "俄罗斯方块");
		data.add(map);

		map = new HashMap<String, Object>();
		map.put("player01", "变异机器人");
		map.put("image01", R.drawable.android);
		map.put("vs", "VS.");
		map.put("image02", R.drawable.apple);
		map.put("player02", "酸苹果");
		data.add(map);

		map = new HashMap<String, Object>();
		map.put("player01", "飞信");
		map.put("image01", R.drawable.fetion);
		map.put("vs", "VS.");
		map.put("image02", R.drawable.qq);
		map.put("player02", "QQ");
		data.add(map);

		return data;
	}
}
这里Main直接继承了ListActivity,所以在显示界面的时候使用setListAdapter()方法,其他的没什么多说的,除了需要提醒看一下SimpleAdapter的构造方法里面的参数类型:
SimpleAdapter(Context context, List<? extends Map<String, ?>> data, int resource, String[] from, int[] to)
第一个参数一般为当前对象,第二个参数为列表中要填充的内容,格式为List<? extends Map<String,?>>,第三个参数为布局文件,第四个参数为Map<String,?>中put的String值,最后一个参数为对应填充到的控件id。
强调一下,SimpleAdapter适配器是自定义的,你可以随意发挥。想要监控点击了哪一个选项,就可以重写onListItemClick方法,注意这个选项是从0开始的。