Android_文档学习_UI_Creating Dialogs
Creating Dialogs
Android中的Dialog,(既对话框). 包括1)AlertDialog 2) ProgressDialog 3) DatePickerDialog 4) TimePickerDialog 5) Custom Dialog
本文测试代码csdn下载频道:http://download.csdn.net/source/2903639
我发现要将文档理顺,其实最好就是全文翻译,但我不想这么做,我就把大致的理一下.方便自己和别人以后查阅使用.
-
AlertDialog - A dialog that can manage zero, one, two, or three buttons, and/or a list of selectable items that can include checkboxes or radio buttons. The AlertDialog is capable of constructing most dialog user interfaces and is the suggested dialog type. See Creating an AlertDialog below.
-
ProgressDialog - A dialog that displays a progress wheel or progress bar. Because it's an extension of the AlertDialog, it also supports buttons. See Creating a ProgressDialog below.
-
DatePickerDialog - A dialog that allows the user to select a date. See the Hello DatePicker tutorial.
-
TimePickerDialog - A dialog that allows the user to select a time. See the Hello TimePicker tutorial.
If you would like to customize your own dialog, you can extend the base Dialog object or any of the subclasses listed above and define a new layout. See the section on Creating a Custom Dialog below.
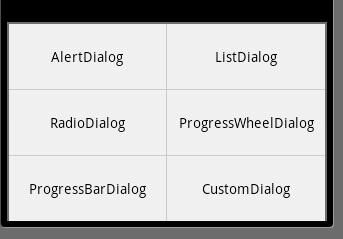
下面开始介绍,我们将要看到击中Dialog ,图中是,我做实验的6种Dialog.
Showing a Dialog
Dialog 是作为Activity的一部分显示.常规的创建一个Dialog需要用Activity的 onCreateDialog(int)方法.如果,你要在该方法外面创建Dialog的话,该Dialog不会与Activity绑定,但你可以用 setOwnerActivity(Activity) 方法绑定.当你想要show一个Dialog的时候,调用showDialog(int)方法,并传给它一个唯一的你想显示的dialog的身份识别.既id.在dialog方法显示之前Android会先调用 onPrepareDialog(int, Dialog) 方法,如果你想每次dialog打开的时候改变dialog的一些属性的话,可以在改方法里面写一些代码. onCreateDialog(int)方法指在第一次打开的时候被调用一次.如果你没定义 onPrepareDialog() 方法,那么dialog会和原先打开的一样.
Creating an AlertDialog
Adding buttons
可以使用如下代码生成.menu中指定相应id,使点击相应的item,就能产生不同的Dialog.我使用的Menu代码如下:
@Override public boolean onCreateOptionsMenu(Menu menu) { // TODO Auto-generated method stub menu.add(0, 1, 1, "AlertDialog"); menu.add(0, 2, 2, "ListDialog"); menu.add(0, 3, 3, "RadioDialog"); menu.add(0, 4, 4, "ProgressWheelDialog"); menu.add(0, 5, 5, "ProgressBarDialog"); menu.add(0, 6, 6, "CustomDialog"); return super.onCreateOptionsMenu(menu); } 
在复写的public boolean onOptionsItemSelected(MenuItem item) 方法中,
用如下代码,产生相应的Dialog
AlertDialog.Builder builder = new AlertDialog.Builder(this); builder.setMessage("Are you sure you want to exit?") .setCancelable(false) //设置此项为false ,则用户按返回按钮,不会关闭这个alertDialog .setPositiveButton("Yes", new DialogInterface.OnClickListener() { //在AlertDialog中添加按钮要实现一些功能,必须先实现DialogInterface.OnClickListener接口 public void onClick(DialogInterface dialog, int id) { finish(); } }) .setNegativeButton("No", new DialogInterface.OnClickListener() { public void onClick(DialogInterface dialog, int id) { dialog.cancel(); } }); AlertDialog alertDialog = builder.create(); alertDialog.show();
Adding a list
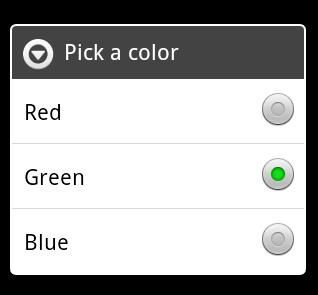
以下是使用list的使用代码,在代码中,我也写了些注释,自己不懂的我就查资料后,并注出来.代码如下:
final CharSequence[] itemsList = {"Red", "Green", "Blue"}; AlertDialog.Builder builderList = new AlertDialog.Builder(this); builderList.setTitle("Pick a color"); builderList.setItems(itemsList, new DialogInterface.OnClickListener() {//重点是setItems方法 public void onClick(DialogInterface dialog, int item) { Toast.makeText(getApplicationContext(), itemsList[item], Toast.LENGTH_SHORT).show(); } }); AlertDialog alertList = builderList.create(); alertList.show(); 
Adding checkboxes and radio buttons
以下是使用radio的使用代码,在代码中,我也写了些注释,自己不懂的我就查资料后,并注出来.代码如下:
final CharSequence[] itemsRadio = {"Red", "Green", "Blue"}; AlertDialog.Builder builderRadio = new AlertDialog.Builder(this); builderRadio.setTitle("Pick a color"); builderRadio.setSingleChoiceItems(itemsRadio, -1, new DialogInterface.OnClickListener() { //重点是setSingleChoiceItems方法 //Use "-1" to indicate that no item should be selected by default.(方法中的-1,用于设置默认没有选项被选中) public void onClick(DialogInterface dialog, int item) { Toast.makeText(getApplicationContext(), itemsRadio[item], Toast.LENGTH_SHORT).show(); } }); AlertDialog alertRadio = builderRadio.create(); alertRadio.show(); 
Creating a ProgressDialog
Showing a progress Wheel
以下是一个progress Wheel的代码:
ProgressDialog dialogProgressWheel = ProgressDialog.show(this, "", "Loading. Please wait...", true); dialogProgressWheel.setCancelable(true);//我将这项设为true是因为实验中,不能按返回,回到主界面是件很不爽的事 dialogProgressWheel.show(); 
Showing a progress bar
以下是一个progress bar的代码:
ProgressDialog progressBarDialog; progressBarDialog = new ProgressDialog(this); progressBarDialog.setProgressStyle(ProgressDialog.STYLE_HORIZONTAL); progressBarDialog.setMessage("Loading..."); progressBarDialog.setCancelable(false); progressBarDialog.setCancelable(true); progressBarDialog.show(); 
Creating a Custom Dialog
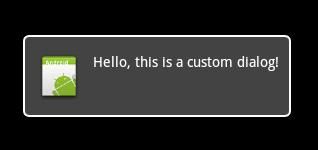
这个DIalog是个比较让人喜欢的对话框.
开发者可以在layout/下,定义自己的xml文件,并使dialog使用developer自己定义的样式来使用.非常人性化.
用户可在layout下定义如下xml文件.
<?xml version="1.0" encoding="utf-8"?> <LinearLayout xmlns:android="http://schemas.android.com/apk/res/android" android:id="@+id/layout_root" android:orientation="horizontal" android:layout_width="fill_parent" android:layout_height="fill_parent" android:padding="10dp" > <ImageView android:id="@+id/image" android:layout_width="wrap_content" android:layout_height="fill_parent" android:layout_marginRight="10dp" /> <TextView android:id="@+id/text" android:layout_width="wrap_content" android:layout_height="fill_parent" android:textColor="#FFF" /> </LinearLayout>
并在java文件中调用相应的布局.下面是java文件中的代码.但是我在做这个实验的时候,遇到个问题,就是使用文档中的getApplicationContext方法
,并调用相应的方法
,程序不出错,但是放到模拟器下,点击menu 的item,程序就报错了.
所以看到这个文档的同学,如果你清楚为什么的话,留言给我哈.
我遇到有问题的代码是:Context mContext = getApplicationContext(); LayoutInflater inflater = (LayoutInflater) mContext.getSystemService(LAYOUT_INFLATER_SERVICE);
然后我将上面的代码做了如下修改,并运行,最终则没问题了.
我想知道的是,两种代码之间的不同和产出错误的原因.希望知道的同学,不要吝惜你的几行留言.
//Context mContext = getApplicationContext(); LayoutInflater inflater = (LayoutInflater) this.getSystemService(LAYOUT_INFLATER_SERVICE);
本文测试代码csdn下载频道:http://download.csdn.net/source/2903639