Extjs学习 对话框
由于传统使用alert、confirm 等方法产生的对话框非常古板,不好看。因此,ExtJS 提供了一套非常漂亮的对话框,可以使用这些对话框代替传统的alert、confirm 等,实现华丽的应用程序界面。
1、Alert
Ext 的对话框都封装在Ext.MessageBox 类,该类还有一个简写形式即Ext.Msg,可以直 接通过Ext.MessageBox 或Ext.Msg 来直接调用相应的对话框方法来显示Ext 对话框。看下 面的代码:
/// <reference path="vswd-ext_2.0.2.js" />


Ext.onReady(function(){
    Ext.get("btnAlert").on("click",function(){
        Ext.MessageBox.alert("请注意","这是ExtJS的提示框");
    });
});
Html 页面中的内容:
<input id="btnAlert" type="button" value="alert框" />
执行程序,点击上面的“alert 框”按钮,将会在页面上显示如下图所示的对话框。
2、Confirm
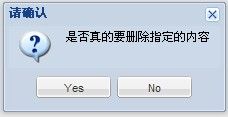
除了alert 以外,Ext 还包含confirm、prompt、progress、wait 等对话框,另外我们可以 根据需要显示自下定义的对话框。普通对话框一般包括四个参数,比如confirm 的方法签 名为confirm ( String title, String msg, [Function fn], [Object scope] ) ,参数title 表示对话框的 标题,参数msg 表示对话框中的提示信息,这两个参数是必须的;可选的参数fn 表示当关 闭对话框后执行的回调函数,参数scope 表示回调函数的执行作用域。回调函数可以包含两 个参数,即button 与text,button 表示点击的按钮,text 表示对话框中有活动输入选项时输 入的文本内容。我们可以在回调函数中通过button 参数来判断用户作了什么什么选择,可 以通过text 来读取在对话框中输入的内容。看下面的例子:
Ext.onReady(function(){
    Ext.get("btn").on("click",function(){
        Ext.MessageBox.confirm("请确认","是否真的要删除指定的内容",function(button){
        if(button=='yes')
            Ext.MessageBox.alert("提示","删除成功!");
        else
            return;
    });
    });
});
Html 页面中的内容:
<input id="btn" type="button" value="对话框" />
点击对话框按钮将会出现下面的对话框,这样当用户点击对话框中的yes 按钮时,就会执行相应的操作,而选择no 则忽略操作。
3、Prompt
下面再看看prompt 框,我们看下面的代码:
Ext.onReady(function(){
    Ext.get("btn").on("click",function(){
        Ext.MessageBox.prompt("输入提示框","请输入你的新年愿望:",function(button,text){
        if(button=="ok"){
            Ext.MessageBox.alert("提示","你的新年愿望是:"+text);
        }
        else
            Ext.MessageBox.alert("提示","你放弃了录入!");
        });
    });
});
Html 页面中的内容:
<input id="btn" type="button" value="对话框" />
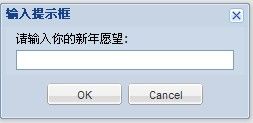
点击上面的“对话框”按钮可以显示如下图所示的内容,如果点击OK 按钮则会输入你输入的文本内容,选择cancel 按钮则会提示放弃了录入,如下图所示:
4、Multi-line Prompt
下面再看看prompt 框,我们看下面的代码:
Ext.onReady(function(){
    Ext.get('btn').on('click', function(e){
        Ext.MessageBox.show({
           title: 'Address',
           msg: 'Please enter your address:',
           width:300,
           buttons: Ext.MessageBox.OKCANCEL,
           multiline: true,
           fn: showResultText,
           animEl: 'btn'
       });
    });
});
Html 页面中的内容:
<input id="btn" type="button" value="对话框" />
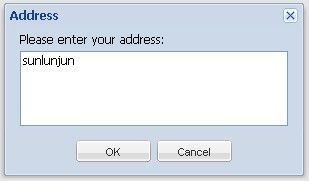
点击上面的“对话框”按钮可以显示如下图所示的内容:
5、Yes/No/Cancel
在实际应用中,可以直接使用MessageBox 的show 方法来显示自定义的对话框,如下面的代码:
Ext.onReady(function(){
    Ext.get("btn").on("click",function(){
        Ext.Msg.show({
            title:'保存数据',
            msg: '你已经作了一些数据操作,是否要保存当前内容的修改?',
            buttons: Ext.Msg.YESNOCANCEL,
            fn: save,
            icon: Ext.MessageBox.QUESTION});
    });
});


function save(button)
{
    if(button=="yes")
    {
    //执行数据保存操作
    } else if(button=="no")
    {
    //不保存数据
    } else
    {
    //取消当前操作
    }
}
点击“对话框”按钮可显示一个自定义的保存数据对话框,对话框中包含yes、no、cancel三个按钮,可以在回调函数save 中根据点击的按钮执行相应的操作,如下图所示:
把上面最后一例的对话框按钮汉化如下面的代码:
Ext.onReady(function(){
    Ext.get("btn").on("click",function(){
        ShowMessageBox('保存数据','你已经作了一些数据操作,是否要保存当前内容的修改?',
        Ext.Msg.YESNOCANCEL,save,Ext.MessageBox.QUESTION);
    });
});


function save(button)
{
    if(button=="yes")
    {
    //执行数据保存操作
    } else if(button=="no")
    {
    //不保存数据
    } else
    {
    //取消当前操作
    }
}


function ShowMessageBox(title, message, button, callBack, icon) {
    Ext.MessageBox.buttonText.ok = '确定';
    Ext.MessageBox.buttonText.yes = '是';
    Ext.MessageBox.buttonText.no = '否';
    Ext.MessageBox.buttonText.cancel = '取消';
    Ext.MessageBox.show({
        title: title,
        msg: message,
        buttons: button,
        fn: callBack,
        icon: icon
    });
};
点击“对话框”按钮可显示一个自定义的保存数据对话框,对话框中包含‘是’、’否‘、‘取消’三个按钮,可以在回调函数save 中根据点击的按钮执行相应的操作,如下图所示:
6、Progress DialogExt 的进度条对话框。看下 面的代码:
Ext.onReady(function(){
    Ext.get('btn').on('click', function(){
        Ext.MessageBox.show({
           title: 'Please wait',
           msg: 'Loading items...',
           progressText: 'Initializing...',
           width:300,
           progress:true,
           closable:false,
           animEl: 'btn'
       });

//     this hideous block creates the bogus progress
       var f = function(v){
            return function(){
                if(v == 12){
                    Ext.MessageBox.hide();
                    Ext.example.msg('Done', 'Your fake items were loaded!');
                }else{
                    var i = v/11;
                    Ext.MessageBox.updateProgress(i, Math.round(100*i)+'% completed');
                }
           };
       };
       for(var i = 1; i < 13; i++){
           setTimeout(f(i), i*500);
       }


   });
});
Html 页面中的内容:
<input id="btn" type="button" value="对话框" />
执行程序,点击上面的“对话框”按钮,将会在页面上显示如下图所示的对话框。
7、Wait Dialog
等待对话框。看下面的例子:
Ext.onReady(function(){
    Ext.get('btn').on('click', function(){
        Ext.MessageBox.show({
           msg: 'Saving your data, please wait...',
           progressText: 'Saving...',
           width:300,
           wait:true,
           waitConfig: {interval:200},
           icon:'ext-mb-download', //custom class in msg-box.html
           animEl: 'btn'
       });
        setTimeout(function(){
            //This simulates a long-running operation like a database save or XHR call.
            //In real code, this would be in a callback function.
            Ext.MessageBox.hide();
            Ext.example.msg('Done', 'Your fake data was saved!');
        }, 8000);
    });
});
Html 页面中的内容:
<input id="btn" type="button" value="对话框" />
执行程序,点击上面的“对话框”按钮,将会在页面上显示如下图所示的对话框。
8、Icons
下面再看看标准alert框的Icons,我们看下面的代码:
Ext.onReady(function(){
    //Add these values dynamically so they aren't hard-coded in the html
    Ext.fly('info').dom.value = Ext.MessageBox.INFO;
    Ext.fly('question').dom.value = Ext.MessageBox.QUESTION;
    Ext.fly('warning').dom.value = Ext.MessageBox.WARNING;
    Ext.fly('error').dom.value = Ext.MessageBox.ERROR;


    Ext.get('mb9').on('click', function(){
        Ext.MessageBox.show({
           title: 'Icon Support',
           msg: 'Here is a message with an icon!',
           buttons: Ext.MessageBox.OK,
           animEl: 'mb9',
           fn: showResult,
           icon: Ext.get('icons').dom.value
       });
    });
});
Html 页面中的内容:
<p>
        <b>Icons</b><br />
        Standard alert with optional icon.
        <select id="icons">
            <option id="error" selected="selected">Error</option>
            <option id="info">Informational</option>
            <option id="question">Question</option>
            <option id="warning">Warning</option>
        </select>
        <button id="mb9">对话框</button>
    </p>
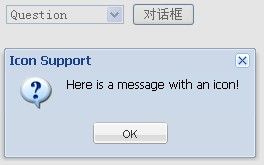
执行程序,点击上面的“对话框”按钮,将会在页面上显示如下图所示的对话框。


