精通git中文版 (连载六)
3.3 查看提交历史(Viewing the Commit History)
在你已经创建了几个提交后,或者如果你已经 clone了一个存在提交历史的库,你有可能想回头看一下都发生了什么。实现该功能的最基本和强大的工具是使用git log 命令。
这些例子使用了一个非常简单的项目称之为simplegit,这是我经常用来做演示的项目。为了获取该项目,运行:
git clone git://github.com/schacon/simplegit-progit.git
当你在这个项目中运行git log,你会得到以下类似的输出:
$ git log
commit ca82a6dff817ec66f44342007202690a93763949
Author: Scott Chacon <[email protected]>
Date: Mon Mar 17 21:52:11 2008 -0700
changed the version number
commit 085bb3bcb608e1e8451d4b2432f8ecbe6306e7e7
Author: Scott Chacon <[email protected]>
Date: Sat Mar 15 16:40:33 2008 -0700
removed unnecessary test code
commit a11bef06a3f659402fe7563abf99ad00de2209e6
Author: Scott Chacon <[email protected]>
Date: Sat Mar 15 10:31:28 2008 -0700
first commit
缺省情况下在没有其它参数时,git log 命令按照时间顺序的反序列出了库中的所有提交。也就是说,最近的提交最先显示。正如你可以看到的,这个命令列出了每个提交的SHA-1校验和,作者的姓名和e-mail,写日期以及提交消息(commit message)。
Git log 命令有大量的不同的选项可以准确的显示给你所需要的信息。这里,我们列出一些最常使用的选项。
一个非常有用的选项是-p,它可以显示每个提交所引入的不同(diff)。你也可以使用-2选项,它仅仅列出最近的两个输出项:
$ git log -p -2
commit ca82a6dff817ec66f44342007202690a93763949
Author: Scott Chacon <[email protected]>
Date: Mon Mar 17 21:52:11 2008 -0700
changed the version number
diff --git a/Rakefile b/Rakefile
index a874b73..8f94139 100644
--- a/Rakefile
+++ b/Rakefile
@@ -5,7 +5,7 @@ require 'rake/gempackagetask'
spec = Gem::Specification.new do |s|
- s.version = "0.1.0"
+ s.version = "0.1.1"
s.author = "Scott Chacon"
commit 085bb3bcb608e1e8451d4b2432f8ecbe6306e7e7
Author: Scott Chacon <[email protected]>
Date: Sat Mar 15 16:40:33 2008 -0700
removed unnecessary test code
diff --git a/lib/simplegit.rb b/lib/simplegit.rb
index a0a60ae..47c6340 100644
--- a/lib/simplegit.rb
+++ b/lib/simplegit.rb
@@ -18,8 +18,3 @@ class SimpleGit
end
end
-
-if $0 == __FILE__
- git = SimpleGit.new
- puts git.show
-end
\ No newline at end of file
这个选项显示了与之前同样的信息,但在每项后面紧接着显示了差异(diff)。这对代码检查(code review)或者是快速浏览一个协作者在每个提交中都做了些什么是非常有用的。 你也可以使用git log 的总结系列选项。例如,如果你想看一些对每个提交的简短的统计,你可以使用--stat 选项:
$ git log --stat
commit ca82a6dff817ec66f44342007202690a93763949
Author: Scott Chacon <[email protected]>
Date: Mon Mar 17 21:52:11 2008 -0700
changed the version number
Rakefile | 2 +-
1 files changed, 1 insertions(+), 1 deletions(-)
commit 085bb3bcb608e1e8451d4b2432f8ecbe6306e7e7
Author: Scott Chacon <[email protected]>
Date: Sat Mar 15 16:40:33 2008 -0700
removed unnecessary test code
lib/simplegit.rb | 5 -----
1 files changed, 0 insertions(+), 5 deletions(-)
commit a11bef06a3f659402fe7563abf99ad00de2209e6
Author: Scott Chacon <[email protected]>
Date: Sat Mar 15 10:31:28 2008 -0700
first commit
README | 6 ++++++
Rakefile | 23 +++++++++++++++++++++++
lib/simplegit.rb | 25 +++++++++++++++++++++++++
3 files changed, 54 insertions(+), 0 deletions(-)
正如你所看到的,--stat选项在每个提交项的下面显示了编辑的文件列表,多少文件被更改,在这些文件中有多少行被添加以及被删除。它也在最后显示一个总结信息。另外一个相当有用的选项是--pretty. 这个选项改变log输出为其它格式而不是缺省格式。一些预先设置的选项可以提供给你使用。Oneline选项将在每个单行中显示一个提交,这会在你查找大量提交时非常有用。另外,short, full以及fuller选项使输出基本上以相同的格式显示但分别会包含或多或少的信息:
$ git log --pretty=oneline
ca82a6dff817ec66f44342007202690a93763949 changed the version number
085bb3bcb608e1e8451d4b2432f8ecbe6306e7e7 removed unnecessary test code
a11bef06a3f659402fe7563abf99ad00de2209e6 first commit
最有趣的选项是format,它可以允许你指定你自己的日志输出格式。这在当你需要生成输出给机器分析时将会尤其有用――因为你显式的指定了输出格式,你知道这不会随着Git的更新而更改:
$ git log --pretty=format:"%h - %an, %ar : %s"
ca82a6d - Scott Chacon, 11 months ago : changed the version number
085bb3b - Scott Chacon, 11 months ago : removed unnecessary test code
a11bef0 - Scott Chacon, 11 months ago : first commit
表2-1列出了一些format可以接受的更有用的选项:
Option Description of Output
%H Commit hash
%h Abbreviated commit hash
%T Tree hash
%t Abbreviated tree hash
%P Parent hashes
%p Abbreviated parent hashes
%an Author name
%ae Author e-mail
%ad Author date (format respects the –date= option)
%ar Author date, relative
%cn Committer name
%ce Committer email
%cd Committer date
%cr Committer date, relative
%s Subject
你可能在奇怪作者(author)和提交者(committer)之间有什么不同。作者是那个初始写这个工作的人,而提交者是最后那个应用这个工作的人。因此,如果你在一个项目中递交了一个补丁而核心成员之一应用了这个补丁,那么你们两个人都会被认可--你作为作者而那个核心成员则作为提交者。我们将在第5章更多的讲解它们的不同。
Oneline和format选项在使用log的另一个选项--graph尤其有用。这个选项会增加一个非常漂亮的小的ASCII图形来显示你的分支以及它们合并的历史,用它我们可以看一下我们从Grit项目库来的copy:
$ git log --pretty=format:"%h %s" --graph
* 2d3acf9 ignore errors from SIGCHLD on trap
* 5e3ee11 Merge branch 'master' of git://github.com/dustin/grit
|\
| * 420eac9 Added a method for getting the current branch.
* | 30e367c timeout code and tests
* | 5a09431 add timeout protection to grit
* | e1193f8 support for heads with slashes in them
|/
* d6016bc require time for xmlschema
* 11d191e Merge branch 'defunkt' into local
这些只是一些简单的git log 输出格式的选项――还有更多其它的选项。表2-2列出了迄今为止我们已经讲解的选项、其它一些公共的非常有用的格式选项以及它们是怎样更改log命令的输出格式的。
Option Description
-p Show the patch introduced with each commit.
--stat Show statistics for files modified in each commit.
--shortstat Display only the changed/insertions/deletions line from the --stat command.
--name-only Show the list of files modified after the commit information.
--name-status Show the list of files affected with added/modified/deleted information as --abbrev- commit Show only the first few characters of the SHA-1 checksum instead of all --relative-date Display the date in a relative format (for example, “2 weeks ago”) instead --graph Display an ASCII graph of the branch and merge history beside the log output.
--pretty Show commits in an alternate format. Options include oneline, short, full, fuller
3.3.1 限制log输出
除了输出格式选项外,git log 可以接受一些有用的限制选项—即, 选项只允许你显示提交的一个子集。你已经看到了一个这样的选项 -2 选项它可以显示最近的两个提交。实际上,你可以使用-<n>,这里n是任意的整数,用来显示最近的n个提交。实际上,你不太可能经常使用它们,因为Git缺省的页面管道机制会使你在同一时刻只能看到log输出的一页。
然而,基于时限的选项如--since以及--until 是非常有用的。例如,以下命令给出了最近2周内的提交列表:
$ git log --since=2.weeks
这个命令可以有很多的格式选项――你可以指定一个特定的日期(“2008-01-15”)或者一个相对的日期诸如”2 years 1 day 3 minutes ago”。
你也可以过滤一些匹配某些特征的提交列表。--author选项允许你过滤某个特定的作者,--grep选项允许你在提交消息中查找一些关键词。 (注意:如果你想同时指定author以及grep选项,你需要增加--all-match,否则命令只会匹配其中之一。)
最后一个相当有用的git log 过滤选项是传递一个路径。如果你指定一个目录或文件名,你可以限制日志输出关联于哪些引入了这些文件更改的提交。这总是最后的选项通常被--优先处理来从选项中分离路径。
在表2-3中,我们将列出这些以及其它一些通用选项作为参考:
Option Description
-(n) Show only the last n commits
--since, --after Limit the commits to those made after the specified date.
--until, --before Limit the commits to those made before the specified date.
--author Only show commits in which the author entry matches the specified string.
--committer Only show commits in which the committer entry matches the specified string
例如,如果你想看由Junio Hamano 在2008年十月份内提交且未被合并的在Git 源码历史中更改了test文件的所有提交,你可以运行如下命令:
$ git log --pretty="%h - %s" --author=gitster --since="2008-10-01" \
--before="2008-11-01" --no-merges -- t/
5610e3b - Fix testcase failure when extended attribute
acd3b9e - Enhance hold_lock_file_for_{update,append}()
f563754 - demonstrate breakage of detached checkout wi
d1a43f2 - reset --hard/read-tree --reset -u: remove un
51a94af - Fix "checkout --track -b newbranch" on detac
b0ad11e - pull: allow "git pull origin $something:$cur
在git源码库中差不多有将近20000个提交,这个命令显示了6个匹配该标准的提交。
3.3.2 使用GUI来可视化历史:
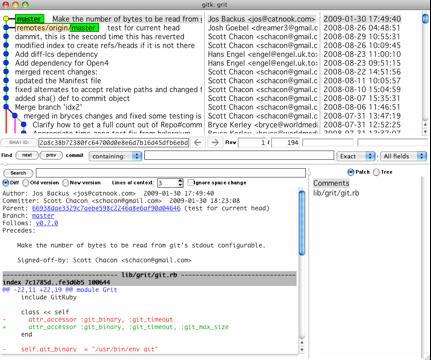
如果你想使用一个更图形化的工具来可视化你的提交历史,你可能会需要看一下一个TCL/TK的程序称为gitk,它随着Git一起分发。Gitk是一个基本的可视的git log工具。它基本上可以接受git log可处理的所有选项。如果你在你项目的命令行中输入gitk,你会看到如图2-2所示的信息:
你会在窗口的上半部分看到提交历史以及一个漂亮的继承历史的图片。窗口的下半部分显示了diff 查看器,它显示给你任何你点击的提交所引入的更改。
3.4 回退(Undoing Things)
在任何阶段,你都可能想回退一些事情。现在,我们会讲解一些基本的用来回退更改的工具。请千万注意,因为你不能总是回退其中一些回退;这是其中一个Git中很少存在的你可能会丢失部分工作的地方,如果你做错了的话。
3.4.1 变更你最后的提交(Changing Your Last Commit)
一个最常见的回退发生在当你过早的提交而可能忘了增加一些文件时,或者你把你的提交消息搞混了。如果你想试图再次提交,你可以运行附带--amend选项的提交:
$ git commit --amend
这个命令使用你的缓存区来提交。如果你自上次提交时没有任何更改(例如,你在上次提交后立即运行该命令),那么你的快照将会与之前是一致的,所有的变更仅是你的提交消息。
同样的,提交消息编辑器被调用,但它已经包含了你之前提交的消息。你可以象之前那么编辑这个消息,但它会覆盖你之前的提交。
作为一个例子,如果你提交了,然后意识到你忘了缓存一些你希望增加进这个提交的文件,那么你可以如下做:
$ git commit -m 'initial commit'
$ git add forgotten_file
$ git commit --amend
所有这三个命令会以一个单一的提交来结束--第二个提交替代了第一个提交。
3.4.2 回退一个缓存的文件(Unstaging a Staged File)
下面两节将演示怎么在你的缓存区和工作目录变更中切换。你用来查看这两个区域状态的命令有一个很友好的部分可以提示你怎么恢复这些更改。例如,你已经更改了两个文件,你想把这两个更新分置在两个提交中,但你无意中输入了git add *而把它们两个都加入到缓存中去了,那么你怎么才能回退其中的一个呢? Git status 命令可以给你一些提示:
$ git add .
$ git status
# On branch master
# Changes to be committed:
# (use "git reset HEAD <file>..." to unstage)
#
# modified: README.txt
# modified: benchmarks.rb
#
就在”Changes to be committed”文本下面,它告诉你使用 git reset HEAD <file> … 去恢复缓存。因此,让我们使用该建议来恢复缓存的benchmarks.rb文件:
$ git reset HEAD benchmarks.rb
benchmarks.rb: locally modified
$ git status
# On branch master
# Changes to be committed:
# (use "git reset HEAD <file>..." to unstage)
#
# modified: README.txt
#
# Changed but not updated:
# (use "git add <file>..." to update what will be committed)
# (use "git checkout -- <file>..." to discard changes in working directory)
#
# modified: benchmarks.rb
#
这个命令有一点奇怪,但可以工作。Benchmarks.rb文件被修改了,但重新恢复到了未缓存状态。
3.4.3 恢复一个修改的文件(Unmodifying a Modified File)
那么,万一你意识到你不想再保存benchmarks.rb文件中的更改呢? 你怎么才能简单地恢复这个更改――恢复到你上次提交(或者初始clone或者不管你怎么在你的工作目录中获得它)时的那个样子?幸运的是,git status 也告诉了你怎么做。在上一个例子的输出中,未缓存区看起来如下:
# Changed but not updated:
# (use "git add <file>..." to update what will be committed)
# (use "git checkout -- <file>..." to discard changes in working directory)
#
# modified: benchmarks.rb
#
它相当清除的告诉你怎么丢弃你做的哪些修改(至少,更新的版本1.6.1及以后是这么做的――如果你的版本太老,我们强烈建议你更新它以便可以获得这样的使用友好的功能)。那么,让我们试一下它告诉我们的:
$ git checkout --benchmarks.rb
$ git status
# On branch master
# Changes to be committed:
# (use "git reset HEAD <file>..." to unstage)
#
# modified: README.txt
#
你可以看到更改已经被恢复。你应当知道这是一个危险的命令:任何你对该文件所做的更改都会丢失了--你只是Copy了其它一个文件来覆盖它。除非你确切的知道你不想要它了,否则不要试图使用这个命令。如果你只是需要把它从这里拿走,我们将在下章介绍的储藏(stashing)和分支(branching)通常是个更好的方式。
请记住,Git中提交的任何东西都总是可以被恢复的。即使是哪些在已经删除分支上的提交或者你使用--amend选项的覆盖的提交都是可以被恢复的(查看第9章数据恢复)。然而,你尚未提交而丢失的任何东西就可能再也找不回来了。
