Activity生命周期详解
本文概述:针对一个例子详细阐述Activity的生命周期。
1.返回栈
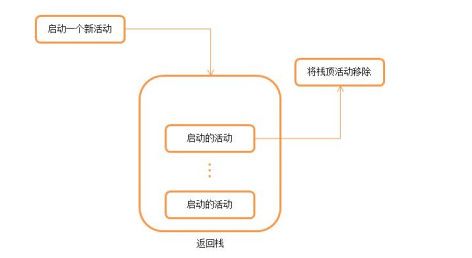
Android是使用任务(Task)来管理活动的,一个任务就是一组存放在栈里的Activity的集合,这个栈也叫返回栈(Back Stack)。每次我们启动一个新的Activity,这个Activity就会入栈,并处于栈顶位置。按下返回键或者finish()方法销毁一个Activity时,处于栈顶的Activity就会出栈,另一个Activity就会处于栈顶位置,显示给用户的就会是这个Activity.
2.活动状态
运行状态:该Activity处于栈顶,可见
暂停状态:不处于栈顶,但仍可见
停止状态:不处于栈顶,且不可见
销毁状态:从返回栈中被移除
3.Activity的生命周期
onCreate()方法:完成Activity的初始化,如加载布局,绑定事件。
onStart()方法:Activity由不可见变为可见
onResume():这个方法在Activity准备和用户交互的时候调用
onPause()方法:准备去启动一个新的Activity的时候调用
onStop()方法:这个方法在Activity完全不可见的时候调用
onDestroy()方法:这个方法在Activity销毁之前调用,之后Activity的状态将变为销毁
onRestart()方法:这个方法在停止状态变为运行状态之前调用
4.Activity的生存期
完整生存期:onCreate()-->onStart()-->onResume()-->onPause()-->onStop-->onDestroy()
可见生存期:onStart-->onResume()-->onPause()-->onStop()
前台生存期:onResume()-->onPause(),该状态下Activity处于运行状态
5.体验Activity的生命周期
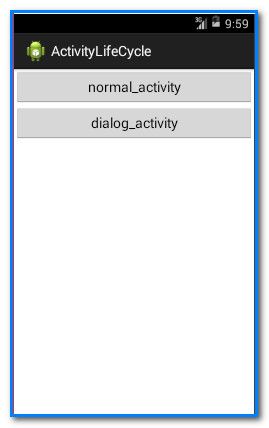
在这里有三个Activity,MainActivity、NormalActivity和DialogActivity,其中DialogActivity是一个弹出框样式的Activity,就是为了演示MainActivity在可见但是不处于栈顶的情况。
MainActivity的布局文件,很简单只有两个跳转按钮
<LinearLayout xmlns:android="http://schemas.android.com/apk/res/android"
    xmlns:tools="http://schemas.android.com/tools"
    android:layout_width="match_parent"
    android:layout_height="match_parent"
    android:orientation="vertical"
    tools:context=".MainActivity" >

    <Button
        android:id="@+id/btn_normal"
        android:layout_width="match_parent"
        android:layout_height="wrap_content"
        android:text="normal_activity"/>

    <Button
        android:id="@+id/btn_dialog"
        android:layout_width="match_parent"
        android:layout_height="wrap_content"
        android:text="dialog_activity"/>
</LinearLayout>
NormalActivity的布局文件,也很简单
<RelativeLayout xmlns:android="http://schemas.android.com/apk/res/android"
    xmlns:tools="http://schemas.android.com/tools"
    android:layout_width="match_parent"
    android:layout_height="match_parent">

    <TextView
        android:layout_width="wrap_content"
        android:layout_height="wrap_content"
        android:text="这是一个normal_activity" />

</RelativeLayout>
DialogActivity的布局文件,注意在清单文件中注册这个Activity的时候要声明它的主题是弹出框主题,否则难以看到实验效果
<activity
            android:name="com.example.activitylifecycle.NormalActivity">
        </activity>

        <activity
            android:name="com.example.activitylifecycle.DialogActivity"
            android:theme="@android:style/Theme.Dialog">
        </activity>
<RelativeLayout xmlns:android="http://schemas.android.com/apk/res/android"
    xmlns:tools="http://schemas.android.com/tools"
    android:layout_width="match_parent"
    android:layout_height="match_parent" >

    <TextView
        android:layout_width="wrap_content"
        android:layout_height="wrap_content"
        android:text="这是一个dialog_activity" />

</RelativeLayout>
MainActivity的代码如下,给按钮添加了两个跳转操作
package com.example.activitylifecycle;

import android.app.Activity;
import android.content.Intent;
import android.os.Bundle;
import android.util.Log;
import android.view.View;
import android.view.View.OnClickListener;
import android.widget.Button;

public class MainActivity extends Activity {
	public static final String TAG="MainActivity";
	Button btn_normal,btn_dialog;
	@Override
	protected void onCreate(Bundle savedInstanceState) {
		super.onCreate(savedInstanceState);
		setContentView(R.layout.activity_main);
		Log.d(TAG,"onCreate");

		btn_normal=(Button) findViewById(R.id.btn_normal);
		btn_dialog=(Button) findViewById(R.id.btn_dialog);

		btn_normal.setOnClickListener(new MyListener());
		btn_dialog.setOnClickListener(new MyListener());
	}

	@Override
	protected void onStart() {
		// TODO Auto-generated method stub
		super.onStart();
		Log.d(TAG,"onStart");
	}

	@Override
	protected void onResume() {
		// TODO Auto-generated method stub
		super.onResume();
		Log.d(TAG,"onResume");
	}

	@Override
	protected void onPause() {
		// TODO Auto-generated method stub
		super.onPause();
		Log.d(TAG,"onPause");
	}

	@Override
	protected void onStop() {
		// TODO Auto-generated method stub
		super.onStop();
		Log.d(TAG,"onStop");
	}

	@Override
	protected void onDestroy() {
		// TODO Auto-generated method stub
		super.onDestroy();
		Log.d(TAG,"onDestroy");
	}

	@Override
	protected void onRestart() {
		// TODO Auto-generated method stub
		super.onRestart();
		Log.d(TAG,"onRestart");
	}


	class MyListener implements OnClickListener{

		@Override
		public void onClick(View v) {
			switch (v.getId()) {
			case R.id.btn_normal:
				Intent intent=new Intent();
				intent.setClass(MainActivity.this, NormalActivity.class);
				startActivity(intent);
				break;
			case R.id.btn_dialog:
				Intent intent2=new Intent();
				intent2.setClass(MainActivity.this, DialogActivity.class);
				startActivity(intent2);
				break;
			}
		}
     }


}
NormalActivity
package com.example.activitylifecycle;

import android.app.Activity;
import android.os.Bundle;

public class NormalActivity extends Activity {

	@Override
	protected void onCreate(Bundle savedInstanceState) {
		super.onCreate(savedInstanceState);
		setContentView(R.layout.normal_activity);

	}

}
DialogActivity
package com.example.activitylifecycle;

import android.app.Activity;
import android.os.Bundle;

public class DialogActivity extends Activity {

	@Override
	protected void onCreate(Bundle savedInstanceState) {
		super.onCreate(savedInstanceState);
		setContentView(R.layout.dialog_activity);

	}


}
下面开始演示程序:
首先部署应用到模拟器,呈现在我们面前的是MainActivity,调用了三个方法:onCreate()、onStart()、onResume()
点击按钮跳转到NormalActivity,调用了onPause()、onStop()
点击返回,MainActivity从新变为可见,调用了onRestart()、onStart()、onPause()
点击按钮跳转到DialogActivity,调用了onPause方法,可以看到和上面的区别,并没有调用onStop方法,因为此时MainActivity仍然可见
点击返回,调用的是onResume()
点击返回,退出程序,调用onPause()、onStop()、ondestroy()

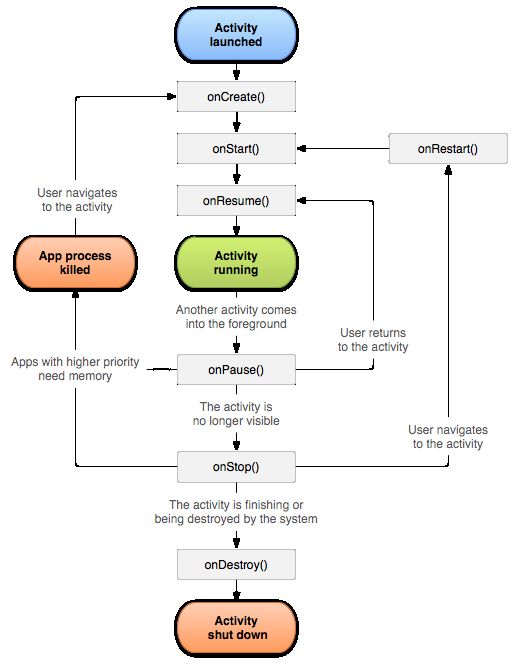
总结:如下是Activity生命周期的完整示意图,和上面的实验结果完全一致
-
本文附件下载:
- ActivityLifeCycle.zip (1.4 MB)
已有 0 人发表留言,猛击->> 这里<<-参与讨论
ITeye推荐
- —软件人才免语言低担保 赴美带薪读研!—


