Node.js集成开发环境Cloud9搭建及CoffeeScript插件使用
Node.js是神马?简单来说,它是实现JavaScript在本地运行的一个框架,包括一个js语言解释器(V8)和一些类库。有了它,就可以使用js语言开发一些本地的应用,使js脱离浏览器的束缚。
Node.js使用的语言解释器与google chrome 浏览器用的是同一个高效的开源引擎-V8。
关于Node.js的入门教程可以参考这本书:"Node入门» 一本全面的Node.js教程",在线地址 http://www.nodebeginner.org/index-zh-cn.html
对于Node.js的开发,除了使用传统的文本编辑工具如Notepad++,vim,还有一款开源的IDE可用,这就是Cloud9 IDE
官方网站:http://c9.io/
这个开发环境的独特之处就是直接使用浏览器在云端完成开发工作,不用在本地安装node啊之类的东东,
不过使用官方的网站有一些限制,比如只对开源的项目免费,不支持第三方扩展啊等等。
本篇文章要讲的是如何在ubuntu 10.10上搭建Cloud9 IDE。
首先说明,Cloud9(版本是0.6),基于node 0.4.2版本构建,虽然目前的node(版本0.6.14)支持windows,但很多类库对window的支持还不完善,
所以还是在linux上搭建会比较顺利。
首先安装git,直接使用
使用命令:

并自动启动浏览器,打开127.0.0.1:3000,进入IDE界面
我使用的命令行: bin/cloud9.sh -l 192.168.37.130 -w ../mynode/ -s
具体意思就是指定一个固定ip,指定工作目录,不自动启动浏览器
启动成功后,就可以通过其他机器来访问这个网站了,效果图:
JS使用的是类C/Java的语法风格,CoffeeScript则采用了类似Ruby/Python的语法,
使脚本的编写工作灵活有趣,减少代码量等等,好处很多,
关于CoffeeScript,这本书值得一看(只有142页):
《CoffeeScript: Accelerated JavaScript Development》网址:http://pragprog.com/book/tbcoffee/coffeescript
在项目中使用Coffee很方便,
首先使用npm安装CoffeeScript:npm install -g coffee-script
然后在项目目录下执行npm link coffee-script
新建一个coffee后缀的脚本文件test.coffee
内容:
再新建个runner.js,内容:
直接调试runner.js即可。
在cloud9中集成livecoffee插件:
首先到用户目录下执行:

在windows7上执行cloud9的话,需要自行下载node-builds文件夹到support中,代码地址:https://github.com/ajaxorg/node-builds
不过socket.io貌似出现问题,暂未成功。。。。。
报错信息:
uncaught exception:
TypeError: Object #<a Server> has no method 'once'
at new Manager (/cygdrive/d/Program Files/Cloude9/cloud9/support/socket.io/l
ib/manager.js:123:10)
at Object.listen (/cygdrive/d/Program Files/Cloude9/cloud9/support/socket.io
/lib/socket.io.js:71:10)
Node.js使用的语言解释器与google chrome 浏览器用的是同一个高效的开源引擎-V8。
关于Node.js的入门教程可以参考这本书:"Node入门» 一本全面的Node.js教程",在线地址 http://www.nodebeginner.org/index-zh-cn.html
对于Node.js的开发,除了使用传统的文本编辑工具如Notepad++,vim,还有一款开源的IDE可用,这就是Cloud9 IDE
官方网站:http://c9.io/
这个开发环境的独特之处就是直接使用浏览器在云端完成开发工作,不用在本地安装node啊之类的东东,
不过使用官方的网站有一些限制,比如只对开源的项目免费,不支持第三方扩展啊等等。
本篇文章要讲的是如何在ubuntu 10.10上搭建Cloud9 IDE。
首先说明,Cloud9(版本是0.6),基于node 0.4.2版本构建,虽然目前的node(版本0.6.14)支持windows,但很多类库对window的支持还不完善,
所以还是在linux上搭建会比较顺利。
首先安装git,直接使用
sudo apt-get install git然后安装nodejs,使用
sudo apt-get install nodejs安装 npm,使用
sudo curl http://npmjs.org/install.sh | sh然后在用户目录下新建一个文件夹:
mkdir cloud9在cloud9内执行
git clone git://github.com/ajaxorg/cloud9.git更文艺一点的做法:
git init
git remote add origin git://github.com/ajaxorg/cloud9.git
git fetch master
git checkout master
然后执行
bin/cloud9.sh初次执行,会下载一堆submodule,如果不幸中间网络中断了,可以使用
git submodule update下载完后会对这些submodule进行编译,可能会遇到libxml package prinstall Failed 的问题,
使用命令:
sudo apt-get install libxml2-dev最终成功后,会显示如下图:

并自动启动浏览器,打开127.0.0.1:3000,进入IDE界面
cloud9.sh是可以带参数的,具体可使用 cloud9.sh --help查看用法
Show this help message
    --help
Load the configuration from a config file. Overrides command-line options. Defau
lt: <null>
    -c, --config <value>
Run child processes with a specific group. Default: <false>
    -g, --group <value>
Run child processes as a specific user. Default: <false>
    -u, --user <value>
Activate debug-mode. Default: <false>
    -d, --debug
Disable auto-open of the browser.
    -s, --silent
Define an action to execute after the Cloud9 server is started. Default: <null>
    -a, --action <value>
IP address where Cloud9 will serve from. Default: <127.0.0.1>
    -l, --ip <value>
Port number where Cloud9 will serve from. Default: <3000>
    -p, --port <value>
Path to the workspace that will be loaded in Cloud9 (may be relative or absolute
). Default: <.>
    -w, --workspace <value>
我使用的命令行: bin/cloud9.sh -l 192.168.37.130 -w ../mynode/ -s
具体意思就是指定一个固定ip,指定工作目录,不自动启动浏览器
启动成功后,就可以通过其他机器来访问这个网站了,效果图:
快捷键:Ctrl+数字可以切换编辑器中的文件,Ctrl+s保存文件,Ctrl+F5是debug,Shift+F5是stop,可以在preferences中设置vim mode使用vim方式编辑源码(大爱啊)等等,最下面的命令行窗口可以执行一些服务器端的命令如ls,git等,方便源代码管理
JS使用的是类C/Java的语法风格,CoffeeScript则采用了类似Ruby/Python的语法,
使脚本的编写工作灵活有趣,减少代码量等等,好处很多,
关于CoffeeScript,这本书值得一看(只有142页):
《CoffeeScript: Accelerated JavaScript Development》网址:http://pragprog.com/book/tbcoffee/coffeescript
在项目中使用Coffee很方便,
首先使用npm安装CoffeeScript:npm install -g coffee-script
然后在项目目录下执行npm link coffee-script
新建一个coffee后缀的脚本文件test.coffee
内容:
hi = ->
    arr = [1..3]
    last = x for x in arr
    console.log "#{last}"
module.exports.hi = hi
再新建个runner.js,内容:
require("coffee-script");
var test = require("./test");
test.hi();
直接调试runner.js即可。
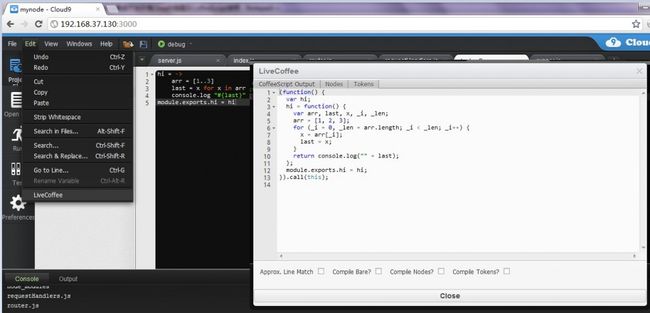
在cloud9中集成livecoffee插件:
首先到用户目录下执行:
nickwar@ubuntu:~$ git clone git://github.com/tanepiper/cloud9-livecoffee-ext.git cloud9/client/ext/livecoffee
然后在界面中的Windows->Extension Manager->User Extensions中输入"ext/livecoffee/livecoffee",点Add,即可加入此插件

在windows7上执行cloud9的话,需要自行下载node-builds文件夹到support中,代码地址:https://github.com/ajaxorg/node-builds
不过socket.io貌似出现问题,暂未成功。。。。。
报错信息:
uncaught exception:
TypeError: Object #<a Server> has no method 'once'
at new Manager (/cygdrive/d/Program Files/Cloude9/cloud9/support/socket.io/l
ib/manager.js:123:10)
at Object.listen (/cygdrive/d/Program Files/Cloude9/cloud9/support/socket.io
/lib/socket.io.js:71:10)
