整合了刷新、加载更多、滑动删除功能的XListview
如果想做带有刷新、加载更多功能的listview,我们可以使用XListview。(已经停止维护,github地址:https://github.com/Maxwin-z/XListView-Android)
如果想做带有滑动删除功能的listview,我们可以使用SwipeListview。(github地址:https://github.com/47deg/android-swipelistview)
如果想做刷新、加载更多、滑动删除的listview呢?抱歉,我暂时还没有发现同时拥有这些功能的listview。不过,我们可以整合多个开源项目,做出这样的效果。
如果要实现这个功能,我们需要两个开源项目的配合,一个就是XListview,来实现刷新加载功能,而滑动删除功能,我们则需要另外一个大神的开源项目,AndroidSwipeLayout(github地址:https://github.com/daimajia/AndroidSwipeLayout)。
话不多说,我们先看一下做出来的效果。
我感觉效果很不错,对于一般的开发需求来说,已经够了,下面,我们看一下项目的集成过程。
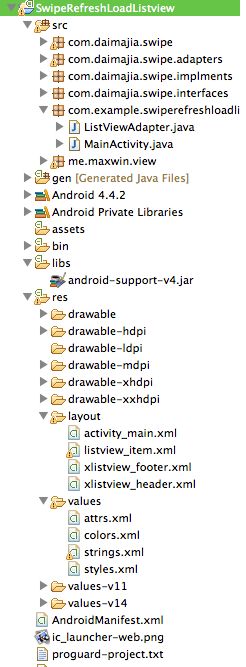
下面是整个项目的结构。
daimajia.swipe是AndroidSwipeLayout的代码,me.maxwin.view是XListview的代码,不需要再导入其他的lib包了。
layout文件夹下面的xlistview_footer,xlistview_header是XListview项目需要的布局文件,values文件夹下面的attrs是
SwipeLayout一些预置参数,colors是用到的两个颜色值,strings是XListview用到的字符串常量。
介绍完一些重要的文件夹,我们看一下ListViewAdapter的代码实现。
- import android.content.Context;
- import android.view.LayoutInflater;
- import android.view.View;
- import android.view.View.OnClickListener;
- import android.view.ViewGroup;
- import android.widget.TextView;
- import android.widget.Toast;
- import com.daimajia.swipe.SimpleSwipeListener;
- import com.daimajia.swipe.SwipeLayout;
- import com.daimajia.swipe.adapters.BaseSwipeAdapter;
- /**
- *
- * @author zhaokaiqiang
- *
- */
- public class ListViewAdapter extends BaseSwipeAdapter {
- // 上下文对象
- private Context mContext;
- // 构造函数
- public ListViewAdapter(Context mContext) {
- this.mContext = mContext;
- }
- // SwipeLayout的布局id
- @Override
- public int getSwipeLayoutResourceId(int position) {
- return R.id.swipe;
- }
- @Override
- public View generateView(int position, ViewGroup parent) {
- View v = LayoutInflater.from(mContext).inflate(R.layout.listview_item,
- parent, false);
- final SwipeLayout swipeLayout = (SwipeLayout) v
- .findViewById(getSwipeLayoutResourceId(position));
- // 当隐藏的删除menu被打开的时候的回调函数
- swipeLayout.addSwipeListener(new SimpleSwipeListener() {
- @Override
- public void onOpen(SwipeLayout layout) {
- Toast.makeText(mContext, "Open", Toast.LENGTH_SHORT).show();
- }
- });
- // 双击的回调函数
- swipeLayout
- .setOnDoubleClickListener(new SwipeLayout.DoubleClickListener() {
- @Override
- public void onDoubleClick(SwipeLayout layout,
- boolean surface) {
- Toast.makeText(mContext, "DoubleClick",
- Toast.LENGTH_SHORT).show();
- }
- });
- // 添加删除布局的点击事件
- v.findViewById(R.id.ll_menu).setOnClickListener(new OnClickListener() {
- @Override
- public void onClick(View arg0) {
- Toast.makeText(mContext, "delete", Toast.LENGTH_SHORT).show();
- //点击完成之后,关闭删除menu
- swipeLayout.close();
- }
- });
- return v;
- }
- //对控件的填值操作独立出来了,我们可以在这个方法里面进行item的数据赋值
- @Override
- public void fillValues(int position, View convertView) {
- TextView t = (TextView) convertView.findViewById(R.id.position);
- t.setText((position + 1) + "."<p class="p1"><span class="s1"> + </span>"我就是一行很长很长很长很长很长很长很长很长很长很长很长很长很长的测试文本"</p>);
- }
- @Override
- public int getCount() {
- return 20;
- }
- @Override
- public Object getItem(int position) {
- return position;
- }
- @Override
- public long getItemId(int position) {
- return position;
- }
- }
如果我们想使用带有滑动布局的listvew,我们需要继承BaseSwipeAdapter,然后对上面代码中提到的重要方法进行实现。
除了adapter需要改变之外,我们还需要修改listview的item的布局文件。
下面是listview_item.xml的代码实现。
- <?xml version="1.0" encoding="utf-8"?>
- <LinearLayout xmlns:android="http://schemas.android.com/apk/res/android"
- android:layout_width="match_parent"
- android:layout_height="80dp" >
- <com.daimajia.swipe.SwipeLayout
- android:id="@+id/swipe"
- android:layout_width="match_parent"
- android:layout_height="match_parent" >
- <LinearLayout
- android:id="@+id/ll_menu"
- android:layout_width="100dp"
- android:layout_height="match_parent"
- android:background="@android:color/holo_red_light"
- android:gravity="center" >
- <ImageView
- android:id="@+id/trash"
- android:layout_width="25dp"
- android:layout_height="25dp"
- android:src="@drawable/trash" />
- <TextView
- android:id="@+id/delete"
- android:layout_width="wrap_content"
- android:layout_height="wrap_content"
- android:text="删除"
- android:textColor="#ffffff"
- android:textSize="15sp" />
- </LinearLayout>
- <LinearLayout
- android:layout_width="match_parent"
- android:layout_height="match_parent"
- android:background="@drawable/item_selector"
- android:padding="6dp" >
- <TextView
- android:id="@+id/position"
- android:layout_width="wrap_content"
- android:layout_height="wrap_content" />
- </LinearLayout>
- </com.daimajia.swipe.SwipeLayout>
- </LinearLayout>
整个item的布局内容需要用SwipeLayout包裹起来,然后添加id,这个id我们需要在adapter里面作为
getSwipeLayoutResourceId()的返回值。
设置好adapter之后,我们就可以在MainActivity里面为我们的xlistview添加适配器了,下面是一个简单的例子。
- package com.example.swiperefreshloadlistview;
- import me.maxwin.view.XListView;
- import me.maxwin.view.XListView.IXListViewListener;
- import android.app.Activity;
- import android.os.Bundle;
- import android.os.Handler;
- import android.widget.Toast;
- /**
- *
- * @author zhaokaiqiang
- *
- */
- public class MainActivity extends Activity {
- private XListView mListView;
- // 只是用来模拟异步获取数据
- private Handler handler;
- @Override
- protected void onCreate(Bundle savedInstanceState) {
- super.onCreate(savedInstanceState);
- setContentView(R.layout.activity_main);
- handler = new Handler();
- mListView = (XListView) findViewById(R.id.xListView);
- // 设置xlistview可以加载、刷新
- mListView.setPullLoadEnable(true);
- mListView.setPullRefreshEnable(true);
- // 设置回调函数
- mListView.setXListViewListener(new IXListViewListener() {
- @Override
- public void onRefresh() {
- // 模拟刷新数据,1s之后停止刷新
- handler.postDelayed(new Runnable() {
- @Override
- public void run() {
- mListView.stopRefresh();
- Toast.makeText(MainActivity.this, "refresh",
- Toast.LENGTH_SHORT).show();
- }
- }, 1000);
- }
- @Override
- public void onLoadMore() {
- handler.postDelayed(new Runnable() {
- // 模拟加载数据,1s之后停止加载
- @Override
- public void run() {
- mListView.stopLoadMore();
- Toast.makeText(MainActivity.this, "loadMore",
- Toast.LENGTH_SHORT).show();
- }
- }, 1000);
- }
- });
- // 设置适配器
- mListView.setAdapter(new ListViewAdapter(this));
- }
- }
好了,完成这些之后,我们就实现了刷新、加载、滑动删除功能的多功能lixtview了。
项目的源代码,请到我的github下载。
https://github.com/ZhaoKaiQiang/SwipeRefreshLoadListview
- 顶
- 8
- 踩

