使用Phalcon框架开发一个简易的博客系统
使用Phalcon PHP框架开发一个简易的博客系统(类似于CMS)
最近在做Phalcon相关的项目,由于刚开始学习,不太熟悉,先搞一个"玩具项目"来练练手,用它来开发一个具有登录操作的博客是再合适不过的选择了...
完整项目源代码: https://github.com/yanglr/phalcon_practice/tree/master/blog
欢迎fork或star !!!
该项目的文件目录如下:
blog
├── app│ ├── cache│ │ ├── dummy.txt│ ├── config│ │ ├── config.ini│ │ ├── config.php│ │ ├── loader.php│ │ ├── services.php│ ├── controllers│ │ ├── CommentsController.php│ │ ├── ControllerBase.php│ │ ├── IndexController.php│ │ ├── PostsController.php│ │ ├── TagsController.php│ │ ├── UsersController.php│ ├── library│ │ ├── composer.json│ │ ├── composer.lock│ │ ├── composer.phar│ │ └── vendor│ │ ├── autoload.php│ │ └── composer│ │ ├── autoload_classmap.php│ │ ├── autoload_namespaces.php│ │ ├── autoload_real.php│ │ ├── ClassLoader.php│ │ └── installed.json│ ├── logs│ │ └── ping.log│ ├── migrations│ ├── models│ │ ├── Comments.php│ │ ├── Posts.php│ │ ├── PostTags.php│ │ ├── Tags.php│ │ └── Users.php│ ├── plugins│ │ ├── PageCache.php│ │ └── Security.php│ └── views│ ├── comments│ │ ├── edit.volt│ │ └── index.volt│ ├── index│ │ ├── index.volt│ ├── index.volt│ ├── layouts│ │ ├── posts.volt│ │ ├── tags.volt│ │ └── users.volt│ ├── partials│ │ ├── navbar.volt│ │ └── sidebar.volt│ ├── posts│ │ ├── edit.volt│ │ ├── feed.volt│ │ ├── index.volt│ │ ├── new.volt│ │ ├── search.volt│ │ └── show.volt│ ├── tags│ │ ├── edit.volt│ │ ├── index.volt│ │ ├── new.volt│ │ └── search.volt│ └── users│ ├── edit.volt│ ├── index.volt│ ├── new.volt│ └── search.volt├── cli│ ├── cli.php│ ├── config│ │ └── config.ini│ └── tasks│ └── MainTask.php├── index.html├── info.php├── micro│ └── index.php├── public│ ├── css│ │ ├── bootstrap│ │ │ ├── bootstrap.min.css│ │ │ ├── bootstrap-responsive.min.css│ │ │ ├── dashboard.css│ │ │ └── index.html│ │ └── codemirror│ │ ├── ambiance.css│ │ ├── codemirror.css│ │ ├── codephalcon.css│ │ └── index.html│ ├── files│ ├── fonts│ │ └── bootstrap│ │ ├── glyphicons-halflings-regular.ttf│ │ ├── glyphicons-halflings-regular.woff│ │ └── index.html│ ├── img│ │ └── bootstrap│ │ ├── glyphicons-halflings.png│ │ └── index.html│ ├── index.php│ ├── js│ │ ├── bootstrap│ │ │ ├── bootstrap.min.js│ │ │ └── index.html│ │ ├── bootstrap.min.js│ │ ├── codemirror│ │ │ ├── addon│ │ │ │ ├── edit│ │ │ │ │ ├── index.html│ │ │ │ │ └── matchbrackets.js│ │ │ │ ├── index.html│ │ │ │ └── selection│ │ │ │ ├── active-line.js│ │ │ │ └── index.html│ │ │ ├── index.html│ │ │ ├── lib│ │ │ │ ├── codemirror.js│ │ │ │ ├── codephalcon.js│ │ │ │ └── index.html│ │ │ └── mode│ │ │ ├── clike│ │ │ │ ├── clike.js│ │ │ │ └── index.html│ │ │ ├── css│ │ │ │ ├── css.js│ │ │ │ └── index.html│ │ │ ├── htmlmixed│ │ │ │ ├── htmlmixed.js│ │ │ │ └── index.html│ │ │ ├── index.html│ │ │ ├── php│ │ │ │ ├── index.html│ │ │ │ └── php.js│ │ │ └── xml│ │ │ ├── index.html│ │ │ └── xml.js│ │ ├── jquery│ │ │ ├── index.html│ │ │ ├── jquery-2.1.4.min.js│ │ │ ├── jquery-2.1.4.min.map│ │ │ └── jquery.min.js│ │ └── jquery.min.js│ ├── ping.log│ ├── temp│ ├── webtools.config.php│ └── webtools.php├── README.md└── sql├── phalconblog-data.sql├── phalconBlogEER.mwb
使用Phalcon框架,首先需要下载phalcon扩展,然后在php.ini中设置开启。
本文使用Phalcon开发了一个简易的博客系统,配置环境为:Linux+nginx+mysql+PHP+Phalcon+bootstrap,此环境配置就不详细介绍了,网上可以搜到不少资料...
step 1: 在nginx对应的Web目录下创建文件夹blog(比如: /home/www/server/blog),然后git clone [email protected]:yanglr/phalcon_practice.git 后,将./phalcon_practice/blog中的内容复制到文件夹/home/www/server/blog中;
step 2: 在nginx/conf/nginx.conf文件末尾加入语句:
include vhost/*.conf;
在nginx配置目录下的conf/vhost中配置多模块路由设置,在该目录下创建文件dev.blog.io.conf文件,其内容如下:
server {
    listen       80;
    server_name  dev.blog.io;
    access_log  /var/log/php_nginx_log/www.access.log;
    error_log  /var/log/php_nginx_log/www.error.log error;

    root   /home/www/server/blog/public;
    index index.php  index.html index.htm;

    location / {
        index index.shtml index.php index.html;
        if (!-e $request_filename) {
            rewrite ^/(.+)$ /index.php?_url=/$1;
        }
    }

    location ~ \.php$ {
        #root           html;
        #fastcgi_pass   127.0.0.1:9000;
        #fastcgi_index  index.php;
        #fastcgi_param  SCRIPT_FILENAME  /scripts$fastcgi_script_name;
        #include        fastcgi_params;

        fastcgi_pass   127.0.0.1:9000;
        fastcgi_index  index.php;
        include fastcgi.conf;
        fastcgi_param  SCRIPT_FILENAME   $document_root$fastcgi_script_name;
    }

    location ~ /\.ht {
        deny  all;
    }
}
修改完后重启nginx。
step 3: 修改app/config/config.php文件中的Mysql的相关信息,根据具体的情况进行修改;
step 4: 在mysql中创建数据库phalconblog,然后将app/sql文件夹中的sql文件phalconblog-data.sql导入到mysql中,可以直接在mysql中导入,也可以用navicat进行导入...
step 5: 修改/etc/hosts文件,添加语句:
☐.☐.☐.☐ dev.blog.io
这里☐.☐.☐.☐是你在Linux下使用ifconfig命令看到的ip地址
step 6: 用浏览器访问 http://dev.blog.io 即可。
特别说明:
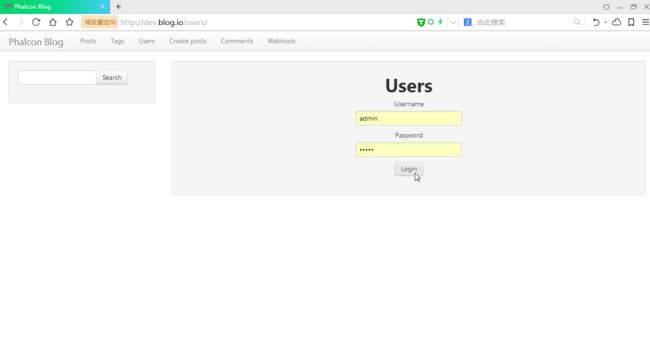
账号: admin 密码: admin
账号: test 密码: test
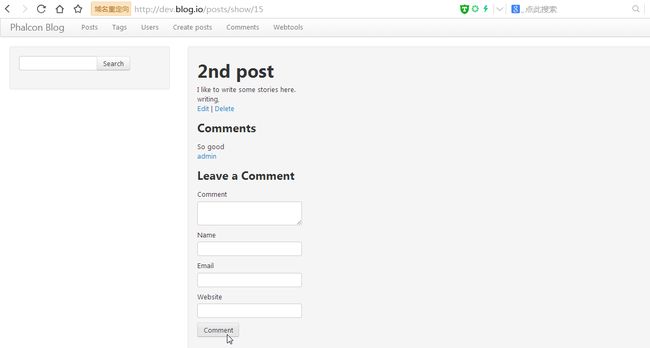
目前该博客系统中实现了登录退出、发表博文、查看博文、分页、评论、搜索等功能...
具体展示如下:
1. 登录
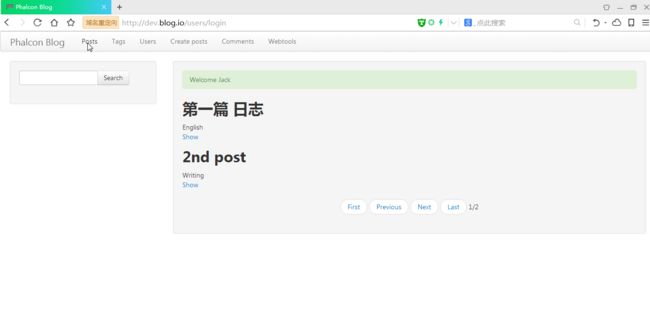
2. 查看博文列表
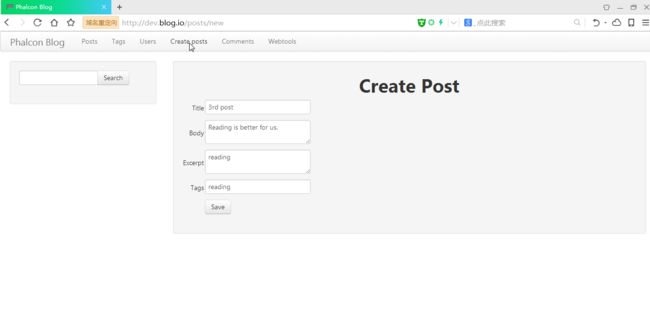
3. 发表博文
4. 查看评论
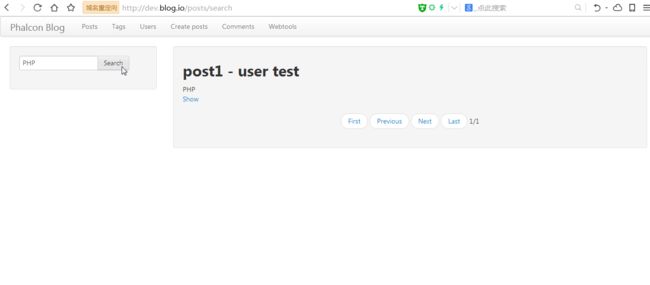
5. 搜索内容
6. 显示博文详细及评论
7. 新增 评论
