自定义View之绘图篇(五):圆形水波
没有比害怕本身更害怕的了。——培根
自定义View之绘图篇(一):基础图形的绘制
自定义View之绘图篇(二):路径(Path)
自定义View之绘图篇(三):文字(Text)
自定义View之绘图篇(四):baseLine和FontMetrics
先来看看下面这张效果图,我们应该怎么去实现:
一、相关知识点
知识点1mPaint.setXfermode()方法的理解以及知识点2mPath.rQuadTo()贝塞尔曲线的绘制原理。那我们分别来看一看。
1、mPaint.setXfermode(Xfermode xfermode)
参数预览:
 mPaint.setXfermode(new AvoidXfermode());

 mPaint.setXfermode(new PixelXorXfermode());

 mPaint.setXfermode(new PorterDuffXfermode());
new AvoidXfermode(),new PixelXorXfermode()用法难度不大,基本也用不到,这里就不再细讲了。主要来看一下new PorterDuffXfermode()。
PorterDuffXfermode
PorterDuffXfermode的构造函数如下:
public PorterDuffXfermode(PorterDuff.Mode mode) 只有一个参数PorterDuff.Mode是枚举类型,值有18个,他们分别为:
Mode.CLEAR
Mode.SRC
Mode.DST
Mode.SRC_OVER
Mode.DST_OVER
Mode.SRC_IN
Mode.DST_IN
Mode.SRC_OUT
Mode.DST_OUT
Mode.SRC_ATOP
Mode.DST_ATOP
Mode.XOR
Mode.DARKEN
Mode.LIGHTEN
Mode.MULTIPLY
Mode.SCREEN
Mode.OVERLAY
Mode.ADD
敲一敲,看看每个函数的展示出来的效果是怎么样的。我们一起来看个例子:
public class TestView extends View {

    private int width = 800;
    private int height = 800;
    private Bitmap dstBmp;
    private Bitmap srcBmp;
    private Paint mPaint;

    public TestView(Context context) {
        this(context, null);
    }

    public TestView(Context context, AttributeSet attrs) {
        this(context, attrs, 0);
    }

    public TestView(Context context, AttributeSet attrs, int defStyleAttr) {
        super(context, attrs, defStyleAttr);

        mPaint = new Paint();
        //目标图
        dstBmp = makeBitmap(width, height, 0);
        //源图
        srcBmp = makeBitmap(width, height, 1);
    }

    public Bitmap makeBitmap(int w, int h, int style) {
        Bitmap bm = Bitmap.createBitmap(w, h, Bitmap.Config.ARGB_8888);
        Canvas c = new Canvas(bm);
        Paint p = new Paint();
        p.setAntiAlias(true);
        switch (style) {
            case 0:
                p.setColor(Color.parseColor("#ff00ff"));
                c.drawOval(new RectF(0, 0, w, h), p);
                break;
            case 1:
                p.setColor(Color.parseColor("#00ffff"));
                c.drawRect(new RectF(0, 0, w, h), p);
                break;
            default:
        }
        return bm;
    }

    @Override
    protected void onDraw(Canvas canvas) {
        super.onDraw(canvas);
        //xml文件中设置math_parent
        //新建图层
        int layerID = canvas.saveLayer(0,0,getWidth(),getHeight(),mPaint,Canvas.ALL_SAVE_FLAG);

        canvas.drawBitmap(dstBmp, 0, 0, mPaint);
        mPaint.setXfermode(new PorterDuffXfermode(PorterDuff.Mode.SRC_IN));
        canvas.drawBitmap(srcBmp, width/2, height/2, mPaint);
        mPaint.setXfermode(null);

        canvas.restoreToCount(layerID);
    }
}
xml文件:
    <com.github.ws.wavedemo.app.TestView
        android:layout_width="match_parent"
        android:layout_height="match_parent"/>
效果图:
一起来看看其他枚举值的效果展示:
2、mPath.rQuadTo()
方法预览:
//二阶贝赛尔
public void quadTo(float x1, float y1, float x2, float y2)
public void rQuadTo(float dx1, float dy1, float dx2, float dy2)

//三阶贝赛尔
public void cubicTo(float x1, float y1, float x2, float y2,float x3, float y3)
public void rCubicTo(float x1, float y1, float x2, float y2,float x3, float y3)多r的方法,把上一个操作点作为起始点,相对值。
贝塞尔公式
1、一阶贝塞尔公式
效果图为:
P0为起点、P1为终点,t表示当前时间,B(t)表示公式的结果值。 曲线的意义就是公式结果B(t)随时间的变化,其取值所形成的轨迹。在动画中,黑色点表示在当前时间t下公式B(t)的取值。而红色的那条线就不在各个时间点下不同取值的B(t)所形成的轨迹。 对于一阶贝赛尔曲线,大家可以理解为在起始点和终点形成的这条直线上,匀速移动的点。
2、二阶贝塞尔公式
效果图为:
图中可以看出,P0是起点,P1是控制点,P2是终点。
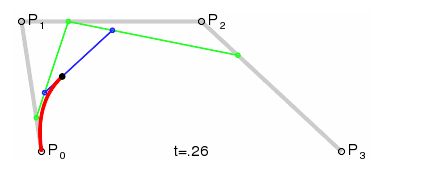
3、三阶贝塞尔公式
效果图为:
公式你一定不要去背,知道就行。
水波效果的源码如下:
package com.github.ws.wavedemo.app;

import android.animation.ValueAnimator;
import android.content.Context;
import android.graphics.Bitmap;
import android.graphics.Canvas;
import android.graphics.Color;
import android.graphics.Paint;
import android.graphics.Path;
import android.graphics.PorterDuff;
import android.graphics.PorterDuffXfermode;
import android.util.AttributeSet;
import android.view.View;
import android.view.animation.LinearInterpolator;

/** * Created by Administrator on 5/16 0016. */
public class WaveLoadingView extends View {

    private Context mContext;

    private Bitmap mBitmap;
    private Canvas mCanvas;

    private Path mWavePath;
    private Paint mCirclePaint;
    private Paint mWavePaint;

    private int mCanvasSize;
    private int mCircleRadius;
    private int mCircleCenterX;
    private int mCircleCenterY;

    private int mWaveOriginX;
    private int mWaveOriginY;
    private int mWaveMoveX;
    private int mWaveAmplitude = DEFAULT_WAVE_AMPLITUDE;

    private int mWaveLength = DEFAULT_WAVE_LENGTH;

    private static final int DEFAULT_WAVE_AMPLITUDE = 100;
    private static final int DEFAULT_WAVE_LENGTH = 800;

    public WaveLoadingView(Context context) {
        this(context, null);
    }

    public WaveLoadingView(Context context, AttributeSet attrs) {
        this(context, attrs, 0);
    }

    public WaveLoadingView(Context context, AttributeSet attrs, int defStyleAttr) {
        super(context, attrs, defStyleAttr);
        init(context);
    }

    private void init(Context context) {
        setLayerType(LAYER_TYPE_SOFTWARE, null);
        mContext = context;

        mCirclePaint=new Paint();
        mCirclePaint.setColor(Color.parseColor("#abc123"));
        mCirclePaint.setAntiAlias(true);

        mWavePaint = new Paint();
        mWavePaint.setStyle(Paint.Style.FILL);
        mWavePaint.setColor(Color.parseColor("#D22D2E"));
        mWavePaint.setAntiAlias(true);

        mWavePath = new Path();

    }

    @Override
    protected void onSizeChanged(int w, int h, int oldw, int oldh) {
        super.onSizeChanged(w, h, oldw, oldh);

        mCircleCenterX = w / 2;
        mCircleCenterY = h / 2;
        mCircleRadius = (int) (Math.min(mCircleCenterX, mCircleCenterY) * 0.615f);

        mWaveOriginX = -mWaveLength;
        mWaveOriginY = mCircleCenterX;

        mBitmap = Bitmap.createBitmap(w, h, Bitmap.Config.ARGB_8888);
        mCanvas = new Canvas(mBitmap);

    }

    @Override
    protected void onMeasure(int widthMeasureSpec, int heightMeasureSpec) {
        super.onMeasure(widthMeasureSpec, heightMeasureSpec);
        int width = measureSize(widthMeasureSpec);
        int height = measureSize(heightMeasureSpec);
        int imageSize = (width < height) ? width : height;
        setMeasuredDimension(imageSize, imageSize);
    }

    private int measureSize(int measureSpec) {
        int result = 0;
        int specMode = MeasureSpec.getMode(measureSpec);
        int specSize = MeasureSpec.getSize(measureSpec);

        if (specMode == MeasureSpec.EXACTLY) {
            result = specSize;
        } else if (specMode == MeasureSpec.AT_MOST) {
            result = specSize;
        } else {
            result = mCanvasSize;
        }

        return result;
    }


    @Override
    protected void onDraw(Canvas canvas) {
        super.onDraw(canvas);
        mCanvasSize = canvas.getWidth();
        if (canvas.getHeight() < mCanvasSize) {
            mCanvasSize = canvas.getHeight();
        }

        int layerID = canvas.saveLayer(0, 0, getWidth(), getHeight(), mWavePaint, Canvas.ALL_SAVE_FLAG);
        mCanvas.drawCircle(mCircleCenterX, mCircleCenterY, mCircleRadius, mCirclePaint);
        mWavePaint.setXfermode(new PorterDuffXfermode(PorterDuff.Mode.SRC_IN));


        mWavePath.reset();
        mWavePaint.setColor(Color.parseColor("#ff00ff"));
        mWavePath.moveTo(mWaveOriginX + mWaveMoveX, mWaveOriginY);
        for (int i = mWaveOriginX; i <= getWidth() + mWaveLength; i += mWaveLength) {
            mWavePath.rQuadTo(mWaveLength / 4f, -mWaveAmplitude, mWaveLength / 2f, 0);
            mWavePath.rQuadTo(mWaveLength / 4f, mWaveAmplitude, mWaveLength / 2f, 0);
        }
        mWavePath.lineTo(getWidth(), getHeight());
        mWavePath.lineTo(0, getHeight());
        mWavePath.close();

        mCanvas.drawPath(mWavePath, mWavePaint);

        canvas.drawBitmap(mBitmap, 0, 0, null);

        mWavePaint.setXfermode(null);
        canvas.restoreToCount(layerID);

    }

    public void startAnim() {
        ValueAnimator animator = ValueAnimator.ofInt(0, Math.abs(mWaveLength));
        animator.setDuration(1000);
        animator.setInterpolator(new LinearInterpolator());
        animator.setRepeatCount(ValueAnimator.INFINITE);
        animator.setInterpolator(new LinearInterpolator());
        animator.addUpdateListener(new ValueAnimator.AnimatorUpdateListener() {
            @Override
            public void onAnimationUpdate(ValueAnimator animation) {
                mWaveMoveX = (int) animation.getAnimatedValue();
                postInvalidate();
            }
        });
        animator.start();
    }


}
今天太累了,有不懂的童鞋请给我留言。


