【CSS3】选择器(表单元素选择器 & 其他)--慕课网【学习总结】
1.表单元素选择器
(1):enabled选择器
在Web的表单中,有些表单元素有可用状态(“:enabled”)和不可用状态(“:disabled”),比如输入框,密码框,复选框等。我们可以通过伪选择器“:enabled”对这些表单元素设置样式。
- 在默认情况之下,这些表单元素都处在可用状态。
【例如】
修改文本输入框的边框为2像素的红色边框,并设置它的背景为灰色。
<!--html代码-->
<form action="#">
  <div>
    <label for="name">Text Input:</label>
    <input type="text" name="name" id="name" placeholder="可用输入框" />
  </div>
   <div>
    <label for="name">Text Input:</label>
    <input type="text" name="name" id="name" placeholder="禁用输入框" disabled="disabled" />
  </div>
</form>
/*css代码*/
div{ margin: 20px; }
input[type="text"]:enabled { background: #ccc; border: 2px solid red; }
效果:
(2):disabled选择器
“:disabled”选择器刚好与“:enabled”选择器相反,用来选择不可用表单元素。要正常使用“:disabled”选择器,需要在表单元素的HTML中设置“disabled”属性。
(3):checked选择器
在表单元素中,单选按钮和复选按钮都具有选中和未选中状态。在CSS3中,我们可以通过状态选择器“:checked”配合其他标签实现自定义样式。而“:checked”表示的是选中状态。
【例如】
通过“:checked”状态来自定义复选框效果。
<!--html代码-->
<form action="#">
  <div class="wrapper">
    <div class="box">
      <input type="checkbox" checked="checked" id="usename" /><span>√</span>
    </div>
    <lable for="usename">我是选中状态</lable>
  </div>

  <div class="wrapper">
    <div class="box">
      <input type="checkbox" id="usepwd" /><span>√</span>
    </div>
    <label for="usepwd">我是未选中状态</label>
  </div>
</form>
/*css代码*/
form { border: 1px solid #ccc; padding: 20px; width: 300px; margin: 30px auto; }

.wrapper { margin-bottom: 10px; }

.box { display: inline-block; width: 20px; height: 20px; margin-right: 10px; position: relative; border: 2px solid orange; vertical-align: middle; }

.box input { opacity: 0; position: absolute; top:0; left:0; }

.box span { position: absolute; top: -10px; right: 3px; font-size: 30px; font-weight: bold; font-family: Arial; -webkit-transform: rotate(30deg); transform: rotate(30deg); color: orange; }

input[type="checkbox"] + span { opacity: 0; /*不显示√*/ }

input[type="checkbox"]:checked + span { opacity: 1; /*显示√*/ }(4):read-only选择器
“:read-only”伪类选择器用来指定处于只读状态元素的样式。简单点理解就是,元素中设置了“readonly=’readonly’”。
【例如】
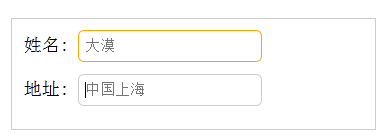
通过“:read-only”选择器来设置地址文本框的样式。
<!--html代码-->
<form action="#">
  <div>
    <label for="name">姓名:</label>
    <input type="text" name="name" id="name" placeholder="大漠" />
  </div>
  <div>
    <label for="address">地址:</label>
    <input type="text" name="address" id="address" placeholder="中国上海" readonly="readonly" />
  </div>
</form>
/*css代码*/
form { width: 300px; padding: 10px; border: 1px solid #ccc; margin: 50px auto; }
form > div { margin-bottom: 10px; }
input[type="text"]{ border: 1px solid orange; padding: 5px; background: #fff; border-radius: 5px; }
input[type="text"]:-moz-read-only{ border-color: #ccc; }
input[type="text"]:read-only{ border-color: #ccc; }(5):read-write选择器
“:read-write”选择器刚好与“:read-only”选择器相反,主要用来指定当元素处于非只读状态时的样式。
2.其他选择器
(1)::selection选择器
“::selection”伪元素是用来匹配突出显示的文本(用鼠标选择文本时的文本)。
浏览器默认情况下,用鼠标选择网页文本是以“深蓝的背景,白色的字体”显示的,效果:

从上图中可以看出,用鼠标选中“专注IT、互联网技术”、“纯干货、学以致用”、“没错、这是免费的”这三行文本中,默认显示样式为:蓝色背景、白色文本。
有的时候设计需要一个与众不同的效果,此时“::selection”伪元素就非常的实用。不过在Firefox浏览器还需要添加前缀。
【例如】
将Web中选中的文本背景变成红色,文本变成绿色。
<!--html代码-->
<p>“::selection”伪元素是用来匹配突出显示的文本。浏览器默认情况下,选择网站文本是深蓝的背景,白色的字体,</p>
/*css代码*/
::-moz-selection { background: red; color: green; }
::selection { background: red; color: green; }效果:
(2)::before和::after选择器
::before和::after这两个主要用来给元素的前面或后面插入内容,这两个常和"content"配合使用,使用的场景最多的就是清除浮动。
【例1】
清楚浮动:
.clearfix::before,
.clearfix::after { content: "."; display: block; height: 0; visibility: hidden; }
.clearfix:after {clear: both;}
.clearfix {zoom: 1;}
【例2】
阴影效果:(详见《css3实现图片阴影效果》中的第1-6小节)
关键代码分析:

/*css代码*/
.effect::before, .effect::after{ content:""; position:absolute; z-index:-1; -webkit-box-shadow:0 0 20px rgba(0,0,0,0.8); -moz-box-shadow:0 0 20px rgba(0,0,0,0.8); box-shadow:0 0 20px rgba(0,0,0,0.8); top:50%; bottom:0; left:10px; right:10px; -moz-border-radius:100px / 10px; border-radius:100px / 10px; }上面代码作用在class名叫.effect上的div的前(before)后(after)都添加一个空元素,然后为这两个空元素添加阴影特效。


