新手福利:Apache Spark入门攻略
【编者按】时至今日,Spark已成为大数据领域最火的一个开源项目,具备高性能、易于使用等特性。然而作为一个年轻的开源项目,其使用上存在的挑战亦不可为不大,这里为大家分享SciSpike软件架构师Ashwini Kuntamukkala在Dzone上进行的Spark入门总结(虽然有些地方基于的是Spark 1.0版本,但仍然值得阅读)—— Apache Spark:An Engine for Large-Scale Data Processing,由OneAPM工程师翻译。
本文聚焦Apache Spark入门,了解其在大数据领域的地位,覆盖Apache Spark的安装及应用程序的建立,并解释一些常见的行为和操作。
一、 为什么要使用Apache Spark
时下,我们正处在一个“大数据”的时代,每时每刻,都有各种类型的数据被生产。而在此紫外,数据增幅的速度也在显著增加。从广义上看,这些数据包含交易数据、社交媒体内容(比如文本、图像和视频)以及传感器数据。那么,为什么要在这些内容上投入如此多精力,其原因无非就是从海量数据中提取洞见可以对生活和生产实践进行很好的指导。
在几年前,只有少部分公司拥有足够的技术力量和资金去储存和挖掘大量数据,并对其挖掘从而获得洞见。然而,被雅虎2009年开源的Apache Hadoop对这一状况产生了颠覆性的冲击——通过使用商用服务器组成的集群大幅度地降低了海量数据处理的门槛。因此,许多行业(比如Health care、Infrastructure、Finance、Insurance、Telematics、Consumer、Retail、Marketing、E-commerce、Media、 Manufacturing和Entertainment)开始了Hadoop的征程,走上了海量数据提取价值的道路。着眼Hadoop,其主要提供了两个方面的功能:
- 通过水平扩展商用主机,HDFS提供了一个廉价的方式对海量数据进行容错存储。
- MapReduce计算范例,提供了一个简单的编程模型来挖掘数据并获得洞见。
下图展示了MapReduce的数据处理流程,其中一个Map-Reduce step的输出将作为下一个典型Hadoop job的输入结果。
在整个过程中,中间结果会借助磁盘传递,因此对比计算,大量的Map-Reduced作业都受限于IO。然而对于ETL、数据整合和清理这样的用例来说,IO约束并不会产生很大的影响,因为这些场景对数据处理时间往往不会有较高的需求。然而,在现实世界中,同样存在许多对延时要求较为苛刻的用例,比如:
- 对流数据进行处理来做近实时分析。举个例子,通过分析点击流数据做视频推荐,从而提高用户的参与度。在这个用例中,开发者必须在精度和延时之间做平衡。
- 在大型数据集上进行交互式分析,数据科学家可以在数据集上做ad-hoc查询。
毫无疑问,历经数年发展,Hadoop生态圈中的丰富工具已深受用户喜爱,然而这里仍然存在众多问题给使用带来了挑战:
1.每个用例都需要多个不同的技术堆栈来支撑,在不同使用场景下,大量的解决方案往往捉襟见肘。
2.在生产环境中机构往往需要精通数门技术。
3.许多技术存在版本兼容性问题。
4.无法在并行job中更快地共享数据。
而通过Apache Spark,上述问题迎刃而解!Apache Spark是一个轻量级的内存集群计算平台,通过不同的组件来支撑批、流和交互式用例,如下图。
二、 关于Apache Spark
Apache Spark是个开源和兼容Hadoop的集群计算平台。由加州大学伯克利分校的AMPLabs开发,作为Berkeley Data Analytics Stack(BDAS)的一部分,当下由大数据公司Databricks保驾护航,更是Apache旗下的顶级项目,下图显示了Apache Spark堆栈中的不同组件。
Apache Spark的5大优势:
1.更高的性能,因为数据被加载到集群主机的分布式内存中。数据可以被快速的转换迭代,并缓存用以后续的频繁访问需求。很多对Spark感兴趣的朋友可能也会听过这样一句话——在数据全部加载到内存的情况下,Spark可以比Hadoop快100倍,在内存不够存放所有数据的情况下快Hadoop 10倍。
2.通过建立在Java、Scala、Python、SQL(应对交互式查询)的标准API以方便各行各业使用,同时还含有大量开箱即用的机器学习库。
3.与现有Hadoop v1 (SIMR) 和2.x (YARN) 生态兼容,因此机构可以进行无缝迁移。
4.方便下载和安装。方便的shell(REPL: Read-Eval-Print-Loop)可以对API进行交互式的学习。
5.借助高等级的架构提高生产力,从而可以讲精力放到计算上。
同时,Apache Spark由Scala实现,代码非常简洁。
三、安装Apache Spark
下表列出了一些重要链接和先决条件:
| Current Release | 1.0.1 @ http://d3kbcqa49mib13.cloudfront.net/spark-1.0.1.tgz |
| Downloads Page | https://spark.apache.org/downloads.html |
| JDK Version (Required) | 1.6 or higher |
| Scala Version (Required) | 2.10 or higher |
| Python (Optional) | [2.6, 3.0) |
| Simple Build Tool (Required) | http://www.scala-sbt.org |
| Development Version | git clone git://github.com/apache/spark.git |
| Building Instructions | https://spark.apache.org/docs/latest/building-with-maven.html |
| Maven | 3.0 or higher |
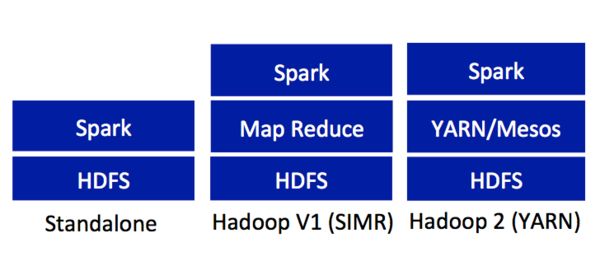
如图6所示,Apache Spark的部署方式包括standalone、Hadoop V1 SIMR、Hadoop 2 YARN/Mesos。Apache Spark需求一定的Java、Scala或Python知识。这里,我们将专注standalone配置下的安装和运行。
1.安装JDK 1.6+、Scala 2.10+、Python [2.6,3] 和sbt
2.下载Apache Spark 1.0.1 Release
3.在指定目录下Untar和Unzip spark-1.0.1.tgz
4.运行sbt建立Apache Spark
5.发布Scala的Apache Spark standalone REPL
如果是Python
6.查看SparkUI @ http://localhost:4040
四、Apache Spark的工作模式
Spark引擎提供了在集群中所有主机上进行分布式内存数据处理的能力,下图显示了一个典型Spark job的处理流程。
下图显示了Apache Spark如何在集群中执行一个作业。
Master控制数据如何被分割,利用了数据本地性,并在Slaves上跟踪所有分布式计算。在某个Slave不可用时,其存储的数据会分配给其他可用的Slaves。虽然当下(1.0.1版本)Master还存在单点故障,但后期必然会被修复。
五、弹性分布式数据集(Resilient Distributed Dataset,RDD)
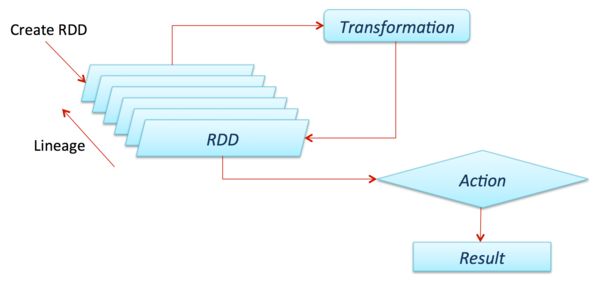
弹性分布式数据集(RDD,从Spark 1.3版本开始已被DataFrame替代)是Apache Spark的核心理念。它是由数据组成的不可变分布式集合,其主要进行两个操作:transformation和action。Transformation是类似在RDD上做 filter()、map()或union() 以生成另一个RDD的操作,而action则是count()、first()、take(n)、collect() 等促发一个计算并返回值到Master或者稳定存储系统的操作。Transformations一般都是lazy的,直到action执行后才会被执行。Spark Master/Driver会保存RDD上的Transformations。这样一来,如果某个RDD丢失(也就是salves宕掉),它可以快速和便捷地转换到集群中存活的主机上。这也就是RDD的弹性所在。
下图展示了Transformation的lazy:
我们可以通过下面示例来理解这个概念:从文本中发现5个最常用的word。下图显示了一个可能的解决方案。
在上面命令中,我们对文本进行读取并且建立字符串的RDD。每个条目代表了文本中的1行。
1. 通过上述命令我们可以发现这个操作非常简单——通过简单的Scala API来连接transformations和actions。
2. 可能存在某些words被1个以上空格分隔的情况,导致有些words是空字符串,因此需要使用filter(!_.isEmpty)将它们过滤掉。
3. 每个word都被映射成一个键值对:map(word=>(word,1))。
4. 为了合计所有计数,这里需要调用一个reduce步骤——reduceByKey(_+_)。 _+_ 可以非常便捷地为每个key赋值。
5. 我们得到了words以及各自的counts,下一步需要做的是根据counts排序。在Apache Spark,用户只能根据key排序,而不是值。因此,这里需要使用map{case (word, count) => (count, word)}将(word, count)流转到(count, word)。
6. 需要计算最常用的5个words,因此需要使用sortByKey(false)做一个计数的递减排序。
上述命令包含了一个.take(5) (an action operation, which triggers computation)和在 /Users/akuntamukkala/temp/gutenburg.txt文本中输出10个最常用的words。在Python shell中用户可以实现同样的功能。
RDD lineage可以通过toDebugString(一个值得记住的操作)来跟踪。
常用的Transformations:
| Transformation & Purpose | Example & Result |
|---|---|
| filter(func) Purpose: new RDD by selecting those data elements on which func returns true | scala> val rdd = sc.parallelize(List(“ABC”,”BCD”,”DEF”)) scala> val filtered = rdd.filter(_.contains(“C”)) scala> filtered.collect() Result: Array[String] = Array(ABC, BCD) |
| map(func) Purpose: return new RDD by applying func on each data element | scala> val rdd=sc.parallelize(List(1,2,3,4,5)) scala> val times2 = rdd.map(_*2) scala> times2.collect() Result: Array[Int] = Array(2, 4, 6, 8, 10) |
| flatMap(func) Purpose: Similar to map but func returns a Seq instead of a value. For example, mapping a sentence into a Seq of words | scala> val rdd=sc.parallelize(List(“Spark is awesome”,”It is fun”)) scala> val fm=rdd.flatMap(str=>str.split(“ “)) scala> fm.collect() Result: Array[String] = Array(Spark, is, awesome, It, is, fun) |
| reduceByKey(func,[numTasks]) Purpose: To aggregate values of a key using a function. “numTasks” is an optional parameter to specify number of reduce tasks | scala> val word1=fm.map(word=>(word,1)) scala> val wrdCnt=word1.reduceByKey(_+_) scala> wrdCnt.collect() Result: Array[(String, Int)] = Array((is,2), (It,1), (awesome,1), (Spark,1), (fun,1)) |
| groupByKey([numTasks]) Purpose: To convert (K,V) to (K,Iterable<V>) | scala> val cntWrd = wrdCnt.map{case (word, count) => (count, word)} scala> cntWrd.groupByKey().collect() Result: Array[(Int, Iterable[String])] = Array((1,ArrayBuffer(It, awesome, Spark, fun)), (2,ArrayBuffer(is))) |
| distinct([numTasks]) Purpose: Eliminate duplicates from RDD | scala> fm.distinct().collect() Result: Array[String] = Array(is, It, awesome, Spark, fun) |
常用的集合操作:
| Transformation and Purpose | Example and Result |
|---|---|
| union() Purpose: new RDD containing all elements from source RDD and argument. |
Scala> val rdd1=sc.parallelize(List(‘A’,’B’)) scala> val rdd2=sc.parallelize(List(‘B’,’C’)) scala> rdd1.union(rdd2).collect() Result: Array[Char] = Array(A, B, B, C) |
| intersection() Purpose: new RDD containing only common elements from source RDD and argument. |
Scala> rdd1.intersection(rdd2).collect() Result: Array[Char] = Array(B) |
| cartesian() Purpose: new RDD cross product of all elements from source RDD and argument |
Scala> rdd1.cartesian(rdd2).collect() Result: Array[(Char, Char)] = Array((A,B), (A,C), (B,B), (B,C)) |
| subtract() Purpose: new RDD created by removing data elements in source RDD in common with argument |
scala> rdd1.subtract(rdd2).collect() Result: Array[Char] = Array(A) |
| join(RDD,[numTasks]) Purpose: When invoked on (K,V) and (K,W), this operation creates a new RDD of (K, (V,W)) |
scala> val personFruit = sc.parallelize(Seq((“Andy”, “Apple”), (“Bob”, “Banana”), (“Charlie”, “Cherry”), (“Andy”,”Apricot”))) scala> val personSE = sc.parallelize(Seq((“Andy”, “Google”), (“Bob”, “Bing”), (“Charlie”, “Yahoo”), (“Bob”,”AltaVista”))) scala> personFruit.join(personSE).collect() Result: Array[(String, (String, String))] = Array((Andy,(Apple,Google)), (Andy,(Apricot,Google)), (Charlie,(Cherry,Yahoo)), (Bob,(Banana,Bing)), (Bob,(Banana,AltaVista))) |
| cogroup(RDD,[numTasks]) Purpose: To convert (K,V) to (K,Iterable<V>) |
scala> personFruit.cogroup(personSe).collect() Result: Array[(String, (Iterable[String], Iterable[String]))] = Array((Andy,(ArrayBuffer(Apple, Apricot),ArrayBuffer(google))), (Charlie,(ArrayBuffer(Cherry),ArrayBuffer(Yahoo))), (Bob,(ArrayBuffer(Banana),ArrayBuffer(Bing, AltaVista)))) |
更多transformations信息,请查看http://spark.apache.org/docs/latest/programming-guide.html#transformations
常用的actions
| Action & Purpose | Example & Result |
|---|---|
| count() Purpose: get the number of data elements in the RDD | scala> val rdd = sc.parallelize(list(‘A’,’B’,’c’)) scala> rdd.count() Result: long = 3 |
| collect() Purpose: get all the data elements in an RDD as an array | scala> val rdd = sc.parallelize(list(‘A’,’B’,’c’)) scala> rdd.collect() Result: Array[char] = Array(A, B, c) |
| reduce(func) Purpose: Aggregate the data elements in an RDD using this function which takes two arguments and returns one | scala> val rdd = sc.parallelize(list(1,2,3,4)) scala> rdd.reduce(_+_) Result: Int = 10 |
| take (n) Purpose: : fetch first n data elements in an RDD. computed by driver program. | Scala> val rdd = sc.parallelize(list(1,2,3,4)) scala> rdd.take(2) Result: Array[Int] = Array(1, 2) |
| foreach(func) Purpose: execute function for each data element in RDD. usually used to update an accumulator(discussed later) or interacting with external systems. | Scala> val rdd = sc.parallelize(list(1,2,3,4)) scala> rdd.foreach(x=>println(“%s*10=%s”. format(x,x*10))) Result: 1*10=10 4*10=40 3*10=30 2*10=20 |
| first() Purpose: retrieves the first data element in RDD. Similar to take(1) | scala> val rdd = sc.parallelize(list(1,2,3,4)) scala> rdd.first() Result: Int = 1 |
| saveAsTextFile(path) Purpose: Writes the content of RDD to a text file or a set of text files to local file system/ HDFS | scala> val hamlet = sc.textFile(“/users/akuntamukkala/ temp/gutenburg.txt”) scala> hamlet.filter(_.contains(“Shakespeare”)). saveAsTextFile(“/users/akuntamukkala/temp/ filtered”) Result: akuntamukkala@localhost~/temp/filtered$ ls _SUCCESS part-00000 part-00001 |
更多actions参见http://spark.apache.org/docs/latest/programming-guide.html#actions
六、RDD持久性
Apache Spark中一个主要的能力就是在集群内存中持久化/缓存RDD。这将显著地提升交互速度。下表显示了Spark中各种选项。
| Storage Level | Purpose |
|---|---|
| MEMORY_ONLY (Default level) | This option stores RDD in available cluster memory as deserialized Java objects. Some partitions may not be cached if there is not enough cluster memory. Those partitions will be recalculated on the fly as needed. |
| MEMORY_AND_DISK | This option stores RDD as deserialized Java objects. If RDD does not fit in cluster memory, then store those partitions on the disk and read them as needed. |
| MEMORY_ONLY_SER | This options stores RDD as serialized Java objects (One byte array per partition). This is more CPU intensive but saves memory as it is more space efficient. Some partitions may not be cached. Those will be recalculated on the fly as needed. |
| MEMORY_ONLY_DISK_SER | This option is same as above except that disk is used when memory is not sufficient. |
| DISC_ONLY | This option stores the RDD only on the disk |
| MEMORY_ONLY_2, MEMORY_AND_DISK_2, etc. | Same as other levels but partitions are replicated on 2 slave nodes |
上面的存储等级可以通过RDD. cache()操作上的 persist()操作访问,可以方便地指定MEMORY_ONLY选项。关于持久化等级的更多信息,可以访问这里http://spark.apache.org/docs/latest/programming-guide.html#rdd-persistence。
Spark使用Least Recently Used (LRU)算法来移除缓存中旧的、不常用的RDD,从而释放出更多可用内存。同样还提供了一个unpersist() 操作来强制移除缓存/持久化的RDD。
七、变量共享
Accumulators。Spark提供了一个非常便捷地途径来避免可变的计数器和计数器同步问题——Accumulators。Accumulators在一个Spark context中通过默认值初始化,这些计数器在Slaves节点上可用,但是Slaves节点不能对其进行读取。它们的作用就是来获取原子更新,并将其转发到Master。Master是唯一可以读取和计算所有更新合集的节点。举个例子:
Broadcast Variables。实际生产中,通过指定key在RDDs上对数据进行合并的场景非常常见。在这种情况下,很可能会出现给slave nodes发送大体积数据集的情况,让其负责托管需要做join的数据。因此,这里很可能存在巨大的性能瓶颈,因为网络IO比内存访问速度慢100倍。为了解决这个问题,Spark提供了Broadcast Variables,如其名称一样,它会向slave nodes进行广播。因此,节点上的RDD操作可以快速访问Broadcast Variables值。举个例子,期望计算一个文件中所有路线项的运输成本。通过一个look-up table指定每种运输类型的成本,这个look-up table就可以作为Broadcast Variables。
上述命令中,我们建立了一个broadcast variable,基于服务类别成本的map。
在上述命令中,我们通过broadcast variable的mailing rates来计算运输成本。
通过上述命令,我们使用accumulator来累加所有运输的成本。详细信息可通过下面的PDF查看http://ampcamp.berkeley.edu/wp-content/uploads/2012/06/matei-zaharia-amp-camp-2012-advanced-spark.pdf。
八、Spark SQL
通过Spark Engine,Spark SQL提供了一个便捷的途径来进行交互式分析,使用一个被称为SchemaRDD类型的RDD。SchemaRDD可以通过已有RDDs建立,或者其他外部数据格式,比如Parquet files、JSON数据,或者在Hive上运行HQL。SchemaRDD非常类似于RDBMS中的表格。一旦数据被导入SchemaRDD,Spark引擎就可以对它进行批或流处理。Spark SQL提供了两种类型的Contexts——SQLContext和HiveContext,扩展了SparkContext的功能。
SparkContext提供了到简单SQL parser的访问,而HiveContext则提供了到HiveQL parser的访问。HiveContext允许企业利用已有的Hive基础设施。
这里看一个简单的SQLContext示例。
下面文本中的用户数据通过“|”来分割。
定义Scala case class来表示每一行:
下面的代码片段体现了如何使用SparkContext来建立SQLContext,读取输入文件,将每一行都转换成SparkContext中的一条记录,并通过简单的SQL语句来查询30岁以下的男性用户。
更多使用SQL和HiveQL的示例请访问下面链接https://spark.apache.org/docs/latest/sql-programming-guide.html、https://databricks-training.s3.amazonaws.com/data-exploration-using-spark-sql.html。
九、Spark Streaming
Spark Streaming提供了一个可扩展、容错、高效的途径来处理流数据,同时还利用了Spark的简易编程模型。从真正意义上讲,Spark Streaming会将流数据转换成micro batches,从而将Spark批处理编程模型应用到流用例中。这种统一的编程模型让Spark可以很好地整合批量处理和交互式流分析。下图显示了Spark Streaming可以从不同数据源中读取数据进行分析。
Spark Streaming中的核心抽象是Discretized Stream(DStream)。DStream由一组RDD组成,每个RDD都包含了规定时间(可配置)流入的数据。图12很好地展示了Spark Streaming如何通过将流入数据转换成一系列的RDDs,再转换成DStream。每个RDD都包含两秒(设定的区间长度)的数据。在Spark Streaming中,最小长度可以设置为0.5秒,因此处理延时可以达到1秒以下。
Spark Streaming同样提供了 window operators,它有助于更有效率在一组RDD( a rolling window of time)上进行计算。同时,DStream还提供了一个API,其操作符(transformations和output operators)可以帮助用户直接操作RDD。下面不妨看向包含在Spark Streaming下载中的一个简单示例。示例是在Twitter流中找出趋势hashtags,详见下面代码。
上述代码用于建立Spark Streaming Context。Spark Streaming将在DStream中建立一个RDD,包含了每2秒流入的tweets。
上述代码片段将Tweet转换成一组words,并过滤出所有以a#开头的。
上述代码展示了如何整合计算60秒内一个hashtag流入的总次数。
上面代码将找出top 10趋势tweets,然后将其打印。
上述代码让Spark Streaming Context 开始检索tweets。一起聚焦一些常用操作,假设我们正在从一个socket中读入流文本。
更多operators请访问http://spark.apache.org/docs/latest/streaming-programming-guide.html#transformations
Spark Streaming拥有大量强大的output operators,比如上文提到的 foreachRDD(),了解更多可访问 http://spark.apache.org/docs/latest/streaming-programming-guide.html#output-operations。
十、附加学习资源
- Wikipedia article (good): http://en.wikipedia.org/wiki/Apache_Spark
- Launching a Spark cluster on EC2: http://ampcamp.berkeley.edu/exercises-strata-conf-2013/launching-a-cluster.html
- Quick start: https://spark.apache.org/docs/1.0.1/quick-start.html
- The Spark platform provides MLLib(machine learning) and GraphX(graph algorithms). The following links provide more information:https://spark.apache.org/docs/latest/mllib-guide.html、https://spark.apache.org/docs/1.0.1/graphx-programming-guide.html、https://dzone.com/refcardz/apache-spark
原文链接:Apache Spark:An Engine for Large-Scale Data Processing (责编/仲浩)


