偶然看到一个关于swing布局管理器的总结,觉得不错,如下。
FlowLayout
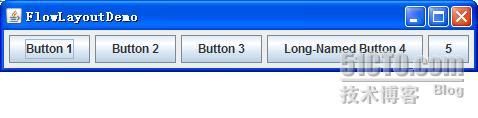
FlowLayout类是最简单的布局管理器。它按照和页面上排列单词的类似方式来安排组件----从左到右,直至没有多余的空间,然后转到下一行。
效果:
内容面板代码:
|
publicstaticvoid
addComponentsToPane(Container pane) {
pane.setLayout(
new
FlowLayout());
pane.add(
new
JButton(
"Button 1"
));
pane.add(
new
JButton(
"Button 2"
));
pane.add(
new
JButton(
"Button 3"
));
pane.add(
new
JButton(
"Long-Named Button 4"
));
pane.add(
new
JButton(
"5"
));
}
|
BorderLayout
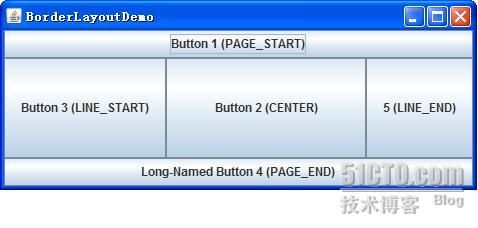
一个BorderLayout对象将界面分成五大区域,分别用BorderLayout类的静态常量指定:
-PAGE_START
-PAGE_END
-LINE_START
-LINE_END
-CENTER
效果:
内容面板代码:
|
publicstaticvoid
addComponentsToPane(Container pane) {
JButton button =
new
JButton(
"Button 1 (PAGE_START)"
);
pane.add(button, BorderLayout.
PAGE_START
);
button =
new
JButton(
"Button 2 (CENTER)"
);
button.setPreferredSize(
new
Dimension(200, 100));
pane.add(button, BorderLayout.
CENTER
);
button =
new
JButton(
"Button 3 (LINE_START)"
);
pane.add(button, BorderLayout.
LINE_START
);
button =
new
JButton(
"Long-Named Button 4 (PAGE_END)"
);
pane.add(button, BorderLayout.
PAGE_END
);
button =
new
JButton(
"5 (LINE_END)"
);
pane.add(button, BorderLayout.
LINE_END
);
}
|
BoxLayout
BoxLayout可以将组件由上至下或由左至右依次加入当前面板。
效果:

内容面板代码:
|
publicstaticvoid
addComponentsToPane(Container pane) {
JPanel xPanel =
new
JPanel();
xPanel.setLayout(
new
BoxLayout(xPanel, BoxLayout.
X_AXIS
));
addButtons(xPanel);
JPanel yPanel =
new
JPanel();
yPanel.setLayout(
new
BoxLayout(yPanel, BoxLayout.
Y_AXIS
));
addButtons(yPanel);
pane.add(yPanel, BorderLayout.
PAGE_START
);
pane.add(xPanel, BorderLayout.
PAGE_END
);
}
privatestaticvoid
addAButton(String text, Container container) {
JButton button =
new
JButton(text);
button.setAlignmentX(Component.
CENTER_ALIGNMENT
);
container.add(button);
}
privatestaticvoid
addButtons(Container container) {
addAButton(
"Button 1"
, container);
addAButton(
"Button 2"
, container);
addAButton(
"Button 3"
, container);
addAButton(
"Long-Named Button 4"
, container);
addAButton(
"5"
, container);
}
|
CardLayout
卡片布局和其他布局不同,因为它隐藏了一些组件。卡片布局就是一组容器或者组件,它们一次仅仅显是一个,组中的每个容器称为卡片。
效果:

内容面板代码:
|
publicvoid
addComponentToPane(Container pane) {
final
JPanel contentPanel =
new
JPanel();
JPanel controlPanel =
new
JPanel();
final
CardLayout cardLayout=
new
CardLayout();;
pane.setLayout(
new
BorderLayout());
pane.add(contentPanel, BorderLayout.
CENTER
);
pane.add(controlPanel, BorderLayout.
PAGE_END
);
controlPanel.setLayout(
new
FlowLayout());
JButton[] b =
new
JButton[10];
for
(
int
i = 0; i < 10; i++) {
b[i] =
new
JButton(
"No."
+ i);
contentPanel.add(b[i]);
}
contentPanel.setLayout(cardLayout);
JButton nextButton =
new
JButton(
"next"
);
nextButton.addActionListener(
new
ActionListener(){
publicvoid
actionPerformed(ActionEvent e) {
cardLayout.next(contentPanel);
}});
controlPanel.add(nextButton);
}
|
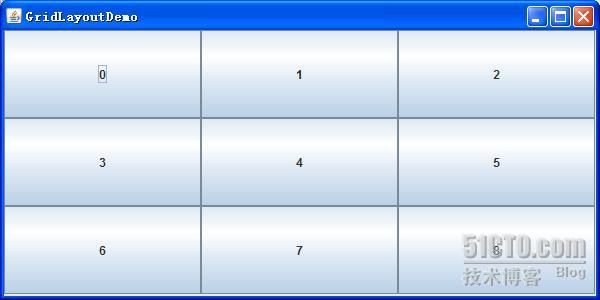
GridLayout
GridLayout让你建立一个组件表格,并且当组件加入时,会依序又左至右,由上至下填充到每个格子,它不能由你指定想放那个格子就放那个格子
效果:
内容面板代码:
|
publicstaticvoid
addComponentsToPane(Container pane) {
JButton[] buttons =
new
JButton[9];
pane.setLayout(
new
GridLayout(3, 3));
for
(
int
i = 0; i < buttons.
length
; i++) {
buttons[i] =
new
JButton(i +
""
);
pane.add(buttons[i]);
}
}
|
GridBagLayout
GridBagLayout是所有AWT布局管理器当中最复杂的,同时他的功能也是最强大的。GridBagLayout同GridLayout一样,在容器中以网格形式来管理组件。但GridBagLayout功能要来得强大得多。
1、GridBagLayout管理的所有行和列都可以是大小不同的;
2、GridLayout把每个组件限制到一个单元格,而GridBagLayout并不这样:组件在容器中可以占据任意大小的矩形区域。
GridBagLayout通常由一个专用类来对他布局行为进行约束,该类叫GridBagConstraints。其中有11个公有成员变量,GridBagConstraints可以从这11个方面来进行控制和操纵。这些内容是:
1、gridx—组件的横向坐标;
2、girdy—组件的纵向坐标;
3、gridwidth—组件的横向宽度,也就是指组件占用的列数;
4、gridheight—组件的纵向长度,也就是指组件占用的行数;
5、weightx—指行的权重,告诉布局管理器如何分配额外的水平空间;
6、weighty—指列的权重,告诉布局管理器如何分配额外的垂直空间;
7、anchor—当组件小于其显示区域时使用此字段;
8、fill—如果显示区域比组件的区域大的时候,可以用来控制组件的行为。控制组件是垂直填充,还是水平填充,或者两个方向一起填充;
9、insets—指组件与表格空间四周边缘的空白区域的大小;
10、ipadx— 组件间的横向间距,组件的宽度就是这个组件的最小宽度加上ipadx值;
11、ipady— 组件间的纵向间距,组件的高度就是这个组件的最小高度加上ipady值。
说明:
1、gridx,gridy:其实就是组件行列的设置,注意都是从0开始的,比如 gridx=0,gridy=1时放在0行1列;
2、gridwidth,gridheight:默认值为1;GridBagConstraints.REMAINDER常量,代表此组件为此行或此列的最后一个组件,会占据所有剩余的空间;
3、weightx,weighty:当窗口变大时,设置各组件跟着变大的比例。比如组件A的weightx=0.5,组件B的weightx=1,那么窗口X轴变大时剩余的空间就会以1:2的比例分配给组件A和B;
4、anchor:当组件空间大于组件本身时,要将组件置于何处。 有CENTER(默认值)、NORTH、NORTHEAST、EAST、SOUTHEAST、WEST、NORTHWEST选择。
5、insets:设置组件之间彼此的间距。它有四个参数,分别是上,左,下,右,默认为(0,0,0,0)。
效果:

内容面板代码:
|
publicstaticvoid
addComponentsToPane(Container pane) {
JButton button;
pane.setLayout(
new
GridBagLayout());
GridBagConstraints c =
new
GridBagConstraints();
button =
new
JButton(
"Button 1"
);
c.
fill
= GridBagConstraints.
HORIZONTAL
;
c.
gridx
= 0;
c.
gridy
= 0;
pane.add(button, c);
button =
new
JButton(
"Button 2"
);
c.
fill
= GridBagConstraints.
HORIZONTAL
;
c.
weightx
= 0.5;
c.
gridx
= 1;
c.
gridy
= 0;
pane.add(button, c);
button =
new
JButton(
"Button 3"
);
c.
fill
= GridBagConstraints.
HORIZONTAL
;
c.
weightx
= 0.5;
c.
gridx
= 2;
c.
gridy
= 0;
pane.add(button, c);
button =
new
JButton(
"Long-Named Button 4"
);
c.
fill
= GridBagConstraints.
HORIZONTAL
;
c.
ipady
= 40;
// make this component tall
c.
weightx
= 0.0;
c.
gridwidth
= 3;
c.
gridx
= 0;
c.
gridy
= 1;
pane.add(button, c);
button =
new
JButton(
"5"
);
c.
fill
= GridBagConstraints.
HORIZONTAL
;
c.
ipady
= 0;
// reset to default
c.
weighty
= 1.0;
// request any extra vertical space
c.
anchor
= GridBagConstraints.
PAGE_END
;
// bottom of space
c.
insets
=
new
Insets(10, 0, 0, 0);
// top padding
c.
gridx
= 1;
// aligned with button 2
c.
gridwidth
= 2;
// 2 columns wide
c.
gridy
= 2;
// third row
pane.add(button, c);
}
|
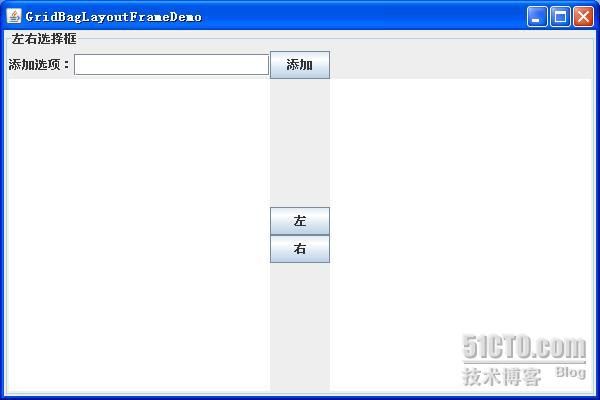
一个GardBagLayout布局的左右选择框,效果:
代码为:
import java.awt.Dimension;
import java.awt.GridBagConstraints;
import java.awt.GridBagLayout;
import java.awt.event.ActionEvent;
import java.awt.event.ActionListener;

import javax.swing.BorderFactory;
import javax.swing.DefaultListModel;
import javax.swing.JButton;
import javax.swing.JFrame;
import javax.swing.JLabel;
import javax.swing.JList;
import javax.swing.JPanel;
import javax.swing.JTextField;

public class GridBagLayoutFrame extends JFrame {
	private static final long serialVersionUID = 6819222900970457455L;
	private JPanel mainPanel = new JPanel();
	private JButton addButton = new JButton();
	private JButton leftButton = new JButton();
	private JButton rightButton = new JButton();
	private JLabel label = new JLabel();
	private JTextField field = new JTextField();
	private DefaultListModel leftModel = new DefaultListModel();
	private DefaultListModel rightMOdel = new DefaultListModel();
	private JList leftList = new JList(leftModel);
	private JList rightList = new JList(rightMOdel);

	public GridBagLayoutFrame(String title) {
		setTitle("GridBagLayoutFrameDemo");
		setPreferredSize(new Dimension(600, 400));
		setDefaultCloseOperation(JFrame.EXIT_ON_CLOSE);
		initComponent();
		addData();
		pack();
		setVisible(true);
	}

	private static void createAndShowGUI() {
		new GridBagLayoutFrame("GridBagLayoutFrameDemo");
	}

	private void initComponent() {

		label.setText("添加选项:");
		addButton.setText("添加");
		leftList.setPreferredSize(new Dimension(150, 150));
		rightList.setPreferredSize(leftList.getPreferredSize());
		leftButton.setText("左");
		rightButton.setText("右");
		mainPanel.setBorder(BorderFactory.createTitledBorder("左右选择框"));
		mainPanel.setLayout(new GridBagLayout());

		GridBagConstraints c = new GridBagConstraints();

		c.gridx = 0; // 0行0列
		c.gridy = 0;
		c.gridwidth = 1;
		c.gridheight = 1;
		c.fill = GridBagConstraints.HORIZONTAL;
		c.weightx = 0;
		c.weighty = 0;
		mainPanel.add(label, c);

		c.gridx++;
		c.weightx = 1;
		mainPanel.add(field, c);

		c.gridx++;
		c.weightx = 0;
		c.gridwidth = 1;
		c.gridheight = 1;
		// c.fill = GridBagConstraints.HORIZONTAL;
		mainPanel.add(addButton, c);

		c.gridx = 0;
		c.gridy = 1;
		c.weightx = 1;
		c.weighty = 1;
		c.gridwidth = 2;
		c.gridheight = 2;
		c.fill = GridBagConstraints.BOTH;
		mainPanel.add(leftList, c);

		c.gridx = 2;
		c.gridy = 1;
		c.gridwidth = 1;
		c.gridheight = 1;
		c.weightx = 0;
		c.weighty = 0.5;
		c.anchor = GridBagConstraints.SOUTH;
		c.fill = GridBagConstraints.HORIZONTAL;
		mainPanel.add(leftButton, c);

		c.gridx = 2;
		c.gridy = 2;
		c.anchor = GridBagConstraints.NORTH;
		c.fill = GridBagConstraints.HORIZONTAL;
		mainPanel.add(rightButton, c);

		c.gridx = 3;
		c.gridy = 1;
		c.gridwidth = 1;
		c.gridheight = 2;
		c.weightx = 1;
		c.weighty = 1;
		c.fill = GridBagConstraints.BOTH;
		mainPanel.add(rightList, c);

		this.getContentPane().add(mainPanel);
	}

	private void addData() {
		addButton.addActionListener(new ActionListener() {
			public void actionPerformed(ActionEvent e) {
				addItem();
			}
		});

		leftButton.addActionListener(new ActionListener() {
			public void actionPerformed(ActionEvent e) {
				leftItem();
			}
		});

		rightButton.addActionListener(new ActionListener() {
			public void actionPerformed(ActionEvent e) {
				rightItem();
			}
		});
	}

	private void addItem() {
		if (field.getText() != null && !field.getText().equals("")) {
			((DefaultListModel) leftList.getModel())
					.addElement(field.getText());
			field.setText("");
		}
	}

	private void leftItem() {
		if (rightList.getSelectedIndex() != -1) {
			Object o = rightList.getSelectedValue();
			((DefaultListModel) rightList.getModel()).remove(rightList
					.getSelectedIndex());
			((DefaultListModel) leftList.getModel()).addElement(o);
		}
	}

	private void rightItem() {
		if (leftList.getSelectedIndex() != -1) {
			Object o = leftList.getSelectedValue();
			((DefaultListModel) leftList.getModel()).remove(leftList
					.getSelectedIndex());
			((DefaultListModel) rightList.getModel()).addElement(o);
		}
	}

	public static void main(String[] args) {
		javax.swing.SwingUtilities.invokeLater(new Runnable() {
			public void run() {
				createAndShowGUI();
			}
		});
	}
}
注:本人摘抄于http://zhangjunhd.blog.51cto.com/113473/128174