android视图学习---添加窗口小部件以及AppWidget的创建详解和快捷方式
转载请注明出处:http://blog.csdn.net/qinjuning
今天给大家展现的如何创建一个窗口小部件(AppWidget)以及如何在自己的应用程序中添加窗口小部件(AppWidget)。
本文组织如下:
第一部分:创建一个窗口小部件;
第二部分:在自己的应用程序中添加窗口小部件(AppWidget)。
整个功能其实实现起来也是很简单的,只望大家能耐着性子点看 。
第一部分 、创建一个窗口小部件
网上资料已经许多了 ,在此先给大家推荐几个不错的Blog ,大家可以先去看看:
1、SDK对AppWidget的介绍
2、Android 桌面组件【widget】初探
从中我们知道:
1、每个AppWidget都有一个AppWidgetProviderInfo对象,该对象描述了每个AppWidget的基本数据(meta-data)信息 ,
其定义在<appwidget-provider>节点信息。
2、每个AppWidget都对应一个RemoteViews视图对象,该RemoteViews提供了特定AppWidget的展示(View视图)和操作
(例如,点击该RemoteViews会跨进程处理一些事情)。
关于RemoteViews类请参考:Android中文API(138) —— RemoteViews
3、AppWidgetManager类维护了应用程序中所有的AppWidget,并且为给每个AppWidget特定的Id去标识他们(一般我们
用 appWidgetId去标识)。通过给定的appWidgetId,AppWidgetManager可以管理对应的AppWidget,例如:更新该
AppWidgetId的RemoteViews视图,删除该AppWidget对象等 。
4、AppWidgetProvider广播类从来说是一个监听器,系统把对AppWidget的操作(例如,创建和更新等)分发给
AppWidgetProvider类去处理。
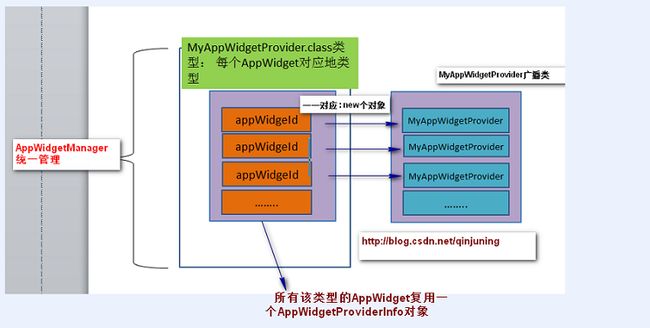
对每个AppWidget,我们可以创建多个其多个实例,当然这些实例对应于不同的appWidgetId。 假设存在这么个
MyAppWidgetProvider广播类,以及对应的MyAppWidgetProviderInfo对象。 那么,则存在如下关系:
MyAppWidgetProvider.class : 代表了由该MyAppWidgetProvider创建的窗口小部件(AppWidget)的类型,一般用
CompontentName对象形式表示 。 那么存在如下关系:
从上图可是,每个appWidget都对应于一个MyAppWidgetProvider类,于是当任何一个appWidgetId发生变化时,我们需要
同步其他实例,保持同步性。
AppWidgetProviderInfo类补充说明:
publicComponentNameconfigure: 一般为一个Activity,表明该Activity复杂需要管理AppWidget的创建操作。
public int updatePeriodMillis:用来更新AppWidget,但该属性在SDK1.5已废除
AppWidgetProvider类介绍:
常用方法:
onDeleted() : 当该类型的AppWidget每次被删除时,调用此方法
onDisabled() : 当该类型的窗口小部件(AppWidget)全被删除时,调用此方法
onEnabled() : 当第一次创建该类型的AppWidget时,调用此方法
onReceive() : 广播接受者方法 , 用来接受广播消息
onUpdate() : 每次创建该类型的AppWidget都会调用此方法 , 通常来说我们需要在该方法里为该AppWidget指定
RemoteViews对象。
AppWidgetManager类介绍:
常用常量:
ACTION_APPWIDGET_PICK= "android.appwidget.action.APPWIDGET_PICK“
说明:列出所有能够创建AppWidget的对象,该对象一般为自定义的AppWidgetProvider广播接受者。
注意:发送该Intent必须添加附加值:EXTRA_APPWIDGET_ID 。
该EXTRA_APPWIDGET_ID含义:该appWidgetId与我们发送Action为ACTION_APPWIDGET_PICK 后
所选择的AppWidget绑定。因此,我们可以通过这个appWidgetId获取该AppWidget的信息了。
ACTION_APPWIDGET_CONFIGURE= "android.appwidget.action.APPWIDGET_CONFIGURE”
说明: 如果选择的AppWidget配置了android:configure 属性,需要再次启动性对应的Activity,继而进一步去选择
AppWidget。同时发送该Intent必须添加附加值:EXTRA_APPWIDGET_ID,含义同上。
常用方法:
public int[] getAppWidgetIds(ComponentName provider)
功能:获取对应ComponentName类型的所有appWidgetId
参数说明: provider 通常为 XXXAppProvider.class类型
publicAppWidgetProviderInfo getAppWidgetInfo(int appWidgetId)
功能: 获取特定appWidgetId对应的AppWidgetProviderInfo对象
public staticAppWidgetManager getInstance(Contextcontext)
功能: 获取 AppWidgetManager对象
public void updateAppWidget(int appWidgetId, RemoteViews views)
功能: 以特定的views视图更新appWidgetId的窗口小部件(AppWidget) 。同时会发送ACTION_APPWIDGET_UPDATE广播
public void updateAppWidget(int[] appWidgetIds,RemoteViews views)
功能:以特定的views视图更新所有appWidgetIds的窗口小部件(AppWidget),同时发送ACTION_APPWIDGET_UPDATE
广播
public void updateAppWidget(ComponentName provider, RemoteViews views)
功能: 已特定的views更新组件类型为provider的所有窗口小部件(AppWidget),同时发送ACTION_APPWIDGET_UPDATE
广播。
示例Demo :
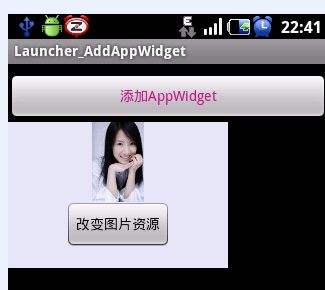
说明:创建一个简单的AppWidget实例,点击按钮后可以更该图片资源显示 ,具体代码在
截图为:
关于如何创建一个AppWidget的教材,我也不再多说了,大家可以参考上面我提到的两篇重量级博客去学习:
1、SDK对AppWidget的介绍
2、Android 桌面组件【widget】初探
PS: 具体代码可在后面下载 。
再次强调一点,每个AppWidget都对应与AppWidgetProvider , 我们需要同步更新这些AppWidget对象。
第二部分:在自己的应用程序中添加窗口小部件(AppWidget)
本部分的主要功能是像Launchcer那样添加AppWidget 。 知识点介绍如下:
1、AppWidgetHost 类
功能:对每个应用程序App,该类提供了和AppWidgetService(该AppWidgetService用来管理所有AppWidget,类似于
NotificationManagerService系统服务管理所有Notifciation,不懂?其实我也不懂,知其大意即可)交互,用来更新、管理
AppWidget。打个比喻:AppWidgetHost是宿主对象,每个AppWidget都是寄生虫,可以附加在(显示)AppWidgetHost上。
每个能添加、显示AppWidget的Activity都是一个AppWidgetHost对象,比如Launcher.java(Activity对象),以及我们后面自定
义的MainActivity.java(Activity对象)。
常用方法为:
public AppWidgetHost(Context context, int hostId)
功能:构造一个AppWidgetHost对象
参数: hostId 大意是该AppWidgetHost(宿主对象)对应的Id号,一般赋予一整数即可。
public int allocateAppWidgetId()
功能:申请一个新的appWidgetId ,该id会与新创建的AppWidget绑定。
public void startListening()
功能:监听所有AppWidget的变化 ,该方法必须在Activity的onCreate()/onStart()调用,否则 AppWidget是不会得到更新的
public void stopListening()
功能: 对应于startListening(),即停止对AppWidget的更新监听。可以在Activity的onStop()方法里调用 ,
一般无需调用此方法去停止监听。
public final AppWidgetHostView createView(Context context, int appWidgetId, AppWidgetProviderInfo appWidget)
功能: 根据指定的appWidgetId以及AppWidgetProviderInfo对象去构建一个AppWidgetHostView对象(具体该对象,
参见下 文)。
AppWidgetHostView 与 RemoteViews的区别
对每个AppWidget内部而言,都有一个RemoteViews对象,用于视图显示;而对于外部而已,则以AppWidgetHostView
形式代言 这个RemoteViews视图。换句话来说就是,AppWidgetHost对象而言,它并不知道RemoteViews存在,而只是知
RemoteViews 的代言人AppWidgetHostView。
好了 ,该说明的都说明了,下面最后给大家补充一下如何利用在自己的应用程序里添加窗口小部件(AppWidget) 。
也是两步走:
第一步: 发送Action为ACTION_APPWIDGET_PICK的 Intent ,则所有能创建窗口小部件的AppWidgetProvider的广播
接收者都会显示 ,同时为该新创建的AppWidget分配一个appWidgetId ,该appWidgetId即可唯一标记我们选择的
AppWidget。
第二步:如果选择的AppWidget对应地AppWidgetProviderInfo对象配置了android:configure属性,则需要在此启动该配置
属性(一般为一个Activity类) ,然后在完成添加AppWidget的操作 ; 否则,没有配置android:configure属性,就可以添加
AppWidget的操作。
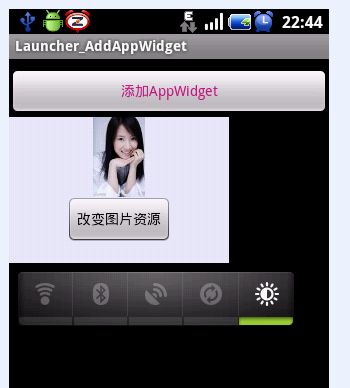
示例Demo截图:
主工程流程如下:
- package com.qin.addappwidget;
- import android.app.Activity;
- import android.appwidget.AppWidgetHost;
- import android.appwidget.AppWidgetHostView;
- import android.appwidget.AppWidgetManager;
- import android.appwidget.AppWidgetProviderInfo;
- import android.content.Intent;
- import android.os.Bundle;
- import android.util.Log;
- import android.view.View;
- import android.widget.Button;
- import android.widget.ImageView;
- import android.widget.LinearLayout;
- import android.widget.TextView;
- import android.widget.Toast;
- public class MainActivity extends Activity
- {
- private static String TAG = "AddAppWidget" ;
- private Button btAddShortCut;
- private LinearLayout linearLayout ; // 装载Appwidget的父视图
- private static final int MY_REQUEST_APPWIDGET = 1;
- private static final int MY_CREATE_APPWIDGET = 2;
- private static final int HOST_ID = 1024 ;
- private AppWidgetHost mAppWidgetHost = null ;
- AppWidgetManager appWidgetManager = null;
- /** Called when the activity is first created. */
- @Override
- public void onCreate(Bundle savedInstanceState)
- {
- super.onCreate(savedInstanceState);
- setContentView(R.layout.main);
- btAddShortCut = (Button) findViewById(R.id.bt_addShortcut);
- linearLayout = (LinearLayout)findViewById(R.id.linearLayout) ;
- //其参数hostid大意是指定该AppWidgetHost 即本Activity的标记Id, 直接设置为一个整数值吧 。
- mAppWidgetHost = new AppWidgetHost(MainActivity.this, HOST_ID) ;
- //为了保证AppWidget的及时更新 , 必须在Activity的onCreate/onStar方法调用该方法
- // 当然可以在onStop方法中,调用mAppWidgetHost.stopListenering() 停止AppWidget更新
- mAppWidgetHost.startListening() ;
- //获得AppWidgetManager对象
- appWidgetManager = AppWidgetManager.getInstance(MainActivity.this) ;
- btAddShortCut.setOnClickListener(new View.OnClickListener()
- {
- @Override
- public void onClick(View v)
- {
- //显示所有能创建AppWidget的列表 发送此 ACTION_APPWIDGET_PICK 的Action
- Intent pickIntent = new Intent(AppWidgetManager.ACTION_APPWIDGET_PICK) ;
- //向系统申请一个新的appWidgetId ,该appWidgetId与我们发送Action为ACTION_APPWIDGET_PICK
- // 后所选择的AppWidget绑定 。 因此,我们可以通过这个appWidgetId获取该AppWidget的信息了
- //为当前所在进程申请一个新的appWidgetId
- int newAppWidgetId = mAppWidgetHost.allocateAppWidgetId() ;
- Log.i(TAG, "The new allocate appWidgetId is ----> " + newAppWidgetId) ;
- //作为Intent附加值 , 该appWidgetId将会与选定的AppWidget绑定
- pickIntent.putExtra(AppWidgetManager.EXTRA_APPWIDGET_ID, newAppWidgetId) ;
- //选择某项AppWidget后,立即返回,即回调onActivityResult()方法
- startActivityForResult(pickIntent , MY_REQUEST_APPWIDGET) ;
- }
- });
- }
- // 如果
- protected void onActivityResult(int requestCode, int resultCode, Intent data)
- {
- //直接返回,没有选择任何一项 ,例如按Back键
- if(resultCode == RESULT_CANCELED)
- return ;
- switch(requestCode){
- case MY_REQUEST_APPWIDGET :
- Log.i(TAG, "MY_REQUEST_APPWIDGET intent info is -----> "+data ) ;
- int appWidgetId = data.getIntExtra(AppWidgetManager.EXTRA_APPWIDGET_ID , AppWidgetManager.INVALID_APPWIDGET_ID) ;
- Log.i(TAG, "MY_REQUEST_APPWIDGET : appWidgetId is ----> " + appWidgetId) ;
- //得到的为有效的id
- if(appWidgetId != AppWidgetManager.INVALID_APPWIDGET_ID){
- //查询指定appWidgetId的 AppWidgetProviderInfo对象 , 即在xml文件配置的<appwidget-provider />节点信息
- AppWidgetProviderInfo appWidgetProviderInfo = appWidgetManager.getAppWidgetInfo(appWidgetId) ;
- //如果配置了configure属性 , 即android:configure = "" ,需要再次启动该configure指定的类文件,通常为一个Activity
- if(appWidgetProviderInfo.configure != null){
- Log.i(TAG, "The AppWidgetProviderInfo configure info -----> " + appWidgetProviderInfo.configure ) ;
- //配置此Action
- Intent intent = new Intent(AppWidgetManager.ACTION_APPWIDGET_CONFIGURE) ;
- intent.setComponent(appWidgetProviderInfo.configure) ;
- intent.putExtra(AppWidgetManager.EXTRA_APPWIDGET_ID, appWidgetId);
- startActivityForResult(intent , MY_CREATE_APPWIDGET) ;
- }
- else //直接创建一个AppWidget
- onActivityResult(MY_CREATE_APPWIDGET , RESULT_OK , data) ; //参数不同,简单回调而已
- }
- break ;
- case MY_CREATE_APPWIDGET:
- completeAddAppWidget(data) ;
- break ;
- }
- }
- //向当前视图添加一个用户选择的
- private void completeAddAppWidget(Intent data){
- Bundle extra = data.getExtras() ;
- int appWidgetId = extra.getInt(AppWidgetManager.EXTRA_APPWIDGET_ID , -1) ;
- //等同于上面的获取方式
- //int appWidgetId = data.getIntExtra(AppWidgetManager.EXTRA_APPWIDGET_ID , AppWidgetManager.INVALID_APPWIDGET_ID) ;
- Log.i(TAG, "completeAddAppWidget : appWidgetId is ----> " + appWidgetId) ;
- if(appWidgetId == -1){
- Toast.makeText(MainActivity.this, "添加窗口小部件有误", Toast.LENGTH_SHORT) ;
- return ;
- }
- AppWidgetProviderInfo appWidgetProviderInfo = appWidgetManager.getAppWidgetInfo(appWidgetId) ;
- AppWidgetHostView hostView = mAppWidgetHost.createView(MainActivity.this, appWidgetId, appWidgetProviderInfo);
- //linearLayout.addView(hostView) ;
- int widget_minWidht = appWidgetProviderInfo.minWidth ;
- int widget_minHeight = appWidgetProviderInfo.minHeight ;
- //设置长宽 appWidgetProviderInfo 对象的 minWidth 和 minHeight 属性
- LinearLayout.LayoutParams linearLayoutParams = new LinearLayout.LayoutParams(widget_minWidht, widget_minHeight);
- //添加至LinearLayout父视图中
- linearLayout.addView(hostView,linearLayoutParams) ;
- }
- }
最后 ,关于AppWidget点击后触发的相应事件,是通过设置该AppWidget的RemoteViews的某个控件点击事件而触发的。
示例DEMO下载地址:http://download.csdn.net/detail/qinjuning/4018449
转载请注明出处:http://blog.csdn.net/qinjuning
前言: 最近一直在看Launcher模块,经过差不多两个月学习,终于摸透了Launcher的一些主要功能实现,目前继续还处于
摸索状态。未看Launcher时,于我而言,只能膜拜,以为所有功能都是它实现的 ;入门后,才发现,Launcher的很多功能只是
集成了框架/应用程序提供的功能。很多陌生的东西,只有接触了才感叹:“oh ,原来是这样的!”
今天先给大家分享下Launcher如何实现添加快捷方式(Shortcut) ,后续会慢慢增加其他方面的功能,帮助大家“一叶而知秋”。
具体来说,Launcher中的快捷方式有两种类型:
1 、"伪"快捷方式 —— 应用程序类型
2 、"真"快捷方式 —— Activity具备<action/>为ACTION_CREATE_SHORTCUT的配置信息
这两种类型的快捷方式是怎么勾搭在一起的,在下面大家通过代码自己理解,也不方便细说了。
关于如何创建一个”真”快捷方式(Shortcut)的App ,大家可以先去看看杨丰盛老师的博客《Android特色开发之桌面组件》 ,
从中我们可以掌握如何创建一个快捷方式,实现也不是很难。
知识点介绍:
知识点一 、ACTION_PICK_ACTIVITY使用说明 ,具体可以参考SDK Intent类
功能:显示匹配附加值为EXTRA_INTENT的所有Activity,并将它们以列表呈现给用户。当用户从该列表选中一项
时,并不会启动该Activity(这与与ACTION_CHOOSER不同,此Action会启动用户选择的Activity),而是将该Activity的详细信
息(可能包括Action、ComponentName、data信息等)以Intent对象返回给调用者(通常为onActivityResult方法)。
附加值:EXTRA_INTENT 显示所有匹配显示所有匹配附加值为EXTRA_INTENT的Activity,
EXTRA_TITLE 作为显示列表即所有Activity的标题 。
因此,根据ACTION_PICK_ACTIVITY的特性,真正地创建快捷方式需要两步走:
第一步:发送ACTION_PICK_ACTIVITY以及EXTRA_INTENT,找到我们希望能创建快捷方式的Activity列表。
第二步:根据第一步所选择的Activity返回的Intent对象,再次发送此Intent对象,即可创建该Activity提供给
我们快捷方式了。
例如,下面我们只是简单的发送一个请求显示所有应用程序的Intent,如下:
- //重新发送一个Action为Pick_Activity的Intent,获取所有应用程序信息
- Intent pickIntent = new Intent(Intent.ACTION_PICK_ACTIVITY);
- Intent mainIntent = new Intent () ;
- mainIntent.setAction(Intent.ACTION_MAIN);
- mainIntent.addCategory(Intent.CATEGORY_LAUNCHER);
- pickIntent.putExtra(Intent.EXTRA_INTENT, mainIntent);
- pickIntent.putExtra(Intent.EXTRA_TITLE, "选择应用程序"); //设置界面title
- //继续选择所有应用程序
- startActivityForResult(pickIntent,MY_REQUEST_ALL_APPLICATION );
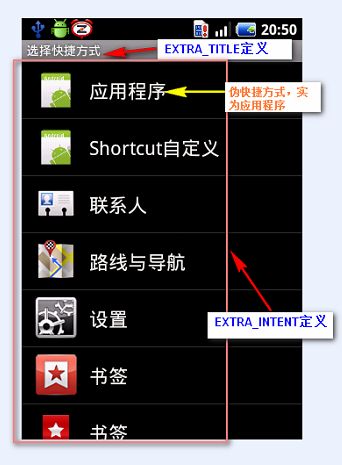
ACTION_PICK_ACTIVITY效果图如下:
点击某一具体Activity , 即可选择创建该Activity的快捷方式了。
知识点二、 Intent.ShortcutIconResource类介绍
功能: 为快捷方式(Shortcut)和文件夹(live folder)提供图片资源
常用方法为:
public static Intent.ShortcutIconResource fromContext(Context context, int resourceId)
功能: 创建一个 Intent.ShortcutIconResource 对象
参数说明:context Context类对象
resourceId 具体的图片资源id 。
常用属性:
packageName 该应用程序所在包名,类型为 packageName:type/entityname
resourceName resourceId所对应地的资源名
例如: 某个图片资源 R.id.icon = 0x7f020000, 则resourceName 为 packageName:drawable/icon
具体怎么通过 Intent.ShortcutIconResource对象获取图片资源,请参考示例Demo。
示例Demo
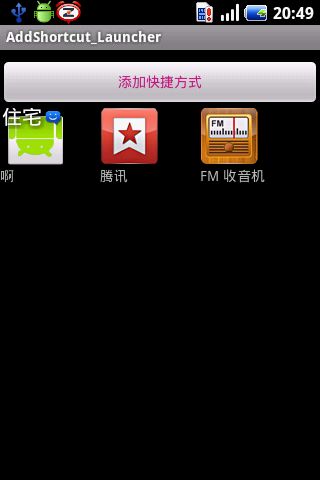
说明:点击创建快捷方式对话框后, 选择某一项具体的快捷方式,即可添加至MainActivity界面中 ,继续点击每个View,则
可启动该快快捷方式的App,挺给力的吧。
PS: 由于我只是简单的利用了LinearLayout去当容器,会存在局限性,大家可在此基础上,利用GridView/ListView构建更好
的布局,当然更NB的是,去提供类似Launcher的自定义布局。
由于执行快捷方式可能需要一些特定的权限,因此我们必须得在AndroidManifest.xml里配置对应的权限。例如,直接拨打电话
需要的权限为: <uses-permission android:name="android.permission.CALL_PHONE"></uses-permission>
如上效果图,增加几个快捷方式后截图如下,点击即可启动该应用。
主工程逻辑如下:
- package com.qin.addshortcut;
- import java.util.ArrayList;
- import android.app.Activity;
- import android.content.ComponentName;
- import android.content.Intent;
- import android.content.Intent.ShortcutIconResource;
- import android.content.pm.ActivityInfo;
- import android.content.pm.PackageManager;
- import android.content.pm.PackageManager.NameNotFoundException;
- import android.content.res.Resources;
- import android.graphics.Bitmap;
- import android.graphics.Rect;
- import android.graphics.drawable.BitmapDrawable;
- import android.graphics.drawable.Drawable;
- import android.os.Bundle;
- import android.os.Parcelable;
- import android.util.Log;
- import android.view.LayoutInflater;
- import android.view.View;
- import android.widget.Button;
- import android.widget.ImageView;
- import android.widget.LinearLayout;
- import android.widget.TextView;
- import android.widget.Toast;
- /**
- *
- * @author http://http://blog.csdn.net/qinjuning
- */
- public class MainActivity extends Activity implements View.OnClickListener
- {
- private LinearLayout linearlayout ; //用来存放所有快捷方式的容器 --- 父视图
- private Button btAddShortCut;
- private static final int MY_REQUEST_SHORT_CUT = 1; // 第一步 、 显示所有能创建快捷方式的Activity
- private static final int MY_CREATE_SHOURT_CUT = 2; //第二步、 创建 真快捷方式
- private static final int MY_REQUEST_ALL_APPLICATION = 3 ; //第二步 、创建 伪快捷方式 -- 应用程序类
- private static String TAG = "AddShortActivity" ;
- private PackageManager mPackageManager = null ;
- /** Called when the activity is first created. */
- @Override
- public void onCreate(Bundle savedInstanceState)
- {
- super.onCreate(savedInstanceState);
- setContentView(R.layout.main);
- btAddShortCut = (Button) findViewById(R.id.bt_addShortcut);
- linearlayout = (LinearLayout)findViewById(R.id.linearLayout) ;
- linearlayout.setOnClickListener(this) ;
- //演示如何通过一个资源的type获取该资源文件在R文件中的整数描述符
- // getIdentifier 参数为 package:type/entry . 例如求icon的资源描述符如下:
- int iconId = this.getResources().getIdentifier("com.qin.addshortcut:drawable/icon", null, null);
- Log.i(TAG, " icon id : " + iconId);
- //获取PackageManager对象
- mPackageManager = getPackageManager();
- btAddShortCut.setOnClickListener(new View.OnClickListener()
- {
- @Override
- public void onClick(View v)
- {
- //创建快捷方式对话框
- createShortDialog() ;
- }
- });
- }
- private void createShortDialog(){
- //begin :添加创建应用程序的图标('快捷方式")
- // 此bundle值为附加的创建PICK_ACTIVITY的一个列表项
- Bundle bundle = new Bundle() ;
- //设置name
- ArrayList<String> shortcutNames = new ArrayList<String>();
- shortcutNames.add("应用程序");
- bundle.putStringArrayList(Intent.EXTRA_SHORTCUT_NAME, shortcutNames);
- //设置对应的头像
- ArrayList<ShortcutIconResource> shortcutIconRes= new ArrayList<ShortcutIconResource>();
- shortcutIconRes.add(ShortcutIconResource.fromContext(MainActivity.this, R.drawable.icon));
- bundle.putParcelableArrayList(Intent.EXTRA_SHORTCUT_ICON_RESOURCE, shortcutIconRes);
- // end
- Intent pickIntent = new Intent(Intent.ACTION_PICK_ACTIVITY);
- Intent extraIntent = new Intent(Intent.ACTION_CREATE_SHORTCUT);
- pickIntent.putExtra(Intent.EXTRA_INTENT, extraIntent);//所要查找的Activity Intent
- pickIntent.putExtra(Intent.EXTRA_TITLE, "选择快捷方式"); // Title
- //看到没 , 伪快捷方式 是在这儿创建地。
- pickIntent.putExtras(bundle);
- startActivityForResult(pickIntent, MY_REQUEST_SHORT_CUT);
- }
- protected void onActivityResult(int requestCode, int resultCode, final Intent data)
- {
- super.onActivityResult(requestCode, resultCode, data);
- //未成功的选择任何一个shortcut(比如直接按back键) , 直接返回
- if(resultCode == RESULT_CANCELED )
- return ;
- switch(requestCode){
- case MY_REQUEST_SHORT_CUT:
- //第一次发送 PICK_Activity后 ,对所选列表项进行选择后,做的中间处理操作,需要判断是选择“应用程序” 抑或真正滴快捷方式
- // 获得快捷方式Label
- String label = data.getStringExtra(Intent.EXTRA_SHORTCUT_NAME);
- //这个字段是我们之前主动添加的
- if(label.equals("应用程序")){
- //重新发送一个Action为Pick_Activity的Intent,获取所有应用程序信息
- Intent pickIntent = new Intent(Intent.ACTION_PICK_ACTIVITY);
- Intent mainIntent = new Intent () ;
- mainIntent.setAction(Intent.ACTION_MAIN);
- mainIntent.addCategory(Intent.CATEGORY_LAUNCHER);
- pickIntent.putExtra(Intent.EXTRA_INTENT, mainIntent);
- pickIntent.putExtra(Intent.EXTRA_TITLE, "选择应用程序"); //设置界面title
- //继续选择所有应用程序
- startActivityForResult(pickIntent,MY_REQUEST_ALL_APPLICATION );
- }
- else{ //重新请求创建上一次点击的Activity , 启动后即可创建
- Log.v(TAG, "MY_REQUEST_SHORT_CUT Intent Info--- >" + data);
- //下一步,创建某一具体的shortcut
- startActivityForResult(data, MY_CREATE_SHOURT_CUT);
- }
- break ;
- //以下操作才是真正地处理添加快捷方式的操作
- case MY_CREATE_SHOURT_CUT:
- //data数据封装了所有快捷方式应该该附加的值
- Log.v(TAG, "MY_CREATE_SHOURT_CUT Intent Info--- >" + data);
- completeAddShortCut(data);
- break ;
- case MY_REQUEST_ALL_APPLICATION: //创建一个应用程序的"快捷方式"
- //data数据封装了点击某个应用程序的intent,包括action,ComponentName组信息等,继而我们可以通过intent对象获取该应用程序的信息
- Log.v(TAG, "MY_REQUEST_ALL_APPLICATION Intent Info--- >" + data);
- completeAddApplication(data) ;
- break ;
- default :
- break ;
- }
- }
- //添加一个应用程序的"快捷方式"
- private void completeAddApplication(Intent data){
- //打印应用程序返回的intent信息, 一个完整的启动应用程序的Intent
- Log.i(TAG, "Application intent info ---->" +data) ;
- ComponentName componentName = data.getComponent() ;
- Log.i(TAG, "ComponentName Info ----> " + componentName) ;
- try
- {
- //获取资源图片
- ActivityInfo activityInfo = mPackageManager.getActivityInfo(componentName, 0);
- CharSequence applabel = activityInfo.loadLabel(mPackageManager) ;
- Drawable appIcon = activityInfo.loadIcon(mPackageManager) ;
- //创建一个View对象
- View view = makeViewForShortcut(applabel , appIcon) ;
- //为该快捷方式的View设置onClick监听
- view.setOnClickListener(this) ;
- //将该intent对象设置为View的tag属性 , onClick时获取该tag , --->getTag()
- view.setTag(data) ;
- //将该View对象添加至LinearLayout中,由于大小发生了变化,系统会重新走”measure“ , ”layout“, ”draw“ 过程
- //设置长宽高
- LinearLayout.LayoutParams llparams = new LinearLayout.LayoutParams(80,90) ;
- linearlayout.addView(view,llparams) ;
- }
- catch (NameNotFoundException e)
- {
- Log.e(TAG, "NameNotFoundException at completeAddApplication method") ;
- }
- }
- //添加快捷方式(真正地,非应用程序)
- private void completeAddShortCut(Intent data){
- Drawable shortcutIcon = null; //快捷方式的图标 , 可以有两种方式获取,如下 if else 判断
- // 获得快捷方式Label
- String label = data.getStringExtra(Intent.EXTRA_SHORTCUT_NAME);
- Parcelable bitmap = data.getParcelableExtra(Intent.EXTRA_SHORTCUT_ICON);
- // 直接了图片 , 即设置了 EXTRA_SHORTCUT_ICON 参数值
- if (bitmap != null && bitmap instanceof Bitmap)
- {
- shortcutIcon = new BitmapDrawable((Bitmap) bitmap);
- }
- else //设置了EXTRA_SHORTCUT_ICON_RESOURCE 附加值
- {
- Parcelable iconParcel = data .getParcelableExtra(Intent.EXTRA_SHORTCUT_ICON_RESOURCE);
- if(iconParcel != null && iconParcel instanceof ShortcutIconResource)
- {
- // 获得ShortcutIconResource对象
- ShortcutIconResource iconRes = (ShortcutIconResource) iconParcel;
- //获得inconRes对象的Resource对象
- try
- {
- //获取对应packageName的Resources对象
- Resources resources = mPackageManager.getResourcesForApplication(iconRes.packageName);
- //获取对应图片的id号
- int iconid = resources.getIdentifier(iconRes.resourceName, null, null);
- Log.i(TAG, "icon identifier is " + iconRes.resourceName) ;
- //获取资源图片
- shortcutIcon = resources.getDrawable(iconid);
- }
- catch (NameNotFoundException e)
- {
- Log.e(TAG, "NameNotFoundException at completeAddShortCut method") ;
- }
- }
- }
- //可能快捷方式没有为我们设置任何图像以及ShortcutIconResource对象,我们需要重置快捷方式的头像
- if ( shortcutIcon == null) {
- // 一定会有图片,这儿我简单的处理了 .
- Toast.makeText(MainActivity.this, "sorry , we could not shortcut image", Toast.LENGTH_SHORT) ;
- return ;
- }
- // 获得快捷方式Intent , 直接startActivity 即可
- Intent shortcut_intent = data.getParcelableExtra(Intent.EXTRA_SHORTCUT_INTENT);
- if (shortcut_intent != null)
- Log.i(TAG, "shortCut intent info ----> "+shortcut_intent) ;
- //创建一个View对象
- View view = makeViewForShortcut(label , shortcutIcon) ;
- //为该快捷方式的View设置onClick监听
- view.setOnClickListener(this) ;
- //将该intent对象设置为View的tag属性 , onClick时获取该tag , --->getTag()
- view.setTag(shortcut_intent) ;
- //将该View对象添加至LinearLayout中,由于大小发生了变化,系统会重新走”measure“ , ”layout“, ”draw“ 过程
- //设置长宽高
- LinearLayout.LayoutParams llparams = new LinearLayout.LayoutParams(100,90) ;
- linearlayout.addView(view,llparams) ;
- }
- //点击事件
- @Override
- public void onClick(View v) {
- Object tag = v.getTag() ;
- if(tag !=null && tag instanceof Intent){
- Intent intent = (Intent)tag ;
- startActivityForSafely(intent) ;
- }
- }
- //安全启动一个Activity
- private void startActivityForSafely(Intent data) {
- Intent launchIntent = data ;
- //有些启动后的Activity需要设置该选项,即为启动的Activity设置一个界面,例如联系人的快捷方式, so , 我们加上它吧
- launchIntent.setSourceBounds(new Rect(0,0,300,300));
- launchIntent.setFlags(Intent.FLAG_ACTIVITY_NEW_TASK);
- startActivity(launchIntent) ;
- }
- //为每个快捷方式创建一个View对象
- private View makeViewForShortcut(CharSequence label , Drawable icon){
- LayoutInflater inflater = LayoutInflater.from(this) ;
- View shortcut_view = inflater.inflate(R.layout.shortcut_view, null) ;
- TextView tv = (TextView)shortcut_view.findViewById(R.id.shortcut_label) ;
- tv.setText(label) ;
- ImageView img = (ImageView)shortcut_view.findViewById(R.id.shortcut_img) ;
- img.setImageDrawable(icon) ;
- return shortcut_view ;
- }
- }
某些快捷方式的功能实现起来还是很炫彩的 , 尤其是启动直接拨打、直接发送短信的Activity,最开始我以为是Launcher实
现地,如今才明白原来是快捷方式提供了一个Intent对象,Launcher直接采用了拿来主义了。 不多说了,大家慢慢感受体味吧。
示例DEMO下载地址: http://download.csdn.net/detail/qinjuning/4008605
