lnmp环境下源码安装zabbix-3.0.1
CentOS 6.7 mininal 源码安装Zabbix-3.0.1
1、环境准备
Lnmp架构
wget -c https://api.sinas3.com/v1/SAE_lnmp/soft/lnmp1.3beta-full.tar.gz 下载时wget需要加--no-check-certificate参数 #lnmp一键安装很好用,生产不建议使用
2、系统设置
CentOS 6.7 IP:192.168.5.5
关闭防火墙:
[root@master mysql]# service iptables stop
iptables: Setting chains to policy ACCEPT: nat filter [ OK ]
iptables: Flushing firewall rules: [ OK ]
iptables: Unloading modules: [ OK ]
[root@master mysql]# service iptables status
iptables: Firewall is not running.
[root@master mysql]# chkconfig iptables off
禁用selinux
[root@master mysql]# sed -i 's/SELINUX=enforceing/SELINUX=disabled/' /etc/sysconfig/selinux
[root@master mysql]# getenforce
Disabled
#禁用selinux需要重启使生效
[root@master mysql]# setenforce 0 #使selinux设置临时生效
3、安装Zabbix源码包
创建Zabbix用户组及用户
groupadd zabbix
useradd -g zabbix zabbix -s /bin/nologin
安装依赖包
yum install net-snmp-devel curl curl-devel mysql-devel -y
#
yum -y install mysql-devel libdbi-dbd-mysql unixODBC-devel OpenIPMI-devel java-devel
yum install php-pecl-ssh2.x86_64 libssh2-devel.x86_64 openldap openldap-devel
#此步骤如果在搭建lnmp时已经完成,可跳过此步骤
下载Zabbix源码包
http://sourceforge.net/projects/zabbix/files/ZABBIX Latest Stable/3.0.1/zabbix-3.0.1.tar.gz
wget -c -url -P /usr/local/src #源码包的一般存放位置
[root@master ~]# cd /usr/local/src/
[root@master src]# tar -zxvf zabbix-3.0.1.tar.gz && cd zabbix-3.0.1
[root@master zabbix-3.0.1]# ./configure --help | less #查看configure支持的参数
[root@master zabbix-3.0.1]# ./configure --prefix=/opt/zabbix --enable-server --enable-agent --enable-ipv6 --with-net-snmp --with-libcurl --with-libxml2 --enable-java --with-ssh2 --with-openssl --with-openipmi --with-mysql=/usr/local/mysql/bin/mysql_config
注:--with-libcurl configuration option with cURL 7.20.0 or higher is required for SMTP authentication, supported since Zabbix 3.0.0.
出现上图界面表示已经configure完成,然后编译
[root@master zabbix-3.0.1]# make && make install
#编译需要等待一会
出现上图表示Zabbix编译完成。
4、创建一个名为zabbix的数据库,并配置相关文件
可以通过mysql -e参数免登陆mysql创建zabbix用户及zabbix数据库
设置方法:
cat >> ~/.my.cnf << EOF
[client]
password="password"
user=root
EOF
#password = "MySQL密码"
#user = MySQL 用户名
#其中user 行可以省略, 默认使用当前的用户名填充mysql的登录用户
mysql -e "create database zabbix character set utf8 collate utf8_bin;"
mysql -e "grant all privileges on zabbix.* to zabbix@localhost identified by 'zabbix';"
mysql -e "flush privileges;"
或者登陆mysql之后创建:
[root@master scripts]# mysql -u root -p
#
shell> mysql -uroot -p
mysql> create database zabbix character set utf8 collate utf8_bin;
mysql> grant all privileges on zabbix.* to zabbix@localhost identified by '';
mysql> quit;
shell> cd database/mysql
shell> mysql -uzabbix -p zabbix < schema.sql
# stop here if you are creating database for Zabbix proxy
shell> mysql -uzabbix -p zabbix < images.sql
shell> mysql -uzabbix -p zabbix < data.sql
或者
shell> mysql -uroot -p
mysql>use zabbix;
mysql>source /usr/local/src/zabbix-3.0.1/database/mysql/schema.sql
mysql>source /usr/local/src/zabbix-3.0.1/database/mysql/images.sql
mysql>source /usr/local/src/zabbix-3.0.1/database/mysql/data.sql
设置zabbix启动服务
root@master core]# cp /usr/local/src/zabbix-3.0.1/misc/init.d/fedora/core/zabbix_* /etc/rc.d/init.d/
[root@master core]# chmod 744 /etc/init.d/zabbix_*
[root@master core]# sed -i "s#BASEDIR=/usr/local#BASEDIR=/opt/zabbix#g" /etc/init.d/zabbix_*
#拷贝zabbix前端程序到web应用目录下
root@master zabbix-3.0.1]# cp -rf /usr/local/src/zabbix-3.0.1/frontends/php /home/wwwroot/default/zabbix
[root@master zabbix-3.0.1]# chown -R zabbix:zabbix /home/wwwroot/default/zabbix #授权
#服务端口设置
cat >>/etc/services <<EOF
zabbix-agent 10050/tcp #Zabbix Agent
zabbix-agent 10050/udp #Zabbix Agent
zabbix-trapper 10051/tcp #Zabbix Trapper
zabbix-trapper 10051/udp #Zabbix Trapper
EOF
#编辑zabbix_server.conf文件
sed -i "s/#\ DBPassword=/DBPassword=zabbix/g" /opt/zabbix/etc/zabbix_server.conf
sed -i "s/#\ DBHost=localhost/DBHost=localhost/g" /opt/zabbix/etc/zabbix_server.conf
sed -i "s/#\ DBSocket=\/tmp\/mysql.sock/DBSocket=/tmp/mysql.sock/g" /opt/zabbix/etc/zabbix_server.conf
sed -i "s#tmp/zabbix_server.log#var/log/zabbix/zabbix_server.log#g" /opt/zabbix/etc/zabbix_server.conf
sed -i "s#tmp/zabbix_server.pid#opt/zabbix/pid/zabbix_server.pid#g" /opt/zabbix/etc/zabbix_server.conf
sed -i "s/#\ Timeout=3/Timeout=5/g" /opt/zabbix/etc/zabbix_server.conf
#修改php.ini 支持zabbix
sed -i "s/;always_populate_raw_post_data = -1/always_populate_raw_post_data = -1/g" /usr/local/php/etc/php.ini
sed -i "s/max_input_time = 60/max_input_time = 300/g" /usr/local/php/etc/php.ini
#修改php配置文件完成之后重启php-fpm
/etc/init.d/php-fpm restart
#edit zabbix_agentd.conf file
sed -i "s/Server\=127.0.0.1/Server=127.0.0.1,192.168.5.5/g" /opt/zabbix/etc/zabbix_agentd.conf
sed -i "s#tmp/zabbix_agentd.log#var/log/zabbix/zabbix_agentd.log#g" /opt/zabbix/etc/zabbix_agentd.conf
sed -i "s#tmp/zabbix_agentd.pid#opt/zabbix/pid/zabbix_agentd.pid#g" /opt/zabbix/etc/zabbix_agentd.conf
sed -i "s/#\ Timeout=3/Timeout=5/g" /opt/zabbix/etc/zabbix_agentd.conf
sed -i "s/#\ Include=\/usr\/local\/etc\/zabbix_agentd.conf.d/Include=\/opt\/zabbix\/etc\/zabbix_agentd.conf.d/g" /opt/zabbix/etc/zabbix_agentd.conf
sed -i "s/#\ UnsafeUserParameters=0/UnsafeUserParameters=1/g" /opt/zabbix/etc/zabbix_agentd.conf
#[root@master zabbix-3.0.1]# egrep -v "^#|^$" /opt/zabbix/etc/zabbix_server.conf
[root@master zabbix-3.0.1]# egrep -v "^#|^$" /opt/zabbix/etc/zabbix_agentd.conf
出现下面表明配置文件已经修改完成
启动Zabbix server和zabbix agent并设置开机自启动
[root@master zabbix-3.0.1]# chkconfig zabbix_agentd on
[root@master zabbix-3.0.1]# chkconfig zabbix_server on
[root@master zabbix-3.0.1]# /etc/init.d/zabbix_agentd restart
[root@master zabbix-3.0.1]# /etc/init.d/zabbix_server restart
5、Zabbix前端安装
在浏览器输入http://192.168.5.5/zabbix #
需要修改php参数,
sed -i "s/;always_populate_raw_post_data = -1/always_populate_raw_post_data = -1/g" /usr/local/php/etc/php.ini
然后重启php-fpm,如果还一直报错,则需要修改zabbix前端源码。
vim /home/wwwroot/default/zabbix/include/classes/setup/CFrontendSetup.php
添加$current = -1;在浏览器中重启刷新
重新刷新浏览器,看到已经没有报错:
端口:3306 密码:zabbix
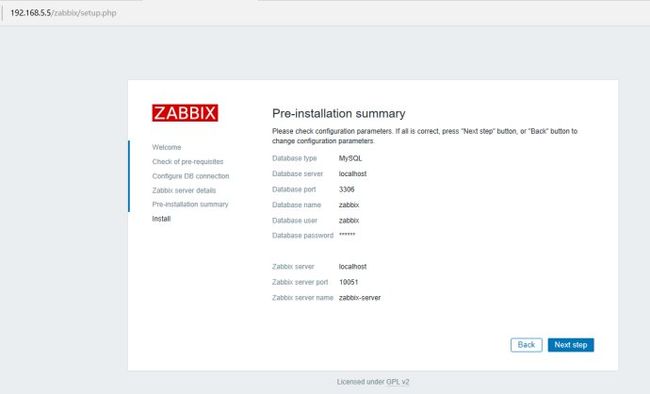
完成点击下一步:
填写Name:zabbix-server,可以不填写,点击下一步:
出错的原因可能是创建文件是权限不够,这里直接下载下来,保存到指定的位置即可:
直接新建这个配置文件,把下面的配置信息复制到新建的配置文件中,保存。
vim /home/wwwroot/default/zabbix/conf/zabbix.conf.php


