Android 5.0 调色 Palette调色功能
Palette非常好用,也非常好玩。 Palette的作用是从图像中提取突出的颜色,这样我们可以根据提取到的色值把它赋给Toolbar,标题,状态栏等,可以使我们的整个界面色调统一,效果非常好看。
Palette介绍
Palette调色板,可以很方便的让我们从图片中提取颜色。并且可以指定提取某种类型的颜色。
Vibrant鲜艳的Vibrantdark鲜艳的暗色Vibrantlight鲜艳的亮色Muted柔和的Muteddark柔和的暗色Mutedlight柔和的亮色
对图片取色是一个比较消耗性能的操作,其内部会对图片的像素值进来遍历以分析对比,所以我们要在异步线程中去完成。
如果操作本来就属于后台线程,可以使用:
Palette p = Palette.generate(Bitmap bitmap);
如果在主线程中,我们可以使用异步的方式:
Palette.generateAsync(bitmap, new Palette.PaletteAsyncListener() {
        public void onGenerated(Palette palette) {  }
});
当操作完成后或者异步回调后,我们就可以使用以下方式来获取对应的色值了,并且可以在没有获取到的情况下之指定默认值:
p.getVibrantColor(int defaultColor);
p.getDarkVibrantColor(int defaultColor);
p.getLightVibrantColor(int defaultColor);
p.getMutedColor(int defaultColor);
p.getDarkMutedColor(int defaultColor);
p.getLightMutedColor(int defaultColor);
在使用palette之前,bitmap提供获取指定位置的像素值:
bitmap.getPixel(x,y)
但是该方式只能获取某一点的像素值,palette是对整个bitmap的所有像素值进行分析,并选出几个像素占比比较多的像素值,这样选择出来的色值更符合图片的整体色值。
Palette简单使用
Palette经常用于和ViewPager,Fragment搭配使用,当我们的Pager切换时伴随着Fragment的变化,而Fragment里的内容一般是不同的,所以每个Fragment里的一般视觉效果也是不同的,所以我们可以用Palette来去提取Fragment中的主色调,把这个主色调用于整体的UI风格。
第一步:添加依赖
compile 'com.android.support:palette-v7:23.4.0'第二步:创建Palette对象,并获取图片的颜色值
package com.itydl.palette;

import android.graphics.Bitmap;
import android.graphics.BitmapFactory;
import android.graphics.Color;
import android.os.Bundle;
import android.support.v7.app.AppCompatActivity;
import android.support.v7.graphics.Palette;
import android.view.View;
import android.widget.ImageView;

public class MainActivity extends AppCompatActivity {

    private Bitmap mBitmap;
    private View mV1;
    private View mV2;
    private View mV3;
    private View mV4,mV5,mV6;
    private ImageView mImageView;

    @Override
    protected void onCreate(Bundle savedInstanceState) {
        super.onCreate(savedInstanceState);
        setContentView(R.layout.activity_main);
        initView();
    }

    private void initView() {
        mV1 = findViewById(R.id.v1);
        mV2 = findViewById(R.id.v2);
        mV3 = findViewById(R.id.v3);
        mV4 = findViewById(R.id.v4);
        mV5 = findViewById(R.id.v5);
        mV6 = findViewById(R.id.v6);
        mImageView = (ImageView) findViewById(R.id.iv_show);
    }

    public void click(View v) {
        mImageView.setImageResource(R.mipmap.h7);

        mBitmap = BitmapFactory.decodeResource(getResources(), R.mipmap.h7);
      /*  如果操作本来就属于后台线程,可以使用:*/
        /*mPalette = Palette.generate(Bitmap mBitmap);*/

        /*如果在主线程中,我们可以使用异步的方式:*/
        Palette.generateAsync(mBitmap, new Palette.PaletteAsyncListener() {
            public void onGenerated(Palette palette) {
                //柔和的
                mV1.setBackgroundColor(palette.getMutedColor(Color.BLACK));//设置默认颜色
                //鲜艳的暗色
                mV2.setBackgroundColor(palette.getDarkMutedColor(Color.BLACK));
                //柔和的亮色
                mV3.setBackgroundColor(palette.getLightMutedColor(Color.BLACK));
                //鲜艳的
                mV4.setBackgroundColor(palette.getVibrantColor(Color.BLACK));
                //鲜艳的暗色
                mV5.setBackgroundColor(palette.getDarkVibrantColor(Color.BLACK));
                //鲜艳的亮色
                mV6.setBackgroundColor(palette.getLightVibrantColor(Color.BLACK));
            }

        });
    }
}
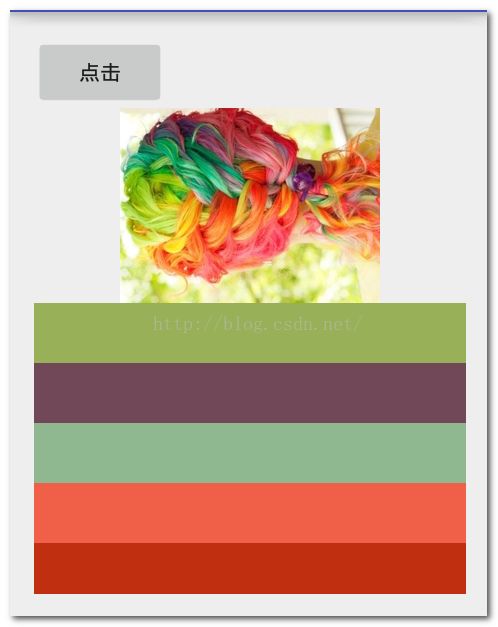
运行程序:
下边的颜色都是从上边图片提取出来的。
最后看一下重要的应用场景,给出运行结果。对于案例,会在后边分析。
