Android项目中遇到的坑之(Android圆角圆形图 一)
看了看以前的项目,发现用了一个叫RoundImageView的类,当时直接从网上copy的(^__^) 嘻嘻……,今天偶尔看到了,觉得不能一直停留在直接拖别人的代码了,于是自己实现了一下,发现以前的只支持CENTER_CROP类型的缩放,于是自己看了下ImageView的源码,实现了下支持所有缩放类型的ImageView.
先上一张效果图:
怎么样?效果还不错吧!接下来我们来一步一步实现一下吧…….
实现圆角圆形的ImageView方式有很多,刚好在复习Paint的Xfermode,所以就先用Xfermode来实现了,
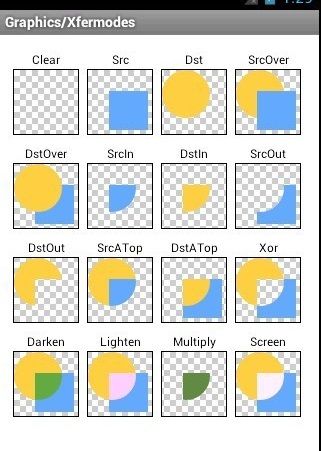
什么时候Xfermode
我先上一张图,想研究和学习的可以去看看我偶像启舰的神作
http://blog.csdn.net/harvic880925/article/details/50995268

简单说一下Xfermode的一些模式:
1.PorterDuff.Mode.CLEAR
所绘制不会提交到画布上。
2.PorterDuff.Mode.SRC
显示上层绘制图片
3.PorterDuff.Mode.DST
显示下层绘制图片
4.PorterDuff.Mode.SRC_OVER
正常绘制显示,上下层绘制叠盖。
5.PorterDuff.Mode.DST_OVER
上下层都显示。下层居上显示。
6.PorterDuff.Mode.SRC_IN
取两层绘制交集。显示上层。
7.PorterDuff.Mode.DST_IN
取两层绘制交集。显示下层。
8.PorterDuff.Mode.SRC_OUT
取上层绘制非交集部分。
9.PorterDuff.Mode.DST_OUT
取下层绘制非交集部分。
10.PorterDuff.Mode.SRC_ATOP
取下层非交集部分与上层交集部分
11.PorterDuff.Mode.DST_ATOP
取上层非交集部分与下层交集部分
12.PorterDuff.Mode.XOR
异或:去除两图层交集部分
13.PorterDuff.Mode.DARKEN
取两图层全部区域,交集部分颜色加深
14.PorterDuff.Mode.LIGHTEN
取两图层全部,点亮交集部分颜色
15.PorterDuff.Mode.MULTIPLY
取两图层交集部分叠加后颜色
16.PorterDuff.Mode.SCREEN
取两图层全部区域,交集部分变为透明色
思路:
画一个圆角或圆形当做SRC(模板)然后自己设置的图片当做DST然后用PorterDuff.Mode.DST_IN让两个相交的部分显示出图片,这样说有点抽象,下面我们来一步一步实现以下。
attrs.xml:
<?xml version="1.0" encoding="utf-8"?>
<resources>
    <attr name="borderRadius" format="dimension"/>
    <attr name="type" format="enum">
        <enum name="circle" value="0"/>
        <enum name="round" value="1"/>
    </attr>
    <declare-styleable name="RoundImageView">
        <attr name="borderRadius"/>
        <attr name="type"/>
    </declare-styleable>
</resources>然后我我们创建一个自定义View叫RoundImageView然后去获取attrs中的属性(想必这都是很简单的操作了,老司机的你应该都敲烂了(^__^) 嘻嘻……):
package com.yqy.canvasdemo;

import android.content.Context;
import android.content.res.TypedArray;
import android.util.AttributeSet;
import android.widget.ImageView;

/** * @author EX_YINQINGYANG * @version [Android PABank C01, @2016-10-08] * @date 2016-10-08 * @description */
public class RoundImageView extends ImageView {
    /** * 圆角ImageView圆角的半径大小 */
    private int mRadius=dp2px(10);
    /** * 圆形类型 */
    private int TYPE_CIRCLE=0;
    /** * 圆角类型 */
    private int TYPED_ROUND=1;
    /** * 图片类型 */
    private int mType=TYPE_CIRCLE;
    /** * 图片缩放模式 */
    private ScaleType mScaleType;
    public RoundImageView(Context context) {
        this(context,null);
    }

    public RoundImageView(Context context, AttributeSet attrs) {
        this(context, attrs,0);
    }

    public RoundImageView(Context context, AttributeSet attrs, int defStyleAttr) {
        super(context, attrs, defStyleAttr);
        obtainStyleAttr(context,attrs,defStyleAttr);
        mScaleType=getScaleType();
    }

    private void obtainStyleAttr(Context context, AttributeSet attrs, int defStyleAttr) {
        TypedArray a=context.getTheme().obtainStyledAttributes(attrs,R.styleable.RoundImageView,defStyleAttr,0);
        mRadius=a.getDimensionPixelSize(R.styleable.RoundImageView_borderRadius,mRadius);
        mType=a.getInteger(R.styleable.RoundImageView_type,mType);
        a.recycle();
    }

    /** * dp2px * @param value * @return px */
    private int dp2px(int value) {
        return (int) (value*getContext().getResources().getDisplayMetrics().density+0.5f);
    }
}
然后我们就要实现最重要的一步了,重写onDraw方法(为了防止多次绘制然后不断创建bitmap耗内存,我们这使用一个弱引用做一下Bitmap的缓存):
@Override
    protected void onDraw(Canvas canvas) {
        Bitmap bitmap = mWeakReference==null?null:mWeakReference.get();
        if(bitmap==null || bitmap.isRecycled()){
            //获取一下设置的图片资源
            Drawable drawable=getDrawable();
            if(drawable!=null){
                //创建一个空白画布,用来画模板跟原图
                bitmap=Bitmap.createBitmap(getWidth(),getHeight(),Bitmap.Config.ARGB_8888);
                Canvas dstCanvas=new Canvas(bitmap);
                //画原图
                drawable.draw(dstCanvas);
                //设置画笔的Xfermode
                mPaint.setXfermode(mXfermode);
                //画模板
                if(mMaskBitmap==null||mMaskBitmap.isRecycled()){
                    mMaskBitmap=getShapeBitmap();
                }
                dstCanvas.drawBitmap(mMaskBitmap,0,0,mPaint);
                mPaint.setXfermode(null);
            }
        }
       //最后把我们准备好的Bitmap画在canvas上
        canvas.drawBitmap(bitmap,0,0,null);
    }

 /** * 根据Shape类型创建ShapeBitmap */
    private Bitmap getShapeBitmap() {
        Bitmap bitmap=Bitmap.createBitmap(getWidth(),getHeight(), Bitmap.Config.ARGB_8888);
        Canvas canvas =new Canvas(bitmap);
        if(TYPE_CIRCLE==mType){
            canvas.drawCircle(canvas.getWidth()/2,canvas.getHeight()/2,canvas.getWidth()/2,shapePaint);
        } else{
            canvas.drawRound


Rect(new RectF(0,0,canvas.getWidth(),canvas.getHeight()),mRadius,mRadius,shapePaint);
        }
        return bitmap;
    }
代码比较简单,都有注释的,我就不解释了。
写到这里一个简单的圆角圆形ImageView就可以使用了,是不是很简单呢?有些东西吧,还是得自己去琢磨琢磨,哪怕是什么都不会,跟着敲一篇总会有收获的。(不怕笑话,我一开始连别人代码都看不懂(^__^) 嘻嘻…… 只会拖着用,然后一个一个查到底什么意思。)废话不说了。
我们运行代码:

**问题来了:效果是有了,但有发现么?我设置的scaleType只有fitxy
是有效果的,其他的都没有效果了。设置为其他的scaleType都变成matrix那种效果了,也就是图片默认从控件的左上角开始摆放。**
现附上现阶段的源码:
package com.yqy.canvasdemo;

import android.content.Context;
import android.content.res.TypedArray;
import android.graphics.Bitmap;
import android.graphics.Canvas;
import android.graphics.Paint;
import android.graphics.PorterDuff;
import android.graphics.PorterDuffXfermode;
import android.graphics.RectF;
import android.graphics.Xfermode;
import android.graphics.drawable.Drawable;
import android.util.AttributeSet;
import android.widget.ImageView;

import com.cisetech.circleviewdemo.R;

import java.lang.ref.WeakReference;

/** * @author EX_YINQINGYANG * @version [Android PABank C01, @2016-10-08] * @date 2016-10-08 * @description */
public class RoundImageView extends ImageView {
    /** * 圆角ImageView圆角的半径大小 */
    private int mRadius=dp2px(10);
    /** * 圆形类型 */
    private int TYPE_CIRCLE=0;
    /** * 圆角类型 */
    private int TYPED_ROUND=1;
    /** * 图片类型 */
    private int mType=TYPE_CIRCLE;
    /** * 图片缩放模式 */
    private ScaleType mScaleType;
    /** * 缓存bitmap */
    private WeakReference<Bitmap>mWeakReference;
    /** * 模板Bitmap */
    private Bitmap mMaskBitmap;
    /** * 画笔 */
    private Paint mPaint;
    /** * shape paint */
    private Paint shapePaint;
    /** * 画笔Xfermode */
    private Xfermode mXfermode=new PorterDuffXfermode(PorterDuff.Mode.DST_IN);
    public RoundImageView(Context context) {
        this(context,null);
    }

    public RoundImageView(Context context, AttributeSet attrs) {
        this(context, attrs,0);
    }

    public RoundImageView(Context context, AttributeSet attrs, int defStyleAttr) {
        super(context, attrs, defStyleAttr);
        obtainStyleAttr(context,attrs,defStyleAttr);
        mScaleType=getScaleType();
        mPaint=new Paint(Paint.ANTI_ALIAS_FLAG|Paint.DITHER_FLAG);
        shapePaint=new Paint(Paint.ANTI_ALIAS_FLAG|Paint.DITHER_FLAG);
    }

    private void obtainStyleAttr(Context context, AttributeSet attrs, int defStyleAttr) {
        TypedArray a=context.getTheme().obtainStyledAttributes(attrs, R.styleable.RoundImageView,defStyleAttr,0);
        mRadius=a.getDimensionPixelSize(R.styleable.RoundImageView_borderRadius,mRadius);
        mType=a.getInteger(R.styleable.RoundImageView_type,mType);
        a.recycle();
    }

    @Override
    protected void onDraw(Canvas canvas) {
        Bitmap bitmap = mWeakReference==null?null:mWeakReference.get();
        if(bitmap==null || bitmap.isRecycled()){
            //获取一下设置的图片资源
            Drawable drawable=getDrawable();
            if(drawable!=null){
                //创建一个空白画布,用来画模板跟原图
                bitmap=Bitmap.createBitmap(getWidth(),getHeight(),Bitmap.Config.ARGB_8888);
                Canvas dstCanvas=new Canvas(bitmap);
                //画原图
                drawable.draw(dstCanvas);
                //设置画笔的Xfermode
                mPaint.setXfermode(mXfermode);
                //画模板
                if(mMaskBitmap==null||mMaskBitmap.isRecycled()){
                    mMaskBitmap=getShapeBitmap();
                }
                dstCanvas.drawBitmap(mMaskBitmap,0,0,mPaint);
                mPaint.setXfermode(null);
            }
        }
        //最后把我们准备好的Bitmap画在canvas上
        canvas.drawBitmap(bitmap,0,0,null);
    }

    /** * 根据Shape类型创建ShapeBitmap */
    private Bitmap getShapeBitmap() {
        Bitmap bitmap=Bitmap.createBitmap(getWidth(),getHeight(), Bitmap.Config.ARGB_8888);
        Canvas canvas =new Canvas(bitmap);
        if(TYPE_CIRCLE==mType){
            canvas.drawCircle(canvas.getWidth()/2,canvas.getHeight()/2,canvas.getWidth()/2,shapePaint);
        } else{
            canvas.drawRoundRect(new RectF(0,0,canvas.getWidth(),canvas.getHeight()),mRadius,mRadius,shapePaint);
        }
        return bitmap;
    }

    /** * dp2px * @param value * @return px */
    private int dp2px(int value) {
        return (int) (value*getContext().getResources().getDisplayMetrics().density+0.5f);
    }
}
太长了,先到这里了…….未完待续啊
感兴趣的可以阅读我第二篇博客:
Android圆角圆形图(支持各种scaleType 二)