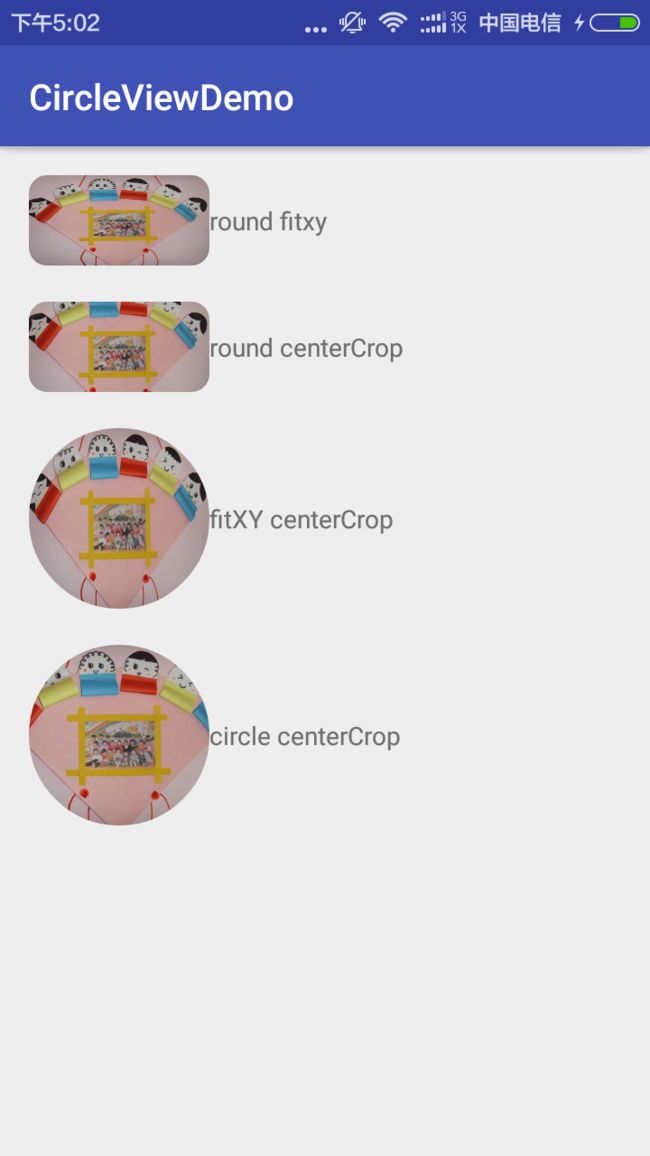
Android项目中遇到的坑之(Android圆角圆形图 二)
接着上一篇的问题来研究研究:
**问题来了:效果是有了,但有发现么?我设置的scaleType只有fitxy
是有效果的,其他的都没有效果了。设置为其他的scaleType都变成matrix那种效果了,也就是图片默认从控件的左上角开始摆放。**
我们先看看ImageView的scaleType
以下内容来自http://www.2cto.com/kf/201411/348601.html
让我们看看scaleType的各类效果图:
ImageView的scaleType的属性有好几种,分别是matrix(默认)、center、centerCrop、centerInside、fitCenter、fitEnd、fitStart、fitXY
android:scaleType=”center”
保持原图的大小,显示在ImageView的中心。当原图的size大于ImageView的size,超过部分裁剪处理。
android:scaleType=”centerCrop”
以填满整个ImageView为目的,将原图的中心对准ImageView的中心,等比例放大原图,直到填满ImageView为止(指的是ImageView的宽和高都要填满),原图超过ImageView的部分作裁剪处理。
android:scaleType=”centerInside”
以原图完全显示为目的,将图片的内容完整居中显示,通过按比例缩小原图的size宽(高)等于或小于ImageView的宽(高)。如果原图的size本身就小于ImageView的size,则原图的size不作任何处理,居中显示在ImageView。
android:scaleType=”matrix”
不改变原图的大小,从ImageView的左上角开始绘制原图,原图超过ImageView的部分作裁剪处理。
android:scaleType=”fitCenter”
把原图按比例扩大或缩小到ImageView的ImageView的高度,居中显示
android:scaleType=”fitEnd”
把原图按比例扩大(缩小)到ImageView的高度,显示在ImageView的下部分位置
android:scaleType=”fitStart”
把原图按比例扩大(缩小)到ImageView的高度,显示在ImageView的上部分位置
android:scaleType=”fitXY”
把原图按照指定的大小在View中显示,拉伸显示图片,不保持原比例,填满ImageView.
下面附上效果图:
原图为Pocoyo的头像,上图为原图的size大于ImageView的size,下图为原图的size小于ImageView的size

已经展示的很清楚了,也就是说我们的RoundImageView只支持fitxy跟martrix两种方式,我们看看ImageView的源码找找原因
问题1:为什么只支持fitxy跟matrix方式呢?
我们看看ImageView源码
 private void configureBounds() {
        if (mDrawable == null || !mHaveFrame) {
            return;
        }

        final int dwidth = mDrawableWidth;
        final int dheight = mDrawableHeight;

        final int vwidth = getWidth() - mPaddingLeft - mPaddingRight;
        final int vheight = getHeight() - mPaddingTop - mPaddingBottom;

        final boolean fits = (dwidth < 0 || vwidth == dwidth)
                && (dheight < 0 || vheight == dheight);

        if (dwidth <= 0 || dheight <= 0 || ScaleType.FIT_XY == mScaleType) {
            /* If the drawable has no intrinsic size, or we're told to scaletofit, then we just fill our entire view. */
            mDrawable.setBounds(0, 0, vwidth, vheight);
            mDrawMatrix = null;
        } else {
            ......
        }
   }
我们看到这么一行代码:
mDrawable.setBounds(0, 0, vwidth, vheight);当为fitxy的时候给mDrawable(也就是我们设置的那张图片)设置了bounds为vwidth,vheight,也就是控件的宽高。所以fitxy时才会铺满整个屏幕的。
搞懂了fitxy,那么matrix又是怎么样的呢?
我们看看onDraw方法:
@Override
    protected void onDraw(Canvas canvas) {
        super.onDraw(canvas);

        if (mDrawable == null) {
            return; // couldn't resolve the URI
        }

        if (mDrawableWidth == 0 || mDrawableHeight == 0) {
            return;     // nothing to draw (empty bounds)
        }

        if (mDrawMatrix == null && mPaddingTop == 0 && mPaddingLeft == 0) {
            mDrawable.draw(canvas);
        } else {
            final int saveCount = canvas.getSaveCount();
            canvas.save();

            if (mCropToPadding) {
                final int scrollX = mScrollX;
                final int scrollY = mScrollY;
                canvas.clipRect(scrollX + mPaddingLeft, scrollY + mPaddingTop,
                        scrollX + mRight - mLeft - mPaddingRight,
                        scrollY + mBottom - mTop - mPaddingBottom);
            }

            canvas.translate(mPaddingLeft, mPaddingTop);

            if (mDrawMatrix != null) {
                canvas.concat(mDrawMatrix);
            }
            mDrawable.draw(canvas);
            canvas.restoreToCount(saveCount);
        }
    }
有点长,我们看到有一行代码:
if (mDrawMatrix != null) {
                canvas.concat(mDrawMatrix);
            }
canvas.concat(mDrawMatrix);是指给canvas做一些改变,比如缩放、平移…… 也就是说源码中通过我们设置的scaleType来通过算法计算mDrawMatrix ,然后再onDraw方法中赋给了canvas,但是我们重写了onDraw方法,也就是说mDrawMatrix 压根就不起作用了,所以当我们在RoundImageView中执行
//最后把我们准备好的Bitmap画在canvas上
        canvas.drawBitmap(bitmap,0,0,null);
的时候,图片就是默认不缩放,原图从控件的左上角开始摆放的。
到此,我们终于弄懂了我们遇到的问题,既然遇到了,那我们就解决下问题。
我们看看ImageView到底是怎么缩放图片的:
 private void configureBounds() {
        if (mDrawable == null || !mHaveFrame) {
            return;
        }

        final int dwidth = mDrawableWidth;
        final int dheight = mDrawableHeight;

        final int vwidth = getWidth() - mPaddingLeft - mPaddingRight;
        final int vheight = getHeight() - mPaddingTop - mPaddingBottom;

        final boolean fits = (dwidth < 0 || vwidth == dwidth)
                && (dheight < 0 || vheight == dheight);

        if (dwidth <= 0 || dheight <= 0 || ScaleType.FIT_XY == mScaleType) {
            /* If the drawable has no intrinsic size, or we're told to scaletofit, then we just fill our entire view. */
            mDrawable.setBounds(0, 0, vwidth, vheight);
            mDrawMatrix = null;
        } else {
            // We need to do the scaling ourself, so have the drawable
            // use its native size.
            mDrawable.setBounds(0, 0, dwidth, dheight);

            if (ScaleType.MATRIX == mScaleType) {
                // Use the specified matrix as-is.
                if (mMatrix.isIdentity()) {
                    mDrawMatrix = null;
                } else {
                    mDrawMatrix = mMatrix;
                }
            } else if (fits) {
                // The bitmap fits exactly, no transform needed.
                mDrawMatrix = null;
            } else if (ScaleType.CENTER == mScaleType) {
                // Center bitmap in view, no scaling.
                mDrawMatrix = mMatrix;
                mDrawMatrix.setTranslate(Math.round((vwidth - dwidth) * 0.5f),
                                         Math.round((vheight - dheight) * 0.5f));
            } else if (ScaleType.CENTER_CROP == mScaleType) {
                mDrawMatrix = mMatrix;

                float scale;
                float dx = 0, dy = 0;

                if (dwidth * vheight > vwidth * dheight) {
                    scale = (float) vheight / (float) dheight;
                    dx = (vwidth - dwidth * scale) * 0.5f;
                } else {
                    scale = (float) vwidth / (float) dwidth;
                    dy = (vheight - dheight * scale) * 0.5f;
                }

                mDrawMatrix.setScale(scale, scale);
                mDrawMatrix.postTranslate(Math.round(dx), Math.round(dy));
            } else if (ScaleType.CENTER_INSIDE == mScaleType) {
                mDrawMatrix = mMatrix;
                float scale;
                float dx;
                float dy;

                if (dwidth <= vwidth && dheight <= vheight) {
                    scale = 1.0f;
                } else {
                    scale = Math.min((float) vwidth / (float) dwidth,
                            (float) vheight / (float) dheight);
                }

                dx = Math.round((vwidth - dwidth * scale) * 0.5f);
                dy = Math.round((vheight - dheight * scale) * 0.5f);

                mDrawMatrix.setScale(scale, scale);
                mDrawMatrix.postTranslate(dx, dy);
            } else {
                // Generate the required transform.
                mTempSrc.set(0, 0, dwidth, dheight);
                mTempDst.set(0, 0, vwidth, vheight);

                mDrawMatrix = mMatrix;
                mDrawMatrix.setRectToRect(mTempSrc, mTempDst, scaleTypeToScaleToFit(mScaleType));
            }
        }
    }
就是我们上面所说的,先通过我们设置的scaleType计算mDrawMatrix,
然后再onDraw方法中赋给canvans,再贴一遍ImageView的onDraw方法。
@Override
    protected void onDraw(Canvas canvas) {
        super.onDraw(canvas);

        if (mDrawable == null) {
            return; // couldn't resolve the URI
        }

        if (mDrawableWidth == 0 || mDrawableHeight == 0) {
            return;     // nothing to draw (empty bounds)
        }

        if (mDrawMatrix == null && mPaddingTop == 0 && mPaddingLeft == 0) {
            mDrawable.draw(canvas);
        } else {
            final int saveCount = canvas.getSaveCount();
            canvas.save();

            if (mCropToPadding) {
                final int scrollX = mScrollX;
                final int scrollY = mScrollY;
                canvas.clipRect(scrollX + mPaddingLeft, scrollY + mPaddingTop,
                        scrollX + mRight - mLeft - mPaddingRight,
                        scrollY + mBottom - mTop - mPaddingBottom);
            }

            canvas.translate(mPaddingLeft, mPaddingTop);

            if (mDrawMatrix != null) {
                canvas.concat(mDrawMatrix);
            }
            mDrawable.draw(canvas);
            canvas.restoreToCount(saveCount);
        }
    }
我们自己重写了onDraw方法,也就是我们只需要像ImageView一样,把configureBounds方法搬到我们的控件中就可以了,好了,我们试试:
@Override
    protected void onDraw(Canvas canvas) {
        Bitmap bitmap = mWeakReference==null?null:mWeakReference.get();
        if(bitmap==null || bitmap.isRecycled()){
            //获取一下设置的图片资源
            Drawable drawable=getDrawable();
            if(drawable!=null){
                //创建一个空白画布,用来画模板跟原图
                bitmap=Bitmap.createBitmap(getWidth(),getHeight(),Bitmap.Config.ARGB_8888);
                ////修改过的代码
                Matrix matrix=null;
                Canvas dstCanvas=new Canvas(bitmap);
                dstCanvas.save();
                if (getScaleType()==ScaleType.FIT_XY){
                    drawable.setBounds(0,0,getWidth(),getHeight());
                    matrix=null;
                }else{
                    matrix=new Matrix();
                    configureBounds(drawable,matrix);
                }
                if(matrix!=null){
                    dstCanvas.concat(matrix);
                }
                drawable.draw(dstCanvas);
                dstCanvas.restore();
                ////修改过的代码
                //画模板
                if(mMaskBitmap==null||mMaskBitmap.isRecycled()){
                    mMaskBitmap=getShapeBitmap();
                }
                dstCanvas.drawBitmap(mMaskBitmap,0,0,mPaint);
                mPaint.setXfermode(null);
            }
        }
        //最后把我们准备好的Bitmap画在canvas上
        canvas.drawBitmap(bitmap,0,0,null);
    }
private void configureBounds(Drawable drawable, Matrix matrix) {
ScaleType mScaleType = getScaleType();
//获取图片的宽高
int dwidth = drawable.getIntrinsicWidth();
int dheight = drawable.getIntrinsicHeight();
int vwidth =getWidth();
int vheight = getHeight();
if (ScaleType.MATRIX == mScaleType) {
/////
} else if (ScaleType.CENTER_CROP == mScaleType) {
float scale;
float dx = 0, dy = 0;
if (dwidth * vheight > vwidth * dheight) {
scale = (float) vheight / (float) dheight;
dx = (vwidth - dwidth * scale) * 0.5f;
} else {
scale = (float) vwidth / (float) dwidth;
dy = (vheight - dheight * scale) * 0.5f;
}
matrix.setScale(scale, scale);
matrix.postTranslate(Math.round(dx), Math.round(dy));
} else if (ScaleType.CENTER_INSIDE == mScaleType) {
float scale;
float dx;
float dy;
if (dwidth <= vwidth && dheight <= vheight) {
scale = 1.0f;
} else {
scale = Math.min((float) vwidth / (float) dwidth,
(float) vheight / (float) dheight);
}
dx = Math.round((vwidth - dwidth * scale) * 0.5f);
dy = Math.round((vheight - dheight * scale) * 0.5f);
matrix.setScale(scale, scale);
matrix.postTranslate(dx, dy);
} else {
matrix.setRectToRect(new RectF(drawable.getBounds()), new RectF(0, 0, getWidth(), getHeight()), scaleTypeToScaleToFit(mScaleType));
}
}直接拖的ImageView的源码,不要问我算法为什么是这样,我也研究了蛮久,数学不好(^__^) 嘻嘻……
到这又郁闷了,scaleTypeToScaleToFit方法没法copy了,怎么办? 反射呗!说干咱就干。
 private Matrix.ScaleToFit scaleTypeToScaleToFit(ScaleType mScaleType) { Class mClass=ImageView.class; try { Method method = mClass.getDeclaredMethod("scaleTypeToScaleToFit", new Class[]{ScaleType.class});
            method.setAccessible(true);
            if(method!=null){ Matrix.ScaleToFit fit = (Matrix.ScaleToFit) (method.invoke(null, new Object[]{mScaleType}));
                return fit;
            }
        } catch (Exception e) { e.printStackTrace(); }
        return Matrix.ScaleToFit.FILL;
    }
不懂的童鞋自己去脑补下javase的东西哈!!
终于是完美的呈现了,从来没写过这么长的博客,小伙伴默默点个赞哈,大牛勿喷!!(^__^) 嘻嘻……
最后附上github地址:https://github.com/913453448/CircleViewDemo
