【配置】Spring Boot配置文件详解(二)
Spring Boot 配置文件详解(二)
1. properties 文件编码问题
application.properties 文件是 Spring Boot 中的另一个全局配置文件
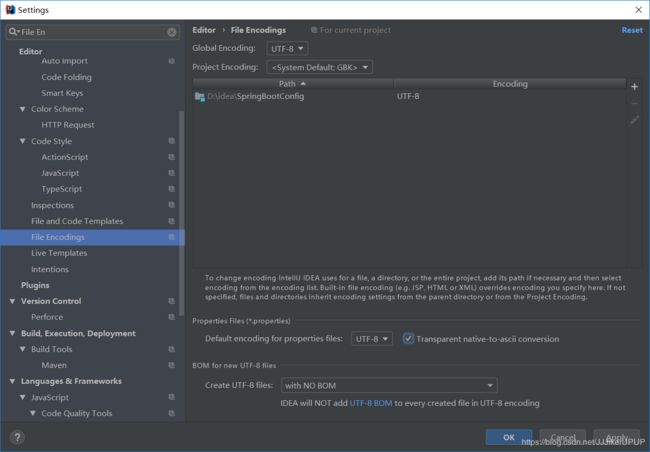
使用 application.properties 配置文件时,需要考虑文件的编码问题
application.properties 文件中配置如下
server.port=8081

person.name=张三
person.age=18
person.boss=false
person.birth=1998/12/12
person.maps.k1=v1
person.maps.k2=v2
person.lists=a,b,c
person.dog.name=dog
person.dog.age=12
解决:在 File -> Setting -> File Encodings 中设置

2. @ConfigurationProperties 与 @Value 的区别
使用 @ConfigurationProperties 注解
package com.jiker.springbootconfig.bean;
import org.springframework.boot.context.properties.ConfigurationProperties;
import org.springframework.stereotype.Component;
import java.util.Date;
import java.util.List;
import java.util.Map;
@Component
@ConfigurationProperties(prefix = "person")
public class Person {
private String name;
private Integer age;
private Boolean boss;
private Date birth;
private Map maps;
private List 使用 @Value 注解获取值
package com.jiker.springbootconfig.bean;
import org.springframework.beans.factory.annotation.Value;
import org.springframework.boot.context.properties.ConfigurationProperties;
import org.springframework.stereotype.Component;
import java.util.Date;
import java.util.List;
import java.util.Map;
@Component
//@ConfigurationProperties(prefix = "person")
public class Person {
@Value("${person.name}")
private String name;
@Value("#{10*2}")
private Integer age;
@Value("true")
private Boolean boss;
private Date birth;
private Map maps;
private List 同样可以得到结果:

@Value 获取值和 @ConfigurationProperties 获取值比较
| @ConfigurationProperties | @Value | |
|---|---|---|
| 功能 | 批量注入配置文件中的属性 | 一个个的给属性指定值 |
| 松散绑定 | 支持 | 不支持 |
| SpEL | 不支持 | 支持 |
| JSR303数据校验 | 支持 | 不支持 |
| 复杂类型封装 | 支持 | 不支持 |
使用场景:
- 配置文件
yml还是properties都能通过两注解获取值 - 如果说,只是在某个业务逻辑中需要获取一下配置文件中的某个值,使用 @Value
- 如果说,专门编写了一个
Java Bean来和配置文件进行映射,则使用 @ConfigurationProperties
3. @PropertySource 、@ImportResource 、@Bean加载指定的配置文件
3.1 @PropertySource
如果不使用全局配置文件,编写一个 person.properties 如下
person.name=张三
person.age=18
person.boss=false
person.birth=1998/12/12
person.maps.k1=v1
person.maps.k2=v2
person.lists=a,b,c
person.dog.name=dog
person.dog.age=12
在 Person.java 中引用如下注解
@PropertySource(value = {"classpath:person.properties"})
3.2 @ImportResource
@ImportResource:导入 Spring 的配置文件,让配置文件里面的内容生效
Spring Boot 里面没有 Spring 的配置文件,我们自己编写的配置文件也不能自动识别
想让Spring 的配置文件生效加载进来,就需要将此注解加到主类上
编写一个 bean.xml
在主类中添加 @ImportResource 注解,将 Spring 的配置文件加载进来
package com.jiker.springbootconfig;

import org.springframework.boot.SpringApplication;
import org.springframework.boot.autoconfigure.SpringBootApplication;
import org.springframework.context.annotation.ImportResource;

@ImportResource(locations = {"classpath:bean.xml"})
@SpringBootApplication
public class SpringbootConfigApplication {

    public static void main(String[] args) {
        SpringApplication.run(SpringbootConfigApplication.class, args);
    }

}
3.3 @Bean
@Bean:
Spring Boot 推荐给容器添加组件的方式;推荐使用全注解的方式
配置类 == Spring 配置文件
package com.jiker.springbootconfig;

import com.jiker.springbootconfig.bean.Person;
import org.springframework.context.annotation.Bean;
import org.springframework.context.annotation.Configuration;

/**
 *  @Configuration:指明当前类是一个配置类,代替之前的 Spring 配置文件
 */
@Configuration
public class ServiceConfig {

    //将方法的返回值添加到容器中,容器中组件的默认 id 就是方法名
    @Bean
    public Person helloPerson(){
        System.out.println("配置类@bean给容器添加了组件");
        return new Person();
    }
}
4. 配置文件占位符
1、随机数
${random.value}、${random.int}、${random.long}、
${random.int(10)}、${random.int[1024,65536]}
2、占位符之前获取的值(如果没有可以用 : 指定默认值)
person.name=张三${random.uuid}
person.age=${random.int}
person.boss=false
person.birth=1998/12/12
person.maps.k1=v1
person.maps.k2=v2
person.lists=a,b,c
person.dog.name=${person.hello:hello}_dog
person.dog.age=12
5. Profile 多文件支持
Profile 是 Spring对不同h环境提供不同p配置功能的支持,可以通过激活指定参数等方式快速切换环境
1、多 profile 文件形式:
格式:application-{profile}.properties
如:application-dev.properties(开发时环境)、application-prod.properties(生产时环境)
2、多 profile 文档块模式
3、激活方式:
- 命令行:–spring.profiles.active=dev
- 配置文件:spring.profiles.active=dev
- jvm参数:—Dspring.profiles.active=dev
5.1 多 Profile 文件形式
编写一个 application-dev.properties 文件,配置如下
server.port=8082
全局配置文件如下:
server.port=8081
若需要启动开发时环境
1、在全局配置文件中配置属性:
server.port=8081
spring.profiles.active=dev
2、将项目 build 成 jar 包,使用如下命令运行
java -jar springbootconfig-0.0.1-SNAPSHOT.jar --spring.profiles.active=dev
5.2 多文档块形式
yml 文件配置如下
server:
	port: 8081
spring:
	profiles:
		active: dev

---
server:
	port: 8082
spring:
	profiles:
		active: test

---
server:
	port: 8083
spring:
	profiles:
		active:prod
6. 配置文件加载位置
Spring Boot 启动会扫描以下位置的 application.properties 或者 application.yml 文件作为默认配置文件
- file:./config/
- file:./
- classpath:/config/
- classpath:/
- 以上是按照优先级从高到低的顺序,所有位置的文件都会被加载,高优先级的内容会覆盖低优先级配置内容
- 我们也可以通过配置
spring.config.location来改变默认配置
时间:2019.5.28 15:06
