Spring Cloud 应用篇 之 Spring Cloud Sleuth + Zipkin(三)修改数据存储方式
(一)简介
默认情况下,Zipkin Server 会将跟踪信息存储在内存中,每次重启 Zipkin Server 都会使之前收集的跟踪信息丢失,并且当有大量跟踪信息时,内存存储也会造成性能瓶颈,所以通常我们都需要将跟踪信息存储到外部组件中,如 Mysql。
由于 Spring Boot 2.0 之后 Zipkin 不再推荐我们来自定义 Server 端了,那么如何把 Zipkin Server 修改为 Mysql 存储功能呢?答案还是和集成 RabbitMQ 一样,在启动 zipkin.jar 的时候,配置相关参数
(二)配置 zipkin server
2.1 创建数据库、表信息
既然数据存储改为 Mysql,那么肯定要建立相关的表,建表的脚本文件 mysql.sql 在 GitHub 官方地址能查到,链接如下:
https://github.com/openzipkin/zipkin/blob/master/zipkin-storage/mysql-v1/src/main/resources/mysql.sql
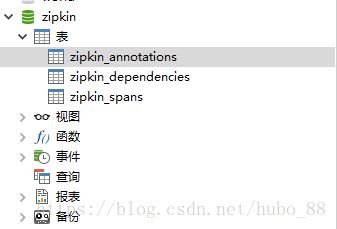
这里会创建三张表,如下,具体表结构信息,大家可以自己查看
2.2 启动 zipkin
zipkin.jar 的 配置文件内容可以查看 GitHub 上官方的提供
https://github.com/openzipkin/zipkin/blob/master/zipkin-server/src/main/resources/zipkin-server-shared.yml
为了方便,我在这里展示部分内容:
zipkin:
collector:
rabbitmq:
# RabbitMQ server address list (comma-separated list of host:port)
addresses: ${RABBIT_ADDRESSES:}
concurrency: ${RABBIT_CONCURRENCY:1}
# TCP connection timeout in milliseconds
connection-timeout: ${RABBIT_CONNECTION_TIMEOUT:60000}
password: ${RABBIT_PASSWORD:guest}
queue: ${RABBIT_QUEUE:zipkin}
username: ${RABBIT_USER:guest}
virtual-host: ${RABBIT_VIRTUAL_HOST:/}
useSsl: ${RABBIT_USE_SSL:false}
uri: ${RABBIT_URI:}
storage:
strict-trace-id: ${STRICT_TRACE_ID:true}
search-enabled: ${SEARCH_ENABLED:true}
type: ${STORAGE_TYPE:mem}
mem:
# Maximum number of spans to keep in memory. When exceeded, oldest traces (and their spans) will be purged.
# A safe estimate is 1K of memory per span (each span with 2 annotations + 1 binary annotation), plus
# 100 MB for a safety buffer. You'll need to verify in your own environment.
# Experimentally, it works with: max-spans of 500000 with JRE argument -Xmx600m.
max-spans: 500000
cassandra:
# Comma separated list of host addresses part of Cassandra cluster. Ports default to 9042 but you can also specify a custom port with 'host:port'.
contact-points: ${CASSANDRA_CONTACT_POINTS:localhost}
# Name of the datacenter that will be considered "local" for latency load balancing. When unset, load-balancing is round-robin.
local-dc: ${CASSANDRA_LOCAL_DC:}
# Will throw an exception on startup if authentication fails.
username: ${CASSANDRA_USERNAME:}
password: ${CASSANDRA_PASSWORD:}
keyspace: ${CASSANDRA_KEYSPACE:zipkin}
# Max pooled connections per datacenter-local host.
max-connections: ${CASSANDRA_MAX_CONNECTIONS:8}
# Ensuring that schema exists, if enabled tries to execute script /zipkin-cassandra-core/resources/cassandra-schema-cql3.txt.
ensure-schema: ${CASSANDRA_ENSURE_SCHEMA:true}
# 7 days in seconds
span-ttl: ${CASSANDRA_SPAN_TTL:604800}
# 3 days in seconds
index-ttl: ${CASSANDRA_INDEX_TTL:259200}
# the maximum trace index metadata entries to cache
index-cache-max: ${CASSANDRA_INDEX_CACHE_MAX:100000}
# how long to cache index metadata about a trace. 1 minute in seconds
index-cache-ttl: ${CASSANDRA_INDEX_CACHE_TTL:60}
# how many more index rows to fetch than the user-supplied query limit
index-fetch-multiplier: ${CASSANDRA_INDEX_FETCH_MULTIPLIER:3}
# Using ssl for connection, rely on Keystore
use-ssl: ${CASSANDRA_USE_SSL:false}
cassandra3:
# Comma separated list of host addresses part of Cassandra cluster. Ports default to 9042 but you can also specify a custom port with 'host:port'.
contact-points: ${CASSANDRA_CONTACT_POINTS:localhost}
# Name of the datacenter that will be considered "local" for latency load balancing. When unset, load-balancing is round-robin.
local-dc: ${CASSANDRA_LOCAL_DC:}
# Will throw an exception on startup if authentication fails.
username: ${CASSANDRA_USERNAME:}
password: ${CASSANDRA_PASSWORD:}
keyspace: ${CASSANDRA_KEYSPACE:zipkin2}
# Max pooled connections per datacenter-local host.
max-connections: ${CASSANDRA_MAX_CONNECTIONS:8}
# Ensuring that schema exists, if enabled tries to execute script /zipkin2-schema.cql
ensure-schema: ${CASSANDRA_ENSURE_SCHEMA:true}
# how many more index rows to fetch than the user-supplied query limit
index-fetch-multiplier: ${CASSANDRA_INDEX_FETCH_MULTIPLIER:3}
# Using ssl for connection, rely on Keystore
use-ssl: ${CASSANDRA_USE_SSL:false}
elasticsearch:
# host is left unset intentionally, to defer the decision
hosts: ${ES_HOSTS:}
pipeline: ${ES_PIPELINE:}
max-requests: ${ES_MAX_REQUESTS:64}
timeout: ${ES_TIMEOUT:10000}
index: ${ES_INDEX:zipkin}
date-separator: ${ES_DATE_SEPARATOR:-}
index-shards: ${ES_INDEX_SHARDS:5}
index-replicas: ${ES_INDEX_REPLICAS:1}
username: ${ES_USERNAME:}
password: ${ES_PASSWORD:}
http-logging: ${ES_HTTP_LOGGING:}
legacy-reads-enabled: ${ES_LEGACY_READS_ENABLED:true}
mysql:
host: ${MYSQL_HOST:localhost}
port: ${MYSQL_TCP_PORT:3306}
username: ${MYSQL_USER:}
password: ${MYSQL_PASS:}
db: ${MYSQL_DB:zipkin}
max-active: ${MYSQL_MAX_CONNECTIONS:10}
use-ssl: ${MYSQL_USE_SSL:false}
ui:
enabled: ${QUERY_ENABLED:true}
## Values below here are mapped to ZipkinUiProperties, served as /config.json
# Default limit for Find Traces
query-limit: 10
# The value here becomes a label in the top-right corner
environment:
# Default duration to look back when finding traces.
# Affects the "Start time" element in the UI. 1 hour in millis
default-lookback: 3600000
# When false, disables the "find a trace" screen
search-enabled: ${SEARCH_ENABLED:true}
# Which sites this Zipkin UI covers. Regex syntax. (e.g. http:\/\/example.com\/.*)
# Multiple sites can be specified, e.g.
# - .*example1.com
# - .*example2.com
# Default is "match all websites"
instrumented: .*
# URL placed into the 从它的配置文件可以看出,storage 默认采用的是内存存储,所以我们要设置 zipkin.storage.type=mysql,除此之外还要设置 zipkin.storage.mysql.host、port、username、password、db 等
下面贴出我的启动命令:
java -jar zipkin.jar --zipkin.collector.rabbitmq.addresses=localhost --zipkin.storage.type=mysql
--zipkin.storage.mysql.host=localhost --zipkin.storage.mysql.port=3306 --zipkin.storage.mysql.username=root
--zipkin.storage.mysql.password=mysql --zipkin.storage.mysql.db=zipkin
大家可以根据自己的数据库信息,修改相关配置即可
(三)验证
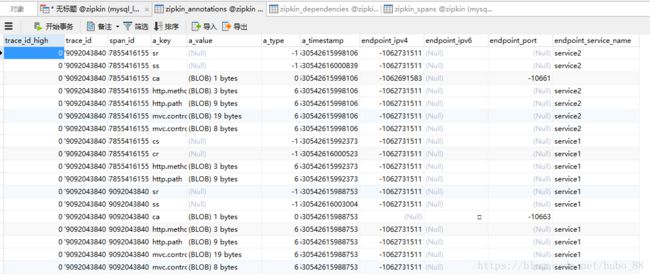
至于 Zipkin Client 端,是不需要相关修改的,按照上面命令启动 zipkin 后,访问 http://localhost:8481/service1,查看数据库信息,表 zipkin_annotations 和表 zipkin_spans 中已经数据存储了
表 zipkin_annotations :
表 zipkin_spans :
表中所存储的信息我们已经非常熟悉,之前分析的内容都可以在这两张表中体现出来。
从 GitHub 的官方配置文件中,我们可以看到,Zipkin 在存储方面除了对 Mysql 有扩展组件之外,还实现了对 CassCassandra 和 ElasElasticSearch 的支持扩展,具体的整合方式与 Mysql 的整合类似。


