opencv-python实际演练(一)图像识别(1)目标区域提取
背景
在现场下军棋时需要三个人,其中一个人当裁判。如果只有两个人,又想玩军棋,就需要有一个自动裁判机制。想通过手机自动识别棋子上的文字,目前还没有看到专门实现这个功能的软件,因此想自已动手试一试。
准备工作
用手机拍摄了一张上面有两个棋子的图片(模拟生成一副图片后再用手机对着屏幕拍摄的,以后再对着真实的棋子拍照吧)
在网上查到了一篇参考文献《基于python+opencv的图像目标区域自动提取(本项目为提取纸张中的内容)》
参考文中的代码,并做了一些修改。对原作者的无私分享深表感谢!
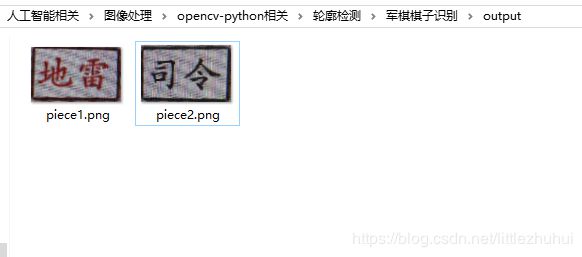
提取结果
运行后的实际效果是得到两个图片文件


python代码
#coding:utf-8
#用手机拍摄的两个军棋棋子照片,将这两个棋子的内容从照片中提取出来,供下一步的文本识别使用
import cv2
import numpy as np
import math
#配置数据
class Config:
def __init__(self):
pass
src = "photo1.jpg"
resizeRate = 0.5
min_area = 5000
min_contours = 8
threshold_thresh = 50
epsilon_start = 10
epsilon_step = 10
''' 对坐标点进行排序 @return [top-left, top-right, bottom-right, bottom-left] '''
def order_points(pts):
# initialzie a list of coordinates that will be ordered
# such that the first entry in the list is the top-left,
# the second entry is the top-right, the third is the
# bottom-right, and the fourth is the bottom-left
rect = np.zeros((4, 2), dtype="float32")
# the top-left point will have the smallest sum, whereas
# the bottom-right point will have the largest sum
s = pts.sum(axis=1)
rect[0] = pts[np.argmin(s)]
rect[2] = pts[np.argmax(s)]
# now, compute the difference between the points, the
# top-right point will have the smallest difference,
# whereas the bottom-left will have the largest difference
diff = np.diff(pts, axis=1)
rect[1] = pts[np.argmin(diff)]
rect[3] = pts[np.argmax(diff)]
# return the ordered coordinates
return rect
# 求两点间的距离
def point_distance(a,b):
return int(np.sqrt(np.sum(np.square(a - b))))
# 找出外接四边形, c是轮廓的坐标数组
def boundingBox(idx,c):
if len(c) < Config.min_contours:
return None
epsilon = Config.epsilon_start
while True:
approxBox = cv2.approxPolyDP(c,epsilon,True)
#求出拟合得到的多边形的面积
theArea = math.fabs(cv2.contourArea(approxBox))
#输出拟合信息
print("contour idx: %d ,contour_len: %d ,epsilon: %d ,approx_len: %d ,approx_area: %s"%(idx,len(c),epsilon,len(approxBox),theArea))
if (len(approxBox) < 4):
return None
if theArea > Config.min_area:
if (len(approxBox) > 4):
# epsilon 增长一个步长值
epsilon += Config.epsilon_step
continue
else: #approx的长度为4,表明已经拟合成矩形了
#转换成4*2的数组
approxBox = approxBox.reshape((4, 2))
return approxBox
else:
print("failed to find boundingBox,idx = %d area=%f"%(idx, theArea))
return None
#-----------------------------------------------------------------------------------------------
# 开始图像处理,读取图片文件
image = cv2.imread(Config.src)
#print(image.shape)
#获取原始图像的大小
srcHeight,srcWidth ,channels = image.shape
#对原始图像进行缩放
image= cv2.resize(image,(int(srcWidth*Config.resizeRate),int(srcHeight*Config.resizeRate)))
#cv2.imshow("image", image)
#转成灰度图
gray = cv2.cvtColor(image, cv2.COLOR_BGR2GRAY)
# 中值滤波平滑,消除噪声
# 当图片缩小后,中值滤波的孔径也要相应的缩小,否则会将有效的轮廓擦除
#binary = cv2.medianBlur(gray,7)
binary = cv2.medianBlur(gray,3)
#转换为二值图像
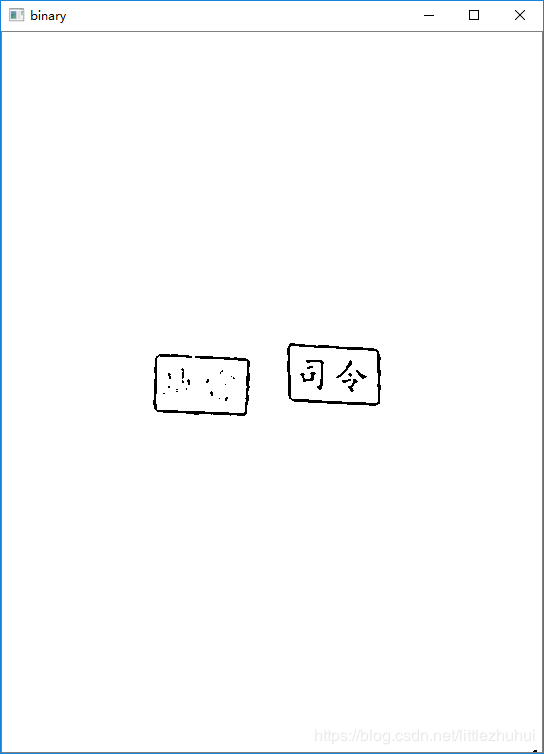
ret, binary = cv2.threshold(binary, Config.threshold_thresh, 255, cv2.THRESH_BINARY)
#显示转换后的二值图像
cv2.imshow("binary", binary)
# 进行2次腐蚀操作(erosion)
# 腐蚀操作将会腐蚀图像中白色像素,可以将断开的线段连接起来
binary = cv2.erode (binary, None, iterations = 2)
#显示腐蚀后的图像
cv2.imshow("erode", binary)
# canny 边缘检测
binary = cv2.Canny(binary, 0, 60, apertureSize = 3)
#显示边缘检测的结果
cv2.imshow("Canny", binary)
# 提取轮廓
contours,_ = cv2.findContours(binary, cv2.RETR_EXTERNAL, cv2.CHAIN_APPROX_SIMPLE)
# 输出轮廓数目
print("the count of contours is %d \n"%(len(contours)))
#针对每个轮廓,拟合外接四边形,如果成功,则将该区域切割出来,作透视变换,并保存为图片文件
for idx,c in enumerate(contours):
approxBox = boundingBox(idx,c)
if approxBox is None:
print("\n")
continue
# 获取最小矩形包络
rect = cv2.minAreaRect(approxBox)
box = cv2.boxPoints(rect)
box = np.int0(box)
box = box.reshape(4,2)
box = order_points(box)
print("boundingBox:\n",box)
# 待切割区域的原始位置,
# approxPolygon 点重排序, [top-left, top-right, bottom-right, bottom-left]
src_rect = order_points(approxBox)
print("src_rect:\n",src_rect)
w,h = point_distance(box[0],box[1]), point_distance(box[1],box[2])
print("w = %d ,h= %d "%(w,h))
# 生成透视变换矩阵
dst_rect = np.array([
[0, 0],
[w - 1, 0],
[w - 1, h - 1],
[0, h - 1]],
dtype="float32")
# 透视变换
M = cv2.getPerspectiveTransform(src_rect, dst_rect)
#得到透视变换后的图像
warped = cv2.warpPerspective(image, M, (w, h))
#将变换后的结果图像写入png文件
cv2.imwrite("output/piece%d.png"%idx, warped, [int(cv2.IMWRITE_PNG_COMPRESSION), 9])
print("\n")
print('over')
cv2.waitKey(0)
运行结果如下:
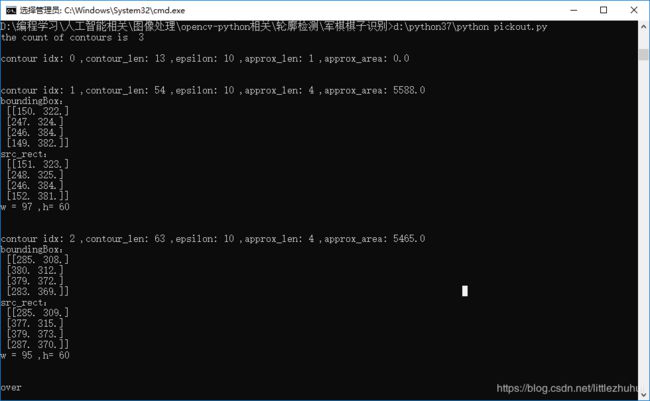
弹出了三个图像窗口
1.二值化后的结果
2 腐蚀后的结果,将断开的线段连起来

3 canny 边缘检测后的结果

最后在output目录下生成了前面展示的两个结果文件
补充说明,以上代码要正常运行的前提是 numpy 与opencv-python模块已安装好。不过这两个模块的安装都很简单,用pip install numpy 与 pip install opencv-python就OK了