Spring+Apache CXF+MyBatis+Maven实例
- 概述
- 第1节 引入maven依赖
- 第2节 数据库设计数据库名spring_cxf表截图如下
- 第3节 在webxml文件中加上springmvcspring容器以及cxf的配置
- 3-1 在webxml文件中配置springmvc容器
- 3-2 在webxml文件中配置spring容器
- 3-3 在webxml文件中配置cxf servletcxf用于提供webservice服务的servlet
- 第4节 Apache CXF拦截器的使用
概述
- 本实例是一个简单的Spring+Apache CXF+MyBatis+Maven的集成小项目,可以略作参考
- 数据库使用的是mysql,ORM框架使用的是MyBatis。其中实体类和mapper接口以及映射文件可以使用MyBatis-Generator工具生成,就不在此赘述了
- 本实例将springmvc的使用简单配置了一下,包括数据源、mybatis session 工厂、spring事务管理等等。深入使用请参考官网开发文档或者书籍
- 案例最后我会将源代码以及数据库sql文件上传。另外,在cxf的实现中加了一个简单的拦截器UserCheckInterceptor,该拦截器可以实现用户名密码验证功能。初次运行的朋友可能会有点儿疑惑,不明白这个拦截器的逻辑,这里简单说明一下。我是将用户与服务进行了绑定。打个比方,用户root只能访问/userService,用户admin只能访问/calculateService。因此,在客户端调用服务的时候,不仅要将正确的用户名密码传过去,并且还只能访问该用户可以访问的服务,其他服务则不能访问。
第1节 引入maven依赖
        commons-lang
        commons-lang
        2.6


        org.codehaus.jackson
        jackson-jaxrs
        1.9.2


        javax.ws.rs
        javax.ws.rs-api
        2.0.1


        org.apache.cxf
        cxf-rt-frontend-jaxws
        ${cxf.version}


        org.apache.cxf
        cxf-rt-transports-http
        ${cxf.version}


        org.apache.cxf
        cxf-rt-frontend-jaxrs
        ${cxf.version}


        org.apache.cxf
        cxf-rt-ws-security
        ${cxf.version}


        org.springframework
        spring-beans
        ${spring.version}


        org.springframework
        spring-aop
        ${spring.version}


        org.springframework
        spring-context
        ${spring.version}


        org.springframework
        spring-expression
        ${spring.version}


        org.springframework
        spring-orm
        ${spring.version}


        org.springframework
        spring-webmvc
        ${spring.version}


        org.springframework
        spring-aspects
        ${spring.version}


        javax.servlet
        jstl
        1.2


        javax.servlet
        javax.servlet-api
        3.1.0
        provided


        javax.servlet.jsp
        jsp-api
        2.1


        mysql
        mysql-connector-java
        5.1.38


        c3p0
        c3p0
        0.9.1.2


        org.mybatis
        mybatis
        3.4.2


        org.mybatis
        mybatis-spring
        1.3.1


        junit
        junit
        4.12
        test
另外,建议在maven中加上bundle插件,可能有些依赖是以bundle形式发布,如下
    org.apache.felix
    maven-bundle-plugin
    3.3.0
第2节 数据库设计,数据库名spring_cxf,表截图如下
数据库sql文件会放在打包的项目文件当中一起上传
第3节 在web.xml文件中加上springmvc、spring容器以及cxf的配置
3-1 在web.xml文件中配置springmvc容器
    DispatcherServlet
    org.springframework.web.servlet.DispatcherServlet

        contextConfigLocation
        classpath:beans-mvc.xml

    1


    DispatcherServlet
    /
另外,beans-mvc.xml配置文件如下
<beans xmlns="http://www.springframework.org/schema/beans" xmlns:xsi="http://www.w3.org/2001/XMLSchema-instance" xmlns:context="http://www.springframework.org/schema/context" xmlns:mvc="http://www.springframework.org/schema/mvc" xsi:schemaLocation="http://www.springframework.org/schema/mvc http://www.springframework.org/schema/mvc/spring-mvc-4.2.xsd http://www.springframework.org/schema/beans http://www.springframework.org/schema/beans/spring-beans-4.2.xsd http://www.springframework.org/schema/context http://www.springframework.org/schema/context/spring-context-4.2.xsd">

    <context:component-scan base-package="com.study.springcxf.action" />

    <mvc:default-servlet-handler/>
    <mvc:annotation-driven />

    <bean class="org.springframework.web.servlet.view.InternalResourceViewResolver">
        <property name="prefix" value="/" />
        <property name="suffix" value=".jsp" />
    bean>

beans>
3-2 在web.xml文件中配置spring容器
    contextConfigLocation
    classpath:beans-core.xml


    org.springframework.web.context.ContextLoaderListener
beans-core.xml文件配置如下,其中
即引入的Apache CXF配置文件
<beans xmlns="http://www.springframework.org/schema/beans" xmlns:xsi="http://www.w3.org/2001/XMLSchema-instance" xmlns:context="http://www.springframework.org/schema/context" xmlns:tx="http://www.springframework.org/schema/tx" xmlns:aop="http://www.springframework.org/schema/aop" xsi:schemaLocation="http://www.springframework.org/schema/beans http://www.springframework.org/schema/beans/spring-beans-4.2.xsd http://www.springframework.org/schema/context http://www.springframework.org/schema/context/spring-context-4.2.xsd http://www.springframework.org/schema/aop http://www.springframework.org/schema/aop/spring-aop-4.2.xsd http://www.springframework.org/schema/tx http://www.springframework.org/schema/tx/spring-tx-4.2.xsd">

    <import resource="classpath:beans-cxf.xml"/>

    <context:component-scan base-package="com.study.springcxf">
        <context:exclude-filter type="annotation" expression="org.springframework.stereotype.Controller"/>
    context:component-scan>


    <bean id="dataSource" class="com.mchange.v2.c3p0.ComboPooledDataSource">
        <property name="user" value="root" />
        <property name="password" value="0000"/>
        <property name="jdbcUrl" value="jdbc:mysql:///spring_cxf" />
        <property name="driverClass" value="com.mysql.jdbc.Driver" />
        <property name="initialPoolSize" value="5" />
        <property name="minPoolSize" value="5"/>
        <property name="maxPoolSize" value="10" />
    bean>


    <bean id="sessionFactory" class="org.mybatis.spring.SqlSessionFactoryBean">
        <property name="dataSource" ref="dataSource" />
        <property name="mapperLocations" value="classpath:com/study/springcxf/mapper/*Mapper.xml" />
        <property name="configLocation" value="classpath:mybatis-config.xml" />
    bean>


    <bean class="org.mybatis.spring.mapper.MapperScannerConfigurer">
        <property name="basePackage" value="com.study.springcxf.mapper" />
        <property name="sqlSessionFactoryBeanName" value="sessionFactory" />
    bean>


    <bean id="txManager" class="org.springframework.jdbc.datasource.DataSourceTransactionManager">
        <property name="dataSource" ref="dataSource" />
    bean>


    <tx:advice id="txAdvice" transaction-manager="txManager">
        <tx:attributes>
            <tx:method name="insert*" propagation="REQUIRED"/>
            <tx:method name="update*" propagation="REQUIRED"/>
            <tx:method name="edit*" propagation="REQUIRED"/>
            <tx:method name="save*" propagation="REQUIRED"/>
            <tx:method name="add*" propagation="REQUIRED"/>
            <tx:method name="new*" propagation="REQUIRED"/>
            <tx:method name="modify*" propagation="REQUIRED"/>
            <tx:method name="remove*" propagation="REQUIRED"/>
            <tx:method name="delete*" propagation="REQUIRED"/>
            <tx:method name="change*" propagation="REQUIRED"/>
            <tx:method name="check*" propagation="REQUIRED"/>

            <tx:method name="get*" propagation="REQUIRED" read-only="true"/>
            <tx:method name="find*" propagation="REQUIRED" read-only="true"/>
            <tx:method name="load*" propagation="REQUIRED" read-only="true"/>
            <tx:method name="*" propagation="REQUIRED" read-only="true"/>
        tx:attributes>
    tx:advice>


    <aop:config>
        <aop:pointcut id="pointcut" expression="execution(* com.study.springcxf.service.*.*(..))"/>
        <aop:advisor advice-ref="txAdvice" pointcut-ref="pointcut"/>
    aop:config>

beans>
3-3 在web.xml文件中配置cxf servlet。cxf用于提供webservice服务的servlet
    CXFServlet
    org.apache.cxf.transport.servlet.CXFServlet


    CXFServlet
    /webservices/*
beans-cxf.xml配置文件如下
<beans xmlns="http://www.springframework.org/schema/beans" xmlns:xsi="http://www.w3.org/2001/XMLSchema-instance" xmlns:jaxws="http://cxf.apache.org/jaxws" xmlns:context="http://www.springframework.org/schema/context" xmlns:jaxrs="http://cxf.apache.org/jaxrs" xsi:schemaLocation="http://cxf.apache.org/jaxws http://cxf.apache.org/schemas/jaxws.xsd http://www.springframework.org/schema/beans http://www.springframework.org/schema/beans/spring-beans-4.2.xsd http://www.springframework.org/schema/context http://www.springframework.org/schema/context/spring-context-4.2.xsd http://cxf.apache.org/jaxrs http://cxf.apache.org/schemas/jaxrs.xsd">

    <import resource="classpath:META-INF/cxf/cxf.xml" />
    <import resource="classpath:META-INF/cxf/cxf-servlet.xml" />


    <jaxws:server address="/calculateService" serviceClass="com.study.springcxf.service.CalculateService" serviceBean="#calculateService">
        <jaxws:inInterceptors>
            <ref bean="loggingInInterceptor"/>
            <ref bean="userCheckInterceptor"/>
        jaxws:inInterceptors>
    jaxws:server>


    <jaxws:endpoint address="/userService" implementor="com.study.springcxf.service.UserServiceImpl">
        <jaxws:inInterceptors>
            <ref bean="userCheckInterceptor"/>
        jaxws:inInterceptors>
    jaxws:endpoint>

    <jaxrs:server address="/restful">
        <jaxrs:serviceBeans>
            <ref bean="customerService"/>
        jaxrs:serviceBeans>
        <jaxrs:providers>
            <bean class="org.codehaus.jackson.jaxrs.JacksonJsonProvider">bean>
        jaxrs:providers>
    jaxrs:server>
beans>
第4节 Apache CXF拦截器的使用
- 使用Apache CXF拦截器,我们首先得知道什么是Apache CXF拦截器。在Apache CXF中,拦截器有几种分类方式,系统拦截器、用户自定义拦截器;出拦截器、入拦截器等等。读者需要理解出入拦截器会更容易使用CXF的这个功能,怎么说呢。说明一下,无论相对于客户端还是服务器,拦截器都是在消息进入或者离开端点(端点表示网络中一台主机,可能是客户端,也可能是服务器)之前或者之后对消息进行我们需要的处理。打个比方,比如日志拦截器,在服务端可能存在一个入日志拦截器A,也可能存在一个出日志拦截器B,A或者B都可能是在消息处理之前或者之后或者某个时间点进行的。对于客户端同样如此。在此就不作深入讲解了,读者可以自行参考官网文档,下面简单把实现步骤说明一下
- 首先需要一个实现了接口org.apache.cxf.interceptor.Interceptor的java类,这个类可以通过继承AbstractPhaseInterceptor类来完成。其中泛型T是一个org.apache.cxf.message.Message接口类型,我们自定义的类型中泛型简单指定为SoapMessage即可。拦截器中主要有两个选择性实现的方法handleFault和handleMessage,分别用于拦截不同方面,前者用于出错的异常拦截,后者是用于消息处理的。用户名密码的验证就是放在后面那个方法当中,代码如下
    @Override
    public void handleMessage(SoapMessage message) throws Fault {
        Header header = message.getHeader(new QName("user"));
        if (header!=null) {
            Element userElement = (Element) header.getObject();
            String username = userElement.getElementsByTagName("username").item(0).getTextContent();
            String password = userElement.getElementsByTagName("password").item(0).getTextContent();

            // 实际发送的请求 uri
            String uri = message.getDestination().getAddress().getAddress().getValue();
            try {
                boolean permit = permissionService.checkUserPermission(username, password, uri);
                if (permit) {
                    logger.log(Level.INFO, "验证权限通过...");
                    return ;
                }
            } catch (Fault e) {
                throw e;
            }
        } else {
            throw new Fault("请输入用户名密码!", logger);
        }
}- 验证的逻辑以PermissionService接口形式封装在方法checkUserPermission中,代码如下
    @Override
    public boolean checkUserPermission(String username, String password, String accessedResource) {

        List resourceUris = new ArrayList();
        User user = userService.findUserByUsernameAndPassword(username, password);
        if (user==null) {
            throw new Fault("用户名密码不正确!", logger);
        }
        List userResources = userResourceService.findResourceByUserId(user.getId());
        if (userResources==null || userResources.size()<1) {
            throw new Fault("该用户没有访问任何资源的权限!", logger);
        }
        List resourceIds = new ArrayList();
        for (UserResource e : userResources) {
            resourceIds.add(e.getResourceId());
        }
        List resources = resourceService.findResourceIn(resourceIds);
        if (resources==null || resources.size()<1) {
            throw new Fault("对应资源已被禁用或者移除!", logger);
        }
        for (Resource e : resources) {
            resourceUris.add(e.getResourceUri());
        }

        if (resourceUris.size()>0 && resourceUris.contains(accessedResource)) {
            return true;
        } else {
            throw new Fault("该用户没有权限访问对应资源,该用户能访问的资源路径如下:" + resourceUris, logger);
        }
} - java类编写完成后在第3节的beans-cxf.xml文件中进行配置。比如
<jaxws:server address="/calculateService" serviceClass="com.study.springcxf.service.CalculateService" serviceBean="#calculateService">
    <jaxws:inInterceptors>
        <ref bean="loggingInInterceptor"/>
        <ref bean="userCheckInterceptor"/>
    jaxws:inInterceptors>
jaxws:server>
表示通过接口CalculateService在/calculateService提供服务,实现类的实例为calculateService,注意前面要加上#,或者用上面配置的方式二。两个ref元素表示日志拦截器和用户名密码检查拦截器,配置在jaxws:inInterceptors元素中。另外如果需要对异常问题进行处理,那么让拦截器类重写handleFault方法,并在配置文件中加上jaxws:inFaultInterceptors元素即可。最后,本实例还实现了一个restful webservice,在beans-cxf.xml文件的最后address为/restful部分
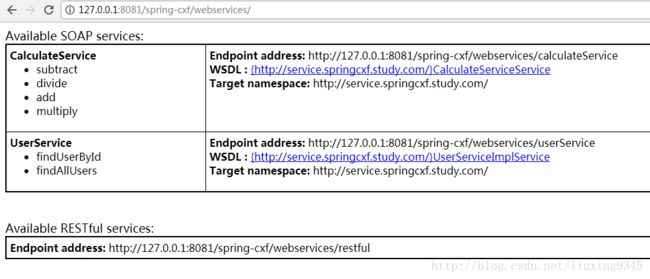
发布程序到tomcat,通过http://127.0.0.1:8081/spring-cxf/webservices/在浏览器中可以查看已经发布的服务,截图如下

发布的服务分两大部分显示,上面的显示为soap webservice,下面的是restful webservice。请求路径中的/webservices是web.xml配置的CXFServlet的url-pattern客户端可以通过http://127.0.0.1:8081/spring-cxf/webservices/calculateService?wsdl请求路径来生成客户端代码,使用apache cxf工具生成命令如下:wsdl2java -encoding utf-8 http://127.0.0.1:8081/spring-cxf/webservices/calculateService?wsdl。wsdl2java命令使用可以参考官方文档
- 其他内容不细说了,写这个博客花了我好几个小时,都不记得上次写博客是什么时候了,大家多多批评指正,有问题的可以给我评论
- 工程文件下载地址:http://download.csdn.net/download/liuxing9345/9980320
