基于 Vue.js 之 iView UI 框架 table表格组件购物车的基本操作实践记要
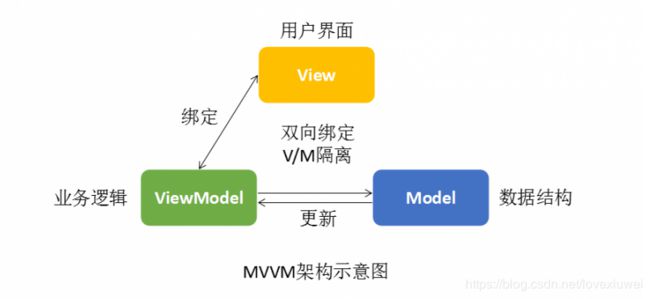
一、 MVVM 模式
Vue.js 比较显著的特征是解耦了视图和数据,也就是说视图的变化不再需要命令式编程去显式改变,只要修改完数据就能立即自动同步,这是比较大的一个思维模式的转变,另一个就是组件化思维俯首皆是,这样开发一个应用就相当是在搭积木。
其实以上对 Vue.js 所阐述的优点也正是 MVVM 模式的写照,它原是由 MVC 所衍生,即当视图层发生变化时,会自动更新到视图模型上,反之亦然,这就是常说的双向绑定,
二、下载 iView 系列文件
- vue.min.2.5.3.js,vue.js 库
- iview.2.7.0.css,iView 样式文件
- iview.min.2.7.0.js,iView 库
- iview /locale/zh-CN.js 语言包
- iview /font 字体包
在 iView 官网的“组件” / “安装” 页面的开头处发现了这个链接:https://unpkg.com/iview/ ,通过它可以查看到 dist 目录:
三、实例演练
整体效果图:
1.引入资源
组件 i-table 最核心的两个属性分别是 columns 和 data,columns 是列定义,data 则为数据。
这两个属性都添加了冒号(:)语法糖,它指代的是 v-bind 指令,表示这个属性的值是动态绑定的,这样在运行过程中发现数据有变更时,表格视图也会迅速的变更。
2.iViewUI_cart.js 脚本部分
var cart = new Vue({
    el: '#app',
    data: function () {
        return {
            cartList: [
                {id: 1, name: 'iPhone X', price: 8300.05, count: 1},
                {id: 2, name: 'MacBook Pro', price: 18800.75, count: 3},
                {id: 3, name: 'Mate 10 Porsche', price: 16600.00, count: 8}
            ],
            columns: [
                {
                    title: '名称',
                    key: 'name'
                },
                {
                    title: '单价',
                    key: 'price'
                },
                {
                    title: '数量',
                    key: 'count'
                }
            ]
        }
    },
    methods: {}
});
该文件是与页面对应的业务脚本,整个文件就负责 new 一个 Vue 实例,并将其赋值给了变量 cart,可以看到的 data 包含了两个属性,即表示数据源的 cartList 和 列定义的 columns,二者正好与上述 i-table 的核心属性相映射。
再次值得注意的是 data,它的值需要以匿名函数的形式进行书写,即:
function () {
    return {}
}
如此,在其 columns 中出现的 Render 函数体内才能正常通过 this 访问到 methods 中定义的方法。当然本次演示是通过 cart 对象来访问,故不受此影响。
运行页面后,数据即可绑定成功。
3.整体效果图:
4.添加操作所需按钮
这一步简单,只需要修改一下 columns 属性,追加一项“操作”列,添加三个按钮:
columns: [
                {
                    title: '名称',
                    key: 'name'
                },
                {
                    title: '单价',
                    key: 'price'
                },
                {
                    title: '数量',
                    key: 'count'
                },
				{
					title: '操作',
					render: (h, params) => {
						return h('div', [
							h('Button', {
								props: {
									type: 'primary',
									size: 'small'
								},
								style: {
									marginRight: '5px'
								},
								on: {
									click: () => {
										console.info('减少数量');
										cart.reduceQuantity(params.row.id);
									}
								}
							}, '-'),
							h('Button', {
								props: {
									type: 'primary',
									size: 'small'
								},
								style: {
									marginRight: '5px'
								},
								on: {
									click: () => {
										console.info('增加数量');
										cart.increaseQuantity(params.row.id);
									}
								}
							}, '+'),
							h('Button', {
								props: {
									type: 'error',
									size: 'small'
								},
								style: {
									marginRight: '5px'
								},
								on: {
									click: () => {
										console.info('删除当前项');
										cart.deleteItem(params.row.id);
									}
								}
							}, '删除')
						]);
					}
				}
            ]
在这里使用到了 Render 函数,该函数的内部机制略显复杂。
说到 Render 函数,还需要再强调一下在其内部对 methods 中所定义方法的调用,如果试图通过 this 来调用方法(比如 reduceQuantity),那么 Vue 实例中 data 的值需要使用匿名函数的方式来表达;反之,若是通过 Vue 实例 cart 来调用,则无此顾虑,即 data 的值使用一贯的对象大括号({})来表达即可。
5.添加操作所需方法
操作按钮已经添加成功了,那就需要有对应的方法去执行,在 Vue.js 中,方法都定义在 methods 属性中。
5-1.减去数量
通过遍历找到目标记录,并将其 count 属性减一,如同 MVVM 的定义,当数据变更的时候,视图也跟随着变化。
但凡是存在于购物车内的商品,其数量至少应该为 1,为防止减到 0,不妨再加一个判断使其逻辑更为完美:
methods: {
    reduceQuantity: function (id) {
        for (let i = 0; i < this.cartList.length; i++) {
            if (this.cartList[i].id === id) {
                if (this.cartList[i].count > 1) {
                    this.cartList[i].count--;
                }
                break;
            }
        }
    }
},
5-2.增加数量
methods: {
    increaseQuantity: function (id) {
        for (let i = 0; i < this.cartList.length; i++) {
            if (this.cartList[i].id === id) {
                this.cartList[i].count++;
                break;
            }
        }
    }
}
只需要针对 count 属性做 +1 操作即可。
5-3.删除
deleteItem: function (id) {
    for (let i = 0; i < this.cartList.length; i++) {
        if (this.cartList[i].id === id) {
            // 询问是否删除
            this.$Modal.confirm({
                title: '提示',
                content: '确定要删除吗?',
                onOk: () => {
                    this.cartList.splice(i, 1);
                },
                onCancel: () => {
                    // 什么也不做
                }
            });
        }
    }
}
在删除逻辑中,当遍历到目标记录时,会询问用户是否真的要删除当前记录,这里用到了 $Modal 对话框,如果用户点击确定,那么就执行真正的删除,看一看效果:


