Spring小结(2)
Spring的bean管理(注解)
注解介绍
1 、代码里面特殊标记,使用注解可以完成功能
2、 注解写法 @注解名称(属性名称=属性值)(例如:value=xxx)
3 、 注解使用在类上面,方法上面 和 属性上面
Spring注解开发准备
1 、导入jar包
(1)导入基本的jar包 Spring注解包 密码:own4
(2)导入aop包 Spring aop 包 密码:d0i72、 创建类,创建方法
package com.spring_stu.aoon;
import org.springframework.context.annotation.Scope;
import org.springframework.stereotype.Component;
@Component(value="user")//相当于3 创建spring配置文件,引入约束
(1)第一天做ioc基本功能,引入约束beans
(2)做spring的ioc注解开发,引入新的约束
4 、开启注解扫描
注解创建对象
1 、在创建对象的类上面使用注解实现

package com.spring_stu.aoon;
import org.springframework.context.annotation.Scope;
import org.springframework.stereotype.Component;
@Component(value="user")//相当于测试类:

package com.spring_stu.aoon;

import org.junit.Test;
import org.springframework.context.ApplicationContext;
import org.springframework.context.support.ClassPathXmlApplicationContext;

public class TestAnno {
	@Test
	public void test() {
		ApplicationContext context = new ClassPathXmlApplicationContext(
				"ApplicationContext.xml");
		User user = (User) context.getBean("user");
		user.add();

	}
}
2 创建对象有四个注解

(1)@Component
(2)@Controller
(3)@Service
(4)@Repository
目前这四个注解功能是一样的,都创建对象
3、 创建对象单实例还是多实例

	@Scope(value="singleton")//配置对象为单实例还是多实例
	public void add(){
		System.out.println("add");
	}
注解注入属性
1 、创建service类,创建dao类,在service得到dao对象
注入属性第一个注解@Autowired
(1)创建dao和service对象
UserService:package com.spring_stu.aopproperty;
import javax.annotation.Resource;
import javax.annotation.Resources;
import org.springframework.beans.factory.annotation.Autowired;
import org.springframework.stereotype.Component;
@Component(value="userService")
public class UserService {
/*
* 得到dao对象
* 1.定义到类型属性对象
* */
//在dao属性上使用注解完成对象注入
//自动装配
@Autowired
//private UserDao userDao;
//使用注解方式时,不需要手动提供set方法,会自动实现
//常用的注解方式,使用resource指定对象注入
//name属性写的是注解创建dao对象value的值
@Resource(name="userDao")
private UserDao userDao;
public void add(){
System.out.println("Service...");
userDao.add();
}
}package com.spring_stu.aopproperty;
import org.springframework.stereotype.Component;
@Component(value="userDao")
public class UserDao {
public void add(){
System.out.println("Dao...");
}
}
(2)在service类里面定义dao类型属性

注入属性第二个注解 @Resource,其中name属性写的是注解创建dao对象value的值
配置文件和注解混合使用
1、创建BookDao,BookService
BookDao:
package com.spring_stu.xmlaoon;

public class BookDao {
	public void book(){
		System.out.println("bookdao....");
	}
}
BookService:
package com.spring_stu.xmlaoon;

import javax.annotation.Resource;

//配置文件方式与注解方式结合使用:
//配置文件生成对象,注解方式注入属性
public class BookService {
	//得到bookdao与ordersdao对象
	@Resource(name="bookDao")
	private BookDao bookDao;
	@Resource(name="ordersDao")
	private OrdersDao ordersDao;

	public void add(){
		System.out.println("bookservice");
		bookDao.book();
		ordersDao.buy();
	}
}
2、 创建对象操作使用配置文件方式实现
2、 注入属性的操作使用注解方式实现
AOP概念
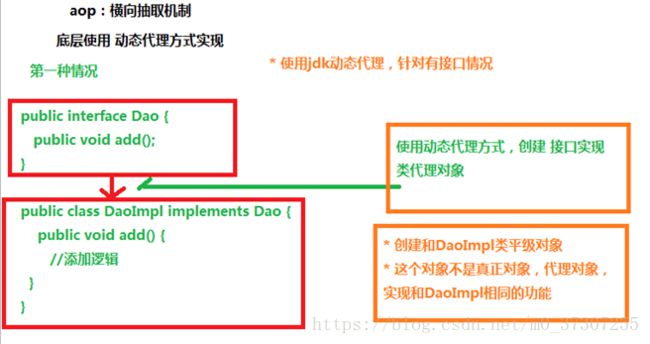
1 、aop:面向切面(方面)编程,扩展功能不修改源代码实现
2 、 aop采取横向抽取机制,取代了传统纵向继承体系重复性代码
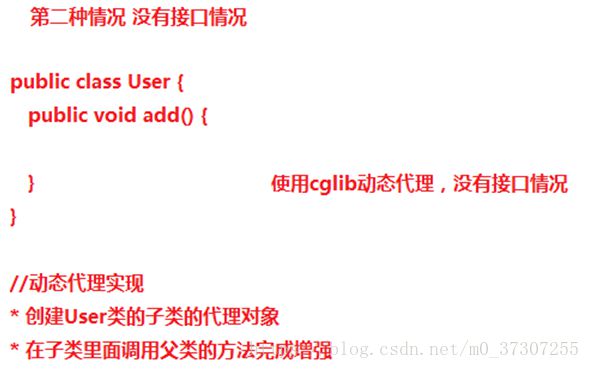
3、 aop底层使用动态代理实现
(1)第一种情况,有接口情况,使用动态代理创建接口实现类代理对象
( 2 )第二种情况,没有接口情况,使用动态代理创建类的子类代理对象AOP原理
画图分析原理

AOP操作术语
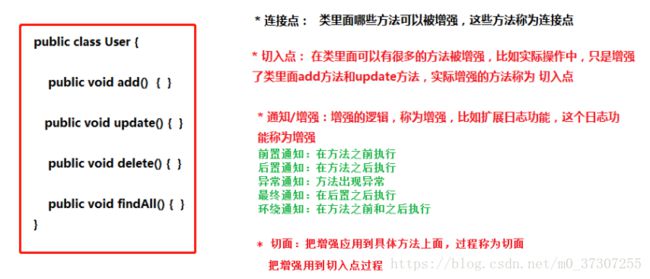
Joinpoint(连接点): 类里面可以被增强的方法,这些方法称为连接点
Pointcut(切入点):所谓切入点是指我们要对哪些Joinpoint进行拦截的定义.
Advice(通知/增强):所谓通知是指拦截到Joinpoint之后所要做的事情就是通知.通知分为前置通知,后置通知,异常通知,最终通知,环绕通知(切面要完成的功能)
Aspect(切面): 是切入点和通知(引介)的结合
Introduction(引介):引介是一种特殊的通知在不修改类代码的前提下, Introduction可以在运行期为类动态地添加一些方法或Field.
Target(目标对象):代理的目标对象(要增强的类)
Weaving(织入):是把增强应用到目标的过程.
把advice 应用到 target的过程
Proxy(代理):一个类被AOP织入增强后,就产生一个结果代理类
Spring的aop操作
1 、在spring里面进行aop操作,使用Aspectj实现
(1)Aspectj不是spring一部分,和spring一起使用进行aop操作
(2)Spring2.0以后新增了对AspectJ支持
2 、使用Aspectj实现aop有两种方式
(1)基于aspectj的xml配置
( 2 )基于 aspectj 的注解方式Aop操作
1 、除了导入基本的jar包之外,还需要导入aop相关的jar包

2 、创建spring核心配置文件,导入aop的约束

使用表达式配置切入点
1 切入点:实际增强的方法
2 常用的表达式
execution(<访问修饰符>?<返回类型><方法名>(<参数>)<异常>)
(1)execution(* com.spring_stu.aop.Book.add(..))
execution(*<代表访问所有修饰符> 空格 包名.类名.方法名(参数名(用点点代替所有参数)))
(2)execution(* com.spring_stu.aop.Book.*(..))
execution(*<代表访问所有修饰符> 空格 包名.类名.*(代表类下所有方法)(参数名(用点点代替所有参数)))
(3)execution(**.*(..))
execution(*<代表访问所有修饰符> *(代表访问src下所有包、类).*(代表类下所有方法)(参数名(用点点代替所有参数)))
Aspectj的aop操作

增强类型:
package com.spring_stu.aop;

import org.aspectj.lang.ProceedingJoinPoint;

//增强类
public class MyBook {
	//前置增强
	public void before1(){
		System.out.println("前置增强...");
	}
	public void after1(){
		System.out.println("后置通知...");
	}
	//环绕通知
	public void around1(ProceedingJoinPoint proceedingJoinPoint) throws Throwable{
		//方法之前
		System.out.println("方法之前...");
		//执行被增强的方法
		proceedingJoinPoint.proceed();
		//方法之后
		System.out.println("方法之后...");
	}
}
配置:
基于aspectj的注解aop
1 、使用注解方式实现aop操作
第一步创建对象

Book:
package com.spring_stu.aop;

public class Book {
	public void add(){
		System.out.println("add...");
	}

}
MyBook:
package com.spring_stu.aop;

import org.aspectj.lang.annotation.Aspect;
import org.aspectj.lang.annotation.Before;

//需要在类上加Aspect注解,使用Aspect注入
@Aspect
public class MyBook {

	//在方法上使用注解来完成增强配置,value内填的是表达式
	@Before(value="execution(* com.spring_stu.aop.Book.add(..))")
	public void before1(){
		System.out.println("before1");
	}
	public void after1(){
		System.out.println("after1");
	}
	public void around(){
		System.out.println("around");
	}
}
配置文件:
测试类:
package com.spring_stu.aop;

import org.junit.Test;
import org.springframework.context.ApplicationContext;
import org.springframework.context.support.ClassPathXmlApplicationContext;

public class TestAop {
	@Test
	public void testdemo(){
		ApplicationContext context=new ClassPathXmlApplicationContext("ApplicationContext.xml");
		Book book=(Book)context.getBean("book");
		book.add();
	}
}log4j介绍
1 、通过log4j可以看到程序运行过程中更详细的信息
(1)经常使用log4j查看日志
2、 使用
(1)导入log4j的jar包
(2)复制log4j的配置文件,复制到src下面
log4j.properties:
### direct log messages to stdout ###
log4j.appender.stdout=org.apache.log4j.ConsoleAppender
log4j.appender.stdout.Target=System.err
log4j.appender.stdout.layout=org.apache.log4j.PatternLayout
log4j.appender.stdout.layout.ConversionPattern=%d{ABSOLUTE} %5p %c{1}:%L - %m%n

### direct messages to file mylog.log ###
log4j.appender.file=org.apache.log4j.FileAppender
log4j.appender.file.File=c:\mylog.log
log4j.appender.file.layout=org.apache.log4j.PatternLayout
log4j.appender.file.layout.ConversionPattern=%d{ABSOLUTE} %5p %c{1}:%L - %m%n

### set log levels - for more verbose logging change 'info' to 'debug' ###

log4j.rootLogger=info, stdout
3 、设置日志级别
(1)info:看到基本信息
( 2 ) debug :看到更详细信息Spring整合web项目演示
1 、演示问题
(1)action调用service,service调用dao
UserAction:package com.spring_stu.action;
import org.springframework.context.ApplicationContext;
import org.springframework.context.support.ClassPathXmlApplicationContext;
import com.opensymphony.xwork2.ActionSupport;
import com.spring_stu.service.UserService;
public class UserAction extends ActionSupport {
@Override
public String execute() throws Exception {
System.out.println("action...");
ApplicationContext context = new ClassPathXmlApplicationContext(
"ApplicationContext.xml");
UserService userService = (UserService) context.getBean("userService");
userService.add();
return NONE;
}
}
UserDao:
package com.spring_stu.dao;

public class UserDao {
	public void add(){
		System.out.println("Dao...");
	}
}
UserService:
package com.spring_stu.service;

import com.spring_stu.dao.UserDao;

public class UserService {

	private UserDao userDao;

	public void setUserDao(UserDao userDao) {
		this.userDao = userDao;
	}

	public void add() {
		System.out.println("Service...");
		userDao.add();
	}
}

每次访问action时候,都会加载spring配置文件
2、 解决方案:
(1)在服务器启动时候,创建对象加载配置文件
(2)底层使用监听器、ServletContext对象
3、 在spring里面不需要我们自己写代码实现,已经帮我们封装好了
(1)封装了一个监听器,只需要配置监听器就可以了
(2)配置监听器之前做事情:导入spring整合web项目jar包 Spring整合web项目jar包 密码:cg4x,也可以在
![]() 下找到。
下找到。
(3)指定加载spring配置文件位置,Spring配置文件在创建对象加载配置文件会自动去WEB-INF下查找ApplicationContext.xml,若不放在这里,会报错,查找不到指定文件,需要配置
![]()
配置为:
![]()
配置文件web.xml为:
  spring_day_002_webdemo


  		contextConfigLocation
  		classpath:ApplicationContext.xml


        struts2
        org.apache.struts2.dispatcher.ng.filter.StrutsPrepareAndExecuteFilter


        struts2
        /*


    	org.springframework.web.context.ContextLoaderListener


    index.html
    index.htm
    index.jsp
    default.html
    default.htm
    default.jsp
本章小结:
1、spring的bean管理(注解)
(1)使用注解创建对象
- 四个注解
(2)使用注解注入属性
- Autowired
-Resource
(3)xml和注解方式混合使用
- 创建对象使用配置文件,注入属性使用注解
2、 AOP
(1)aop概述
(2)aop底层原理
(3)aop操作相关术语
- 切入点
- 增强
- 切面
3、spring的aop操作(基于aspectj的xml方式)
-基于aspectj的注解aop操作(会用)
4、log4j介绍
5、spring整合web项目演示


