一步一步学习自定义View(二)
前言
上篇博客一步一步学习自定义View(一) 学习了怎么自定义组合控件view和继承现有控件的view。这一篇我们来学学如何自绘View,个人感觉自绘view应该再分为自定义View和自定义ViewGroup两种(虽然ViewGroup不用重写ondraw方法)。
概述
1、ViewGroup是什么?View是什么?
源码中ViewGroup是继承自View的,ViewGroup具有View的所有特性,ViewGroup主要用来充当View的容器,将其中的View作为自己孩子,并对其进行管理,当然孩子也可以是ViewGroup类型。例:layout都是ViewGroup,textview等绘制控件就是View。
2、View的3种测量模式
ViewGroup会为childView指定测量模式,下面简单介绍下三种测量模式:
EXACTLY:设置了精确的值,一般当childView设置其宽、高为精确值、match_parent时,ViewGroup会将其设置为EXACTLY;
AT_MOST:父视图为子视图指定一个最大尺寸。子视图必须确保它自己所有子视图可以适应在该尺寸范围内,一般当childView设置其宽、高为wrap_content时,ViewGroup会将其设置为AT_MOST;
UNSPECIFIED:父视图不对子视图有任何约束,它可以达到所期望的任意尺寸。比如 ListView、ScrollView,一般自定义 View 中用不到;
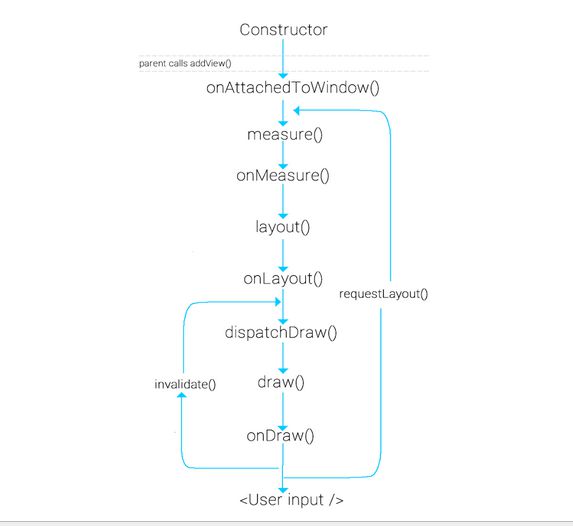
3、自定义View主要重写方法的周期
上图就是一个自定义view的时候常用的几个方法的运行周期,着重说一下三个方法:
onMeasure: 自定义视图中实现测量逻辑的方法,该方法的参数是父视图对子视图的 width 和 height 的测量要求。在我们自身的自定义视图中,要做的就是根据该 widthMeasureSpec 和 heightMeasureSpec 计算视图的 width 和 height,不同的模式处理方式不同。
onLayout:对其所有childView进行定位(设置childView的绘制区域)。ViewGroup源码中次方法是抽象方法,所以是自定义ViewGroup必须重写的方法。在自定义View的时候就不需要重写此方法。
onDraw:绘制方法,通过Canvas和Paint绘制自己需要的控件。自定义ViewGroup不需要重写此方法。
示例:
自定义View
代码:
1、定义参数,重新构造方法:
//画笔
    private Paint mPaint;
    //画布
    private Canvas mCanvas;
    //画笔路径
    private Path mPath;
    //是否正在绘制
    private boolean isDrawing = false;
    //画笔的颜色(默认黑色)
    private int paintColor = Color.BLACK;
    //画板的背景色(默认颜色 ddddddd)
    private int canvasColor = Color.parseColor("#bbccaa");
    //画笔宽度
    private int paintSize = 5;

    //缓存图片
    private Bitmap cacheBitmap;

    public DrawView(Context context, AttributeSet attrs) {
        super(context, attrs);

        initWedgits();

    }
2、先设置画笔和路径:
        mPaint = new Paint();
        //设置抗锯齿,如果不设置,加载位图的时候可能会出现锯齿状的边界,如果设置,边界就会变的稍微有点模糊,锯齿就看不到了。
        mPaint.setAntiAlias(true);
        //设置是否抖动,如果不设置感觉就会有一些僵硬的线条,如果设置图像就会看的更柔和一些
        mPaint.setDither(true);
        // 设置画笔宽度
        mPaint.setStrokeWidth(paintSize);
        //设置画笔模式填充内部(STROKE描边  FILL填充内部  FILL_AND_STROKE 填充内部和描边)
        mPaint.setStyle(Paint.Style.STROKE);
        //设置画笔转弯处的连接风格为圆角
        mPaint.setStrokeJoin(Paint.Join.ROUND);
        //设置画笔线条末端效果为圆角
        mPaint.setStrokeCap(Paint.Cap.ROUND);
        //设置画笔颜色
        mPaint.setColor(paintColor);
        //绘制路径
        mPath = new Path();
3、重写onSizeChanged方法:
@Override
    protected void onSizeChanged(int w, int h, int oldw, int oldh) {
        super.onSizeChanged(w, h, oldw, oldh);
        //创建空缓存图片
        cacheBitmap = Bitmap.createBitmap(w,h, Bitmap.Config.ARGB_8888);
        //将画布内容画在空缓存图片上
        mCanvas = new Canvas(cacheBitmap);
    }
4、重写onDraw方法:
@Override
    protected void onDraw(Canvas canvas) {
        super.onDraw(canvas);

        canvas.drawColor(canvasColor);
        canvas.drawBitmap(cacheBitmap,0,0,mPaint);
        canvas.drawPath(mPath,mPaint);
    }
5、重写onTouchEvent方法:
public boolean onTouchEvent(MotionEvent event) {
        //记录手指触摸时屏幕的X坐标和Y坐标
        float X = event.getX();
        float Y = event.getY();
        switch (event.getAction()){
            case MotionEvent.ACTION_DOWN:
                //手指按下时清空之前的路径设置
                mPath.reset();
                //设置路径起始点
                mPath.moveTo(X,Y);
                isDrawing= true;

                break;
            case MotionEvent.ACTION_UP:
                //手指抬起时绘制路径
                mCanvas.drawPath(mPath,mPaint);
                mPath.reset();
                isDrawing = false;
                break;
            case MotionEvent.ACTION_MOVE:
                //移动下一点的路径
                mPath.lineTo(X,Y);
                isDrawing = true;
                break;
            default:
                break;
        }
        invalidate();
        return true;
    }
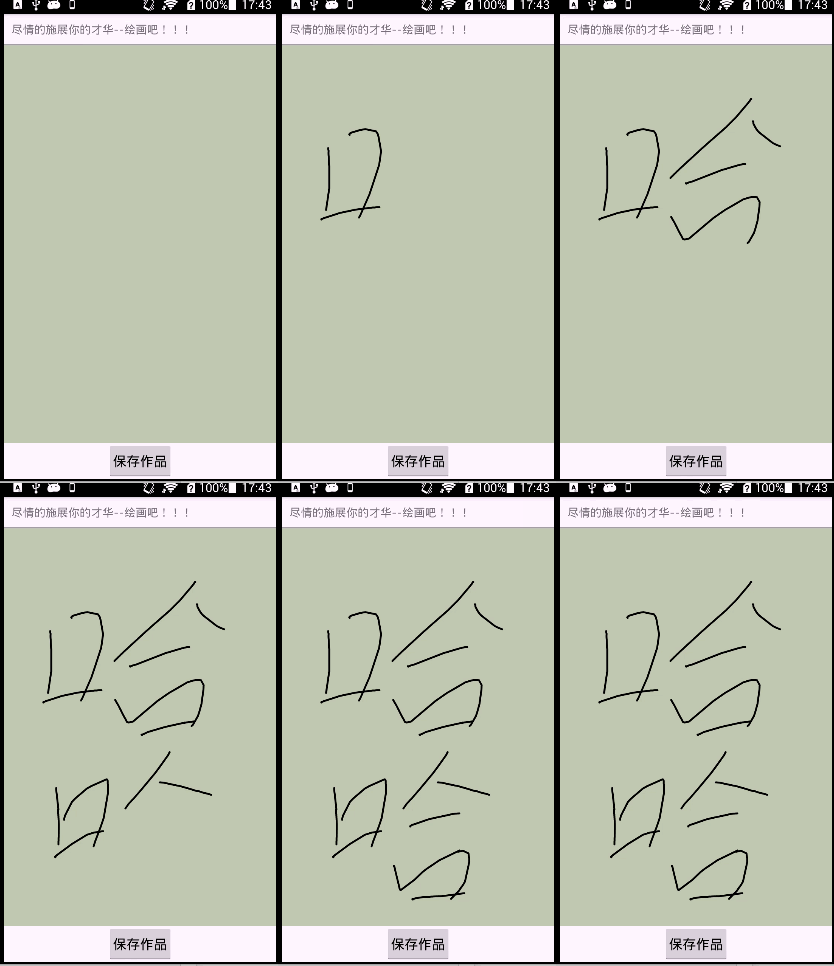
这样一个绘画板的view就完成了。当然我们还可以添加些方法,让这个view更灵活一些。如:
 /** * 设置画笔颜色 * * @param color * 画笔颜色 */
    public void setPaintColor(int color) {
        paintColor = color;
    }

    /** * 设置画笔宽度 * * @param size * 画笔颜色 */
    public void setPaintSize(int size) {
        paintSize = size;
    }

    /** * 设置画板颜色 * * @param color * 画板颜色 */
    public void setCanvasColor(int color) {
        canvasColor = color;
    }

    /** * 返回绘画状态 * * @return【true:正在绘制】【false:绘制完成】 */
    public boolean getDrawState() {
        return isDrawing;
    }

    /** * 返回Bitmap * * @return 返回绘制的图片 */
    public Bitmap getBitmap() {
        return cacheBitmap;
    }
里面的方法注解很详细,就不具体再解释了,最后我会附上dome,这个自定义view的类名是DrawView。
自定义ViewGroup
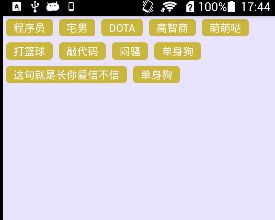
这个我跟着 鸿洋 大神仿了一个添加标签的FlowLayout效果,上图:

防止看不懂,可去看大神博客,上链接实现FlowLayout
代码:
1、定义参数重新构造方法:
 public CustonViewGroup(Context context, AttributeSet attrs) {
        super(context, attrs);
    }

    /** * 存储所有的view,按行记录 */
    private List> mAllViews = new ArrayList>();
    /** * 记录每一行的最大高度 */
    private List mLineHeight = new ArrayList<>();
2、onMeasure重写:计算所有childview的高度和宽度 然后根据childview的计算结果,设置自己的高和宽
protected void onMeasure(int widthMeasureSpec, int heightMeasureSpec) {

        /** * 获得此ViewGroup上级容器为其推荐的宽和高,以及计算模式 */
        int widthMode = MeasureSpec.getMode(widthMeasureSpec);
        int heightMode = MeasureSpec.getMode(heightMeasureSpec);
        int sizeWidth = MeasureSpec.getSize(widthMeasureSpec);
        int sizeHeight = MeasureSpec.getSize(heightMeasureSpec);

        //计算所有childview的宽和高
        measureChildren(widthMeasureSpec,heightMeasureSpec);

        /** * 记录如果是wrap_content时设置的宽和高 */
        int width = 0;
        int height = 0;

        //得到childview的个数
        int cCount = getChildCount();

        /** * 记录每一行的宽度,width不断取最大宽度,最后得到最宽的一行的宽度 */
       int lineWidth = 0;

        /** * 每一行的高度,累加至height */
        int lineHeight = 0;

        for(int i = 0 ; i < cCount ; i++){
            View child = getChildAt(i);
            //测量每一个child的宽和高
            measureChild(child, widthMeasureSpec ,heightMeasureSpec);
            //得到child的param
            MarginLayoutParams params = (MarginLayoutParams) child.getLayoutParams();
            //当前子空间实际占据的宽度
            int childWidth = child.getMeasuredWidth() + params.leftMargin + params.rightMargin;
            //当前子空间实际占据的高度
            int childHeight = child.getMeasuredHeight() + params.topMargin + params.bottomMargin;
            /** * 如果当前加入了child超出了最大宽度,则把当前最大的宽度给width,累加height,开启新的一行 */
            if(lineWidth + childWidth > sizeWidth){
                width = Math.max(lineWidth , childWidth);//取最大值
                lineWidth = childWidth;//重新开启新的一行,开始记录新一行的宽度
                height += lineHeight;//叠加当前的高度
                lineHeight = childHeight;//开始记录新一行的高度
            }else{
                //没有超出最大宽度则累加当前child宽度,lineHeight取最大值
                lineWidth = lineWidth + childWidth;
                lineHeight = Math.max(lineHeight , childHeight);
            }
            //如果是最后一个child,则把当前记录的最大宽度和当前lineWidth做比较,取较大的一个,高度累加
            if(i == cCount -1){
                width = Math.max(width,lineWidth);
                height += lineHeight;
            }
        }

        setMeasuredDimension((widthMode == MeasureSpec.EXACTLY) ? sizeWidth : width , (heightMode == MeasureSpec.EXACTLY) ? sizeHeight : height);

    }
方法简要说明: 首先得到父容器推荐的宽高和模式,然后遍历所有子view,测量每次插入的子view,用lineWidth记录每一行的宽度,用lineHeight记录每一行的高度
插入子view之后如果 “累计宽度” 加上 “插入的view宽度” 大于了控件的最大宽度,就需要新开启一行来放刚插入的子view。
否则:子view宽度加到累计宽度中,行宽度设置为 原行高和子view高度中较高的一个。
最后如果计算模式是EXACTLY 就使用父容器给的宽高,否则使用我们算的最大宽度width 和 累计高度height
3、onLayout重写:为子view布局
 protected void onLayout(boolean changed, int l, int t, int r, int b) {
        mAllViews.clear();
        mLineHeight.clear();

        //获取此view的宽度
        int width = getWidth();

        //记录每一行的宽度和每一行最大的高度(每一行所有子view的最大高度为行高)
        int lineWidth = 0;
        int lineHeight = 0;

        //每一行的子view
        List lineViews = new ArrayList<>();
        //含所有的所有子view的个数
        int cCount = getChildCount();

        //遍历所有的子view
        for(int i = 0; i < cCount ; i++){
            View child = getChildAt(i);

            MarginLayoutParams params = (MarginLayoutParams) child.getLayoutParams();

            int childWith = child.getMeasuredWidth();
            int childHeight = child.getMeasuredHeight();

            //如果累加宽度+插入子view宽度 > 该控件宽度 (需要换行)
            if(childWith + params.leftMargin + params.rightMargin + lineWidth > width){
                //记录这一行所有view的最大高度
                mLineHeight.add(lineHeight);
                //将当前行的子view集合 保存,然后开启新的子view集合来保存下一行的子view
                mAllViews.add(lineViews);
                lineWidth = 0;//重置行宽
                lineViews = new ArrayList<>();
            }

            //如果不需要换行,则宽度累加
            lineWidth += childWith + params.leftMargin + params.rightMargin;
            //取每行的最大高度
            lineHeight = Math.max(lineHeight,childHeight+params.topMargin + params.bottomMargin);
            lineViews.add(child);

        }

        //记录最后一行添加
        mLineHeight.add(lineHeight);
        mAllViews.add(lineViews);

        //子view距离左边的距离和上边的距离(不包含本身自己的margin)
        int left = 0;
        int top = 0;

        int lineNums = mAllViews.size();//得到所有的总行数
        for(int i =0; i< lineNums ; i++){
            lineViews = mAllViews.get(i);//获取每一行所有的子view

            lineHeight = mLineHeight.get(i);//获取每一行的高度

            //遍历当前行所有的子view
            for(int j =0; j< lineViews.size() ; j++){
                View child = lineViews.get(j);
                if(child.getVisibility() == View.GONE){
                    continue;
                }

                MarginLayoutParams params = (MarginLayoutParams) child.getLayoutParams();

                //计算childView的left,top.right.bottom
                int lc = left + params.leftMargin;
                int tc = top + params.topMargin;
                int rc = lc + child.getMeasuredWidth();
                int bc = tc + child.getMeasuredHeight();

                child.layout(lc,tc,rc,bc);

                left += child.getMeasuredWidth() + params.rightMargin + params.leftMargin;
            }
            //每一行的left都重新开始,top都累加行高
            left = 0;
            top += lineHeight;
        }

    }
这个和上边的差不多,理解了上面这个就很好理解了。
4、最后加上generateLayoutParams方法的重写,否则MarginLayoutParams params = (MarginLayoutParams) child.getLayoutParams();会报错
@Override
    public LayoutParams generateLayoutParams(AttributeSet attrs) {
        return new MarginLayoutParams(getContext(),attrs);
    }
这样自定义viewgroup的标签示例也就写完了。类名:CustonViewGroup
结语
自定义view到这也能基本理解了,但是自定义view牵扯到的知识点远远不止这些,所以我们后面会继续补充一些自定义view的进阶知识。下面我们需要去深入了解三方面知识点:view的绘制(包括画笔、画笔、路径、Matrix等等)、View的触摸机制、属性动画。

