SpringBoot-SpringData-懒加载
本节聊一下,懒加载的配置与应用
本工程由SpringBoot-SpringData-ManyToMany为基础修改而来
沿用了之前项目的配置,如有任何疑问请进入查看
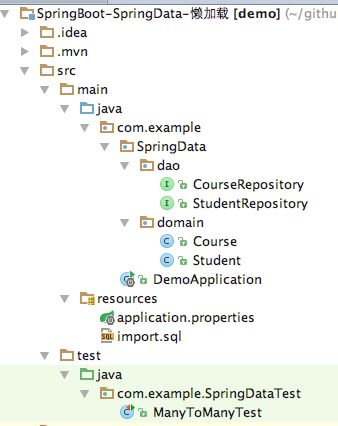
一,目录结构
和SpringBoot-SpringData-ManyToMany项目相同
以课程和学生的多对多关系为模型
二,懒加载的作用和应用场景
预期:
     启用懒加载后,对Student表取数,不会自动带出Course集合
     当student1.getCourse()使用集合时,再执行Student取数
作用:
     当不需要使用Course集合引用时,不会执行多余的查询,提升效率
三,修改domain实现懒加载
主要修改部分:
@ManyToMany(cascade = {CascadeType.PERSIST}, fetch = FetchType.LAZY)
Student.java
@Entity
@Table(name = "student")
public class Student {

    private String pid;
    private String studentName;
    private Set course;    //选修课程

    public Student() {

    }

    public Student(String pid, String studentName, Set course) {
        this.pid = pid;
        this.studentName = studentName;
        this.course = course;
    }

    @Id
    @Column(name = "pid", unique = true, nullable = false, length = 32)
// @GeneratedValue(generator = "generator")
// @GenericGenerator(name = "generator", strategy = "uuid")
    public String getPid() {
        return pid;
    }

    @Column(name = "student_name", unique = true, length = 64)
    public String getStudentName() {
        return studentName;
    }

    /** * Hibernate 会自动创建一张关系表stu_cou, 里边有俩字段stu_id和cou_id分别为两表主键 * * @return */
    @ManyToMany(cascade = {CascadeType.PERSIST}, fetch = FetchType.LAZY)
    @JoinTable(name = "stu_cou", joinColumns = {@JoinColumn(name = "stu_id")}, inverseJoinColumns = {@JoinColumn(name = "cou_id")})
    public Set getCourse() {
        return course;
    }

    public void setPid(String pid) {
        this.pid = pid;
    }

    public void setStudentName(String studentName) {
        this.studentName = studentName;
    }

    public void setCourse(Set course) {
        this.course = course;
    }

}
Course.java
@Entity
@Table(name = "course")
public class Course implements java.io.Serializable {

    private static final long serialVersionUID = 6398143635533582335L;

    private String pid;
    private String courseName;// 课程名称
    private Set Student; // 选修课程学生

    public Course() {

    }

    public Course(String pid, String courseName, Set student) {
        this.pid = pid;
        this.courseName = courseName;
        this.Student = student;
    }

    @Id
    @Column(name = "pid", unique = true, nullable = false, length = 32)
// @GeneratedValue(generator = "generator")
// @GenericGenerator(name = "generator", strategy = "uuid")
    public String getPid() {
        return pid;
    }

    @Column(name = "course_name", unique = true, length = 64)
    public String getCourseName() {
        return courseName;
    }

    //mappedBy :
    // 表示当前所在表和 Student 的关系是定义在 Student 里面的 course 这个成员上面的,
    // 他表示此表是一对一关系中的从表,也就是关系是在 Student 表中维护的,
    // Student 表是关系的维护者,有主导权,它有个外键指向 course (Student 中的 getCourse() )
    @ManyToMany(fetch = FetchType.LAZY, mappedBy = "course")
    //NotFound : 意思是找不到引用的外键数据时忽略,NotFound默认是exception
    @NotFound(action = NotFoundAction.IGNORE)
    public Set getStudent() {
        return Student;
    }

    public void setPid(String pid) {
        this.pid = pid;
    }
    public void setCourseName(String courseName) {
        this.courseName = courseName;
    }
    public void setStudent(Set student) {
        Student = student;
    }

}
四,application.properties开启懒加载
spring.datasource.url=jdbc:mysql://localhost:3306/test
spring.datasource.username=root
spring.datasource.password=123
spring.datasource.driver-class-name=com.mysql.jdbc.Driver

spring.jpa.properties.hibernate.hbm2ddl.auto=update
spring.jpa.show-sql=true
##懒加载
spring.jpa.open-in-view=true
五,添加测试数据
import.sql
INSERT INTO `course` VALUES ('1', 'course1'), ('2', 'course2');
INSERT INTO `student` VALUES ('1', 'student1'), ('2', 'student2'), ('3', 'student3');
INSERT INTO `stu_cou` VALUES ('1', '1'), ('3', '1'), ('1', '2'), ('3', '2');
六,单元测试
ManyToManyTest.java
@RunWith(SpringJUnit4ClassRunner.class)
@SpringApplicationConfiguration(DemoApplication.class)
public class ManyToManyTest {

    @Autowired
    StudentRepository studentRepository;

    @Autowired
    CourseRepository courseRepository;

    @Before
    public void testData(){

    }

    @Test
    @Transactional
    public void test() throws Exception {

        //取学生-包含课程对象集
        Student student1 = studentRepository.findByStudentName("Student1");

        //验证懒加载
        Set course = student1.getCourse();
        System.out.print("course.size()" + course.iterator().next());

    }

}
七,测试懒加载
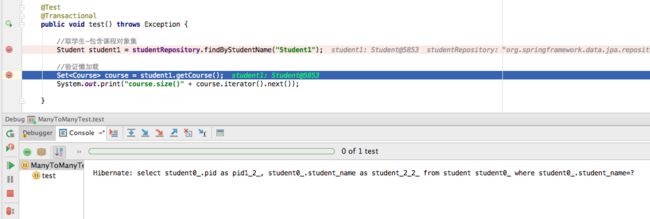
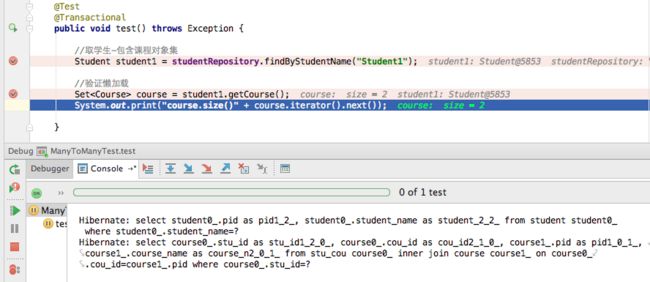
在测试类,查询Student代码下断点,查看当使用前后,Course集合的引用变化,及SQL输出,验证懒加载
Debug模式运行测试类方法,进入调试模式,先清空无用Log
测试加入测试数据到数据库
INSERT INTO `course` VALUES ('1', 'course1'), ('2', 'course2');
INSERT INTO `student` VALUES ('1', 'student1'), ('2', 'student2'), ('3', 'student3');
INSERT INTO `stu_cou` VALUES ('1', '1'), ('3', '1'), ('1', '2'), ('3', '2');
F6执行student表取数,查看变量值和LOG输出
此时LOG输出只取了Student表,再F6向下执行student1.getCourse()
LOG输出了取Course集合的SQL语句
至此SpringBoot-SpringData-JPA-懒加载完成
八,总结
懒加载的配置主要有两点:
1,spring.jpa.open-in-view=true 这个配置默认就是true
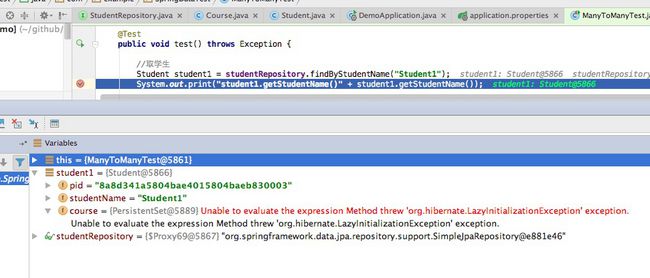
2,取数方法使用@Transactional注解–主要
如不使用@Transactional懒加载会报错
九,代码下载
CSDN下载
GitHub下载


