Oracle ASM + 11g R2 + Centos 6.5 安装
一 软件环境
- VMware Workstation 12 Pro
- CentOS-6.5-x86_64
- p13390677_112040_Linux-x86-64
- 主机名称设置为strong.oracle.com,IP为192.168.1.115
- Xmanager Enterprise 5
二 主机设置
内存要求
安装独立服务器的Grid Infrastructure,内存至少是1.5GB,如果安装Grid和数据库,建议内存是4GB以上。
磁盘空间要求
至少5.5GB。
设置主机名称
[root@strong ~]# more /etc/hosts
127.0.0.1   localhost localhost.localdomain localhost4 localhost4.localdomain4
::1         localhost localhost.localdomain localhost6 localhost6.localdomain6
192.168.1.115 strong.oracle.com
[root@strong ~]# more /etc/sysconfig/network
NETWORKING=yes
HOSTNAME=strong.oracle.com
[root@strong ~]#
配置网络地址
[root@strong ~]# more /etc/sysconfig/network-scripts/ifcfg-eth0
TYPE=Ethernet
BOOTPROTO=none
IPADDR=192.168.1.115
PREFIX=24
GATEWAY=192.168.1.1
DNS1=192.168.1.1
DEFROUTE=yes
IPV4_FAILURE_FATAL=yes
IPV6INIT=no
NAME=eth0
UUID=2f318d53-93a1-4228-bab6-cffb3b6f106e
ONBOOT=yes
[root@strong ~]# service network restart
Shutting down loopback interface:                          [  OK  ]
Bringing up loopback interface:                            [  OK  ]
Bringing up interface eth0:  Active connection state: activated
Active connection path: /org/freedesktop/NetworkManager/ActiveConnection/2
                                                           [  OK  ]
配置本地YUM源,为安装Oracle 11g所需的rpm做准备
[root@strong ~]# umount /dev/cdrom
[root@strong ~]# mount /dev/cdrom /mnt/
mount: block device /dev/sr0 is write-protected, mounting read-only
[root@strong ~]# cd /etc/yum.repos.d/
[root@strong yum.repos.d]# ls
CentOS-Base.repo  CentOS-Debuginfo.repo  CentOS-Media.repo  CentOS-Vault.repo
[root@strong yum.repos.d]# mv CentOS-Base.repo CentOS-Base.repo.bak
[root@strong yum.repos.d]# vim CentOS-Media.repo

# CentOS-Media.repo
#
#  This repo can be used with mounted DVD media, verify the mount point for
#  CentOS-6.  You can use this repo and yum to install items directly off the
#  DVD ISO that we release.
#
# To use this repo, put in your DVD and use it with the other repos too:
#  yum --enablerepo=c6-media [command]
#
# or for ONLY the media repo, do this:
#
#  yum --disablerepo=\* --enablerepo=c6-media [command]

[c6-media]
name=CentOS-$releasever - Media
baseurl=file:///mnt/
gpgcheck=1
enabled=1
gpgkey=file:///etc/pki/rpm-gpg/RPM-GPG-KEY-CentOS-6
[root@strong yum.repos.d]# yum clean all
Loaded plugins: fastestmirror, refresh-packagekit, security
Cleaning repos: c6-media
Cleaning up Everything
Cleaning up list of fastest mirrors
[root@strong yum.repos.d]# yum list[root@sz yum.repos.d]# yum install xterm
[root@sz yum.repos.d]# yum install xclock
安装Oracle 11g所需的Package
下面的Packages时安装Oracle 11g所需的,利用yum install 进行安装。
binutils-2.20.51.0.2-5.11.el6 (x86_64)
compat-libcap1-1.10-1 (x86_64)
compat-libstdc++-33-3.2.3-69.el6 (x86_64)
compat-libstdc++-33-3.2.3-69.el6.i686
gcc-4.4.4-13.el6 (x86_64)
gcc-c++-4.4.4-13.el6 (x86_64)
glibc-2.12-1.7.el6 (i686)
glibc-2.12-1.7.el6 (x86_64)
glibc-devel-2.12-1.7.el6 (x86_64)
glibc-devel-2.12-1.7.el6.i686
ksh
libgcc-4.4.4-13.el6 (i686)
libgcc-4.4.4-13.el6 (x86_64)
libstdc++-4.4.4-13.el6 (x86_64)
libstdc++-4.4.4-13.el6.i686
libstdc++-devel-4.4.4-13.el6 (x86_64)
libstdc++-devel-4.4.4-13.el6.i686
libaio-0.3.107-10.el6 (x86_64)
libaio-0.3.107-10.el6.i686
libaio-devel-0.3.107-10.el6 (x86_64)
libaio-devel-0.3.107-10.el6.i686
make-3.81-19.el6
sysstat-9.0.4-11.el6 (x86_64)

elfutils-libelf-devel-0.125
或者利用下面的方式进行安装:
[root@strong ~]#yum -y install binutils compat-libcap1 compat-libstdc* gcc gcc-c++* glibc glibc-devel ksh libgcc libstdc libaio libaio-devel make elfutils-libelf-devel sysstat
[root@strong ~]# rpm -ivh pdksh-5.2.14-37.el5_8.1.x86_64.rpm --nodeps[root@strong ~]# groupadd oinstall
[root@strong ~]# groupadd -g 502 dba
[root@strong ~]# groupadd -g 503 oper
[root@strong ~]# groupadd -g 504 asmadmin
[root@strong ~]# groupadd -g 506 asmdba
[root@strong ~]# groupadd -g 505 asmoper
[root@strong ~]# useradd -u 502 -g oinstall -G dba,asmdba,oper oracle
[root@strong ~]# passwd oracle
Changing password for user oracle.
New password:
BAD PASSWORD: it is based on a dictionary word
BAD PASSWORD: is too simple
Retype new password:
passwd: all authentication tokens updated successfully.
[root@strong ~]# useradd -u 503 -g oinstall -G asmadmin,asmdba,asmoper,oper,dba grid
[root@strong ~]# passwd grid
Changing password for user grid.
New password:
BAD PASSWORD: it is too short
BAD PASSWORD: is too simple
Retype new password:
passwd: all authentication tokens updated successfully.
配置内核参数
[root@sz yum.repos.d]# vim /etc/sysctl.conf
fs.aio-max-nr = 1048576
fs.file-max = 6815744
kernel.shmmni = 4096
kernel.sem = 250 32000 100 128
net.ipv4.ip_local_port_range = 9000 65500
net.core.rmem_default = 262144
net.core.rmem_max = 4194304
net.core.wmem_default = 262144
net.core.wmem_max = 1048576
[root@sz yum.repos.d]# sysctl -p ##使上面的命令生效
[root@sz yum.repos.d]# vim /etc/security/limits.conf
grid soft nproc 2047
grid hard nproc 16384
grid soft nofile 1024
grid hard nofile 65536
oracle soft nproc 2047
oracle hard nproc 16384
oracle soft nofile 1024
oracle hard nofile 65536
创建目录
创建Grid用户目录
[root@strong ~]# mkdir -p /u01/app/grid
[root@strong ~]# chown -R grid:oinstall /u01/app/grid/
[root@strong ~]# chmod -R 775 /u01/app/grid/
[root@strong ~]# ll /u01/app/
total 4
drwxrwxr-x. 2 grid oinstall 4096 Dec  7 21:50 grid
创建Oracle用户目录
[root@strong ~]# mkdir -p /u01/app/oracle
[root@strong ~]# chown -R oracle:oinstall /u01/app/oracle/
[root@strong ~]# chmod -R 775 /u01/app/oracle/
[root@strong ~]# ll /u01/app/
total 8
drwxrwxr-x. 2 grid   oinstall 4096 Dec  7 21:50 grid
drwxrwxr-x. 2 oracle oinstall 4096 Dec  7 21:52 oracle
配置环境变量
配置Grid用户的环境变量
[grid@strong ~]$ vim ./.bash_profile

        . ~/.bashrc
fi

# User specific environment and startup programs

PATH=$PATH:$HOME/bin

ORACLE_SID=+ASM; export ORACLE_SID
ORACLE_BASE=/u01/app/grid; export ORACLE_BASE
ORACLE_HOME=$ORACLE_BASE/product/11.2.0/grid; export ORACLE_HOME
GRID_HOME=$ORACLE_HOME; export GRID_HOME
NLS_DATE_FORMAT="yyyy-mm-dd HH24:MI:SS"; export NLS_DATE_FORMAT
THREADS_FLAG=native; export THREADS_FLAG
PATH=$ORACLE_HOME/bin:$PATH; export PATH
THREADS_FLAG=native; export THREADS_FLAG
PATH=$ORACLE_HOME/bin:$PATH; export PATH
if [ $USER = "oracle" ] || [ $USER = "grid" ]; then
if [ $SHELL = "/bin/ksh" ]; then
ulimit -p 16384
ulimit -n 65536
else
ulimit -u 16384 -n 65536
fi
umask 022
fi
[grid@strong ~]$ . ./.bash_profile
配置Oracle用户的环境变量
[oracle@sz ~]$ vim ./.bash_profile
ORACLE_BASE=/u01/app/oracle
ORACLE_SID=orcl
export ORACLE_BASE ORACLE_SID
if [ $USER = "oracle" ]; then
  if [ $SHELL = "/bin/ksh" ]; then
    ulimit -p 16384
    ulimit -n 65536
  else
    ulimit -u 16384 -n 65536
  fi
fi
[oracle@strong ~]$ . ./.bash_profile
[oracle@strong ~]$ echo $ORACLE_SID
orcl
安装ASM库支持
[root@strong ~]# uname -rm
2.6.32-431.el6.x86_64 x86_64
根据以上信息安装所需的RPM,分别为:
[root@strong ~]# rpm -qa |grep oracleasm
kmod-oracleasm-2.0.8-15.el6_9.x86_64
oracleasm-support-2.1.8-1.el6.x86_64
oracleasmlib-2.0.4-1.el6.x86_64
配置ASM
[root@strong ~]# /etc/init.d/oracleasm configure
Configuring the Oracle ASM library driver.

This will configure the on-boot properties of the Oracle ASM library
driver.  The following questions will determine whether the driver is
loaded on boot and what permissions it will have.  The current values
will be shown in brackets ('[]').  Hitting  without typing an
answer will keep that current value.  Ctrl-C will abort.

Default user to own the driver interface [grid]: grid
Default group to own the driver interface [asmadmin]: asmadmin
Start Oracle ASM library driver on boot (y/n) [y]: y
Scan for Oracle ASM disks on boot (y/n) [y]: y
Writing Oracle ASM library driver configuration: done
Initializing the Oracle ASMLib driver:                     [  OK  ]
Scanning the system for Oracle ASMLib disks:               [  OK  ]
[root@strong ~]# fdisk -l
[root@strong ~]# fdisk /dev/sdb
Device contains neither a valid DOS partition table, nor Sun, SGI or OSF disklabel
Building a new DOS disklabel with disk identifier 0x8c0a27c5.
Changes will remain in memory only, until you decide to write them.
After that, of course, the previous content won't be recoverable.

Warning: invalid flag 0x0000 of partition table 4 will be corrected by w(rite)

WARNING: DOS-compatible mode is deprecated. It's strongly recommended to
         switch off the mode (command 'c') and change display units to
         sectors (command 'u').

Command (m for help): m
Command action
   a   toggle a bootable flag
   b   edit bsd disklabel
   c   toggle the dos compatibility flag
   d   delete a partition
   l   list known partition types
   m   print this menu
   n   add a new partition
   o   create a new empty DOS partition table
   p   print the partition table
   q   quit without saving changes
   s   create a new empty Sun disklabel
   t   change a partition's system id
   u   change display/entry units
   v   verify the partition table
   w   write table to disk and exit
   x   extra functionality (experts only)

Command (m for help): n
Command action
   e   extended
   p   primary partition (1-4)
p
Partition number (1-4): 1
First cylinder (1-1305, default 1):
Using default value 1
Last cylinder, +cylinders or +size{K,M,G} (1-1305, default 1305):
Using default value 1305

Command (m for help): p

Disk /dev/sdb: 10.7 GB, 10737418240 bytes
255 heads, 63 sectors/track, 1305 cylinders
Units = cylinders of 16065 * 512 = 8225280 bytes
Sector size (logical/physical): 512 bytes / 512 bytes
I/O size (minimum/optimal): 512 bytes / 512 bytes
Disk identifier: 0x8c0a27c5

   Device Boot      Start         End      Blocks   Id  System
/dev/sdb1               1        1305    10482381   83  Linux

Command (m for help): w
The partition table has been altered!

Calling ioctl() to re-read partition table.
Syncing disks.
同样操作分区:fdisk /dev/sdc fdisk /dev/sdd fdisk /dev/sde
[root@strong ~]# fdisk -l |grep /dev/sd
Disk /dev/sda: 75.2 GB, 75161927680 bytes
/dev/sda1               1        5222    41943040   83  Linux
/dev/sda2            5222        5744     4194304   82  Linux swap / Solaris
/dev/sda3   *        5744        9138    27261952   83  Linux
Disk /dev/sdb: 10.7 GB, 10737418240 bytes
/dev/sdb1               1        1305    10482381   83  Linux
Disk /dev/sdc: 10.7 GB, 10737418240 bytes
/dev/sdc1               1        1305    10482381   83  Linux
Disk /dev/sdd: 10.7 GB, 10737418240 bytes
/dev/sdd1               1        1305    10482381   83  Linux
Disk /dev/sde: 10.7 GB, 10737418240 bytes
/dev/sde1               1        1305    10482381   83  Linux
Disk /dev/sdf: 10.7 GB, 10737418240 bytes
Disk /dev/sdi: 10.7 GB, 10737418240 bytes
Disk /dev/sdg: 10.7 GB, 10737418240 bytes
Disk /dev/sdj: 10.7 GB, 10737418240 bytes
Disk /dev/sdh: 10.7 GB, 10737418240 bytes
Disk /dev/sdk: 10.7 GB, 10737418240 bytes
[root@strong ~]# /etc/init.d/oracleasm createdisk DATADISK1 /dev/sdb1
Marking disk "DATADISK1" as an ASM disk:                   [  OK  ]
[root@strong ~]# /etc/init.d/oracleasm createdisk DATADISK2 /dev/sdc1
Marking disk "DATADISK2" as an ASM disk:                   [  OK  ]
[root@strong ~]# /etc/init.d/oracleasm createdisk FRADISK3 /dev/sdd1
Marking disk "FRADISK3" as an ASM disk:                    [  OK  ]
[root@strong ~]# /etc/init.d/oracleasm createdisk FRADISK4 /dev/sde1
Marking disk "FRADISK4" as an ASM disk:                    [  OK  ]
[root@strong ~]# /etc/init.d/oracleasm listdisks
DATADISK1
DATADISK2
FRADISK3
FRADISK4
三 Oracle ASM 安装
上传并解压缩Grid软件
[grid@strong ~]$ cd /u01/app/grid/
[grid@strong grid]$ ls
[grid@strong grid]$ mkdir soft
[grid@strong grid]$ ls
soft[grid@strong grid]$ cd /u01/app/grid/soft/
[grid@strong soft]$ ls
grid p13390677_112040_Linux-x86-64_3of7.zip
[grid@strong soft]$ cd /u01/app/grid/soft/grid/
[grid@strong grid]$ ls
install readme.html response rpm runcluvfy.sh runInstaller sshsetup stage welcome.html
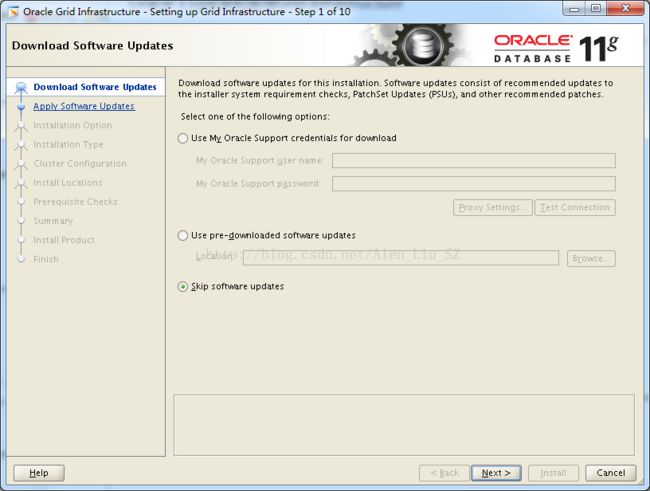
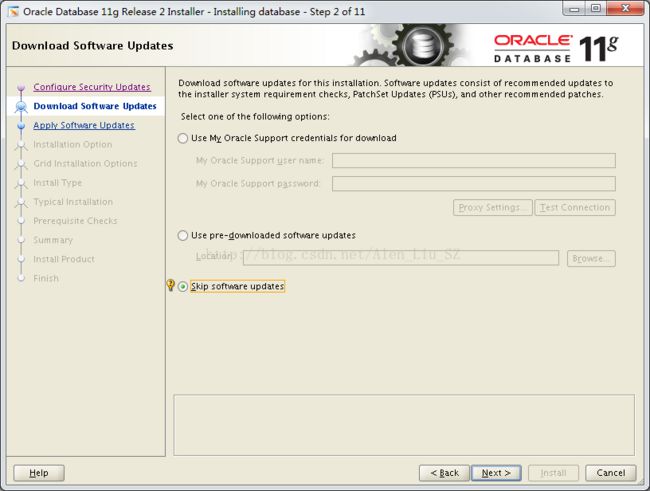
1、出现第一步,下载软件更新页面,选择Skip software update,点击Next,如图:
2、在选择安装选项页,选择第二个选项,点击Next:
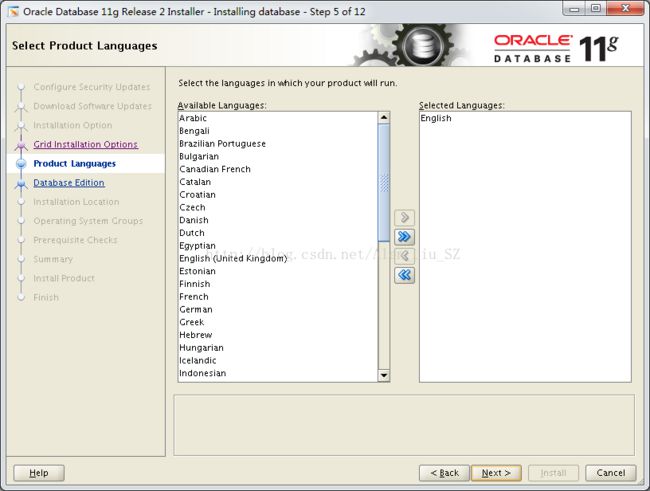
3、在选择产品语言页面,选择语言,点击Next:
4、在创建ASM磁盘组页,根据实际情况进行选择,点击next:
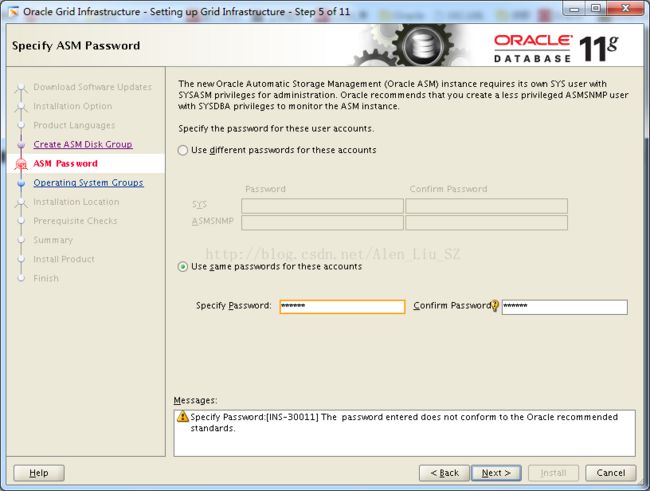
5、在指定ASM密码页,填写密码,点击Next:
6、在权限操作系统组页,选择对应的组,在此默认,点击Next:
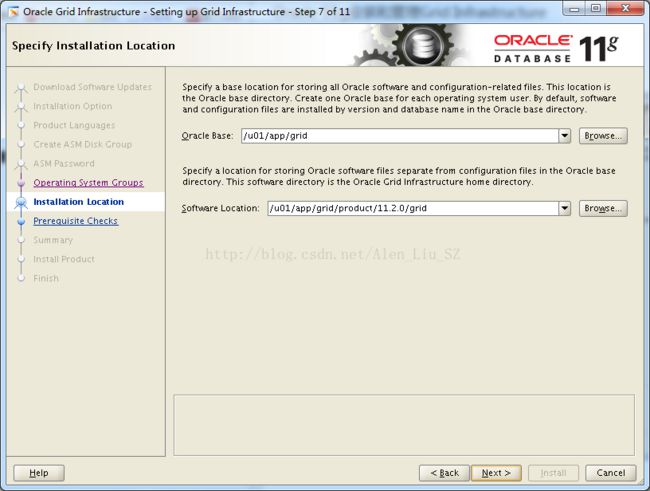
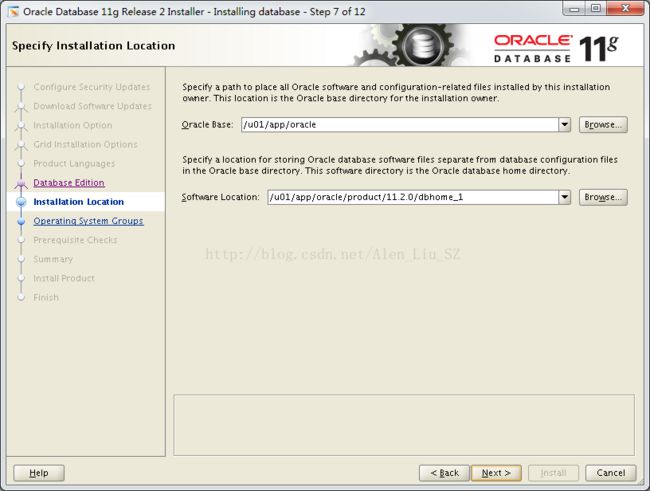
7、在指定安装位置页,选择Oracle Base和Software Location,在此默认,点击Next:
8、创建安装库,点击Next:
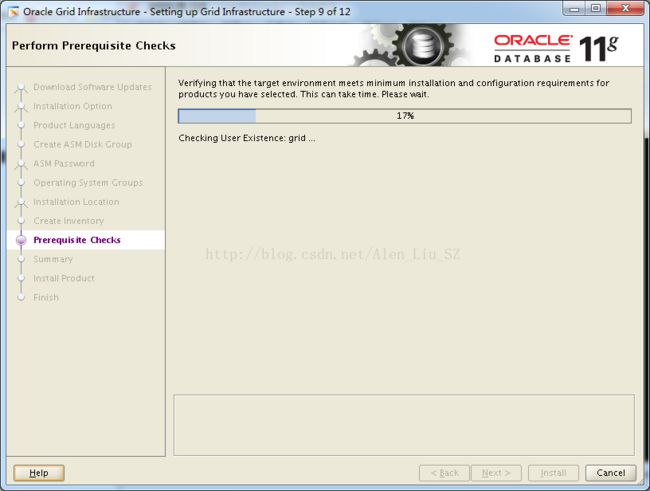
9、执行先决条件检查,通过后进入下一步:
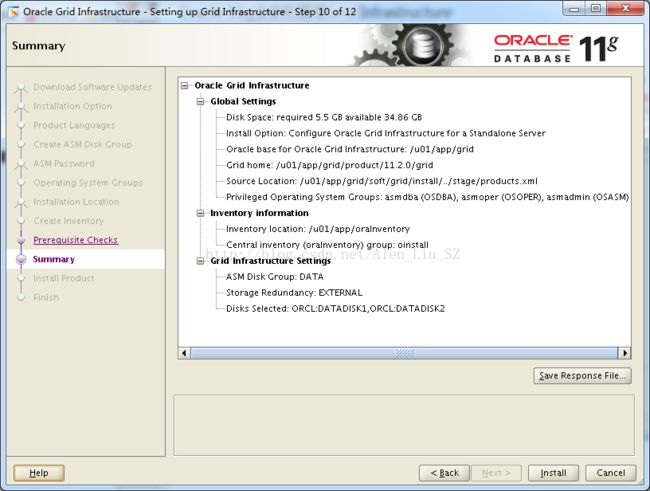
10、先决条件检查完毕,没有问题则出现概要页,点击Install,进入下一步:
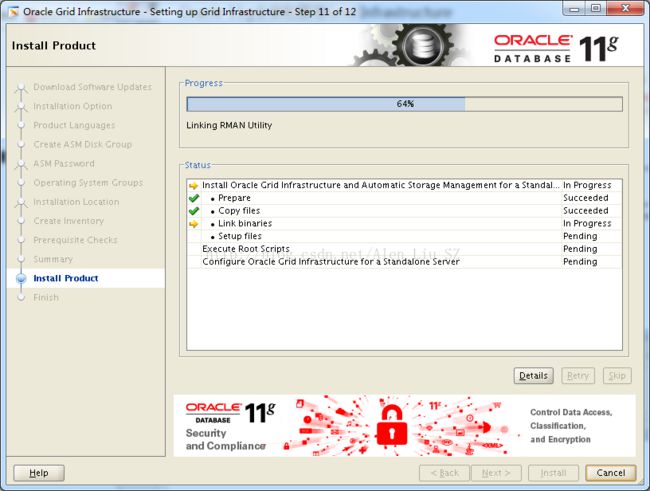
11、进入产品安装页,需要一点时间:
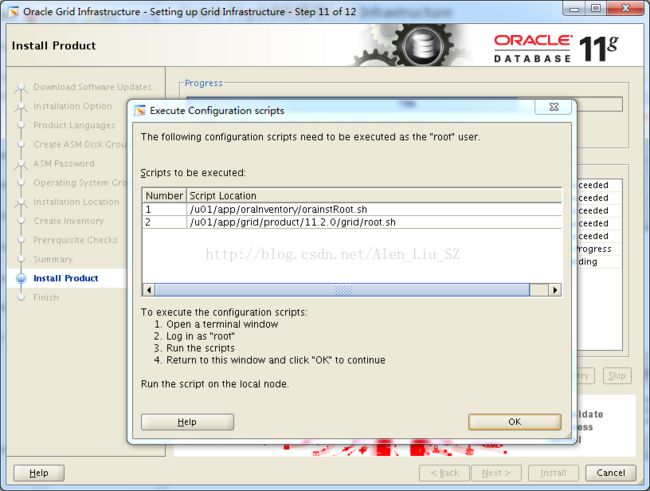
12、安装过程需要在ROOT下执行2个脚本,执行完点击OK:
[root@strong ~]# /u01/app/oraInventory/orainstRoot.sh
Changing permissions of /u01/app/oraInventory.
Adding read,write permissions for group.
Removing read,write,execute permissions for world.

Changing groupname of /u01/app/oraInventory to oinstall.
The execution of the script is complete.
[root@strong ~]# /u01/app/grid/product/11.2.0/grid/root.sh
Performing root user operation for Oracle 11g

The following environment variables are set as:
    ORACLE_OWNER= grid
    ORACLE_HOME=  /u01/app/grid/product/11.2.0/grid

Enter the full pathname of the local bin directory: [/usr/local/bin]:
   Copying dbhome to /usr/local/bin ...
   Copying oraenv to /usr/local/bin ...
   Copying coraenv to /usr/local/bin ...


Creating /etc/oratab file...
Entries will be added to the /etc/oratab file as needed by
Database Configuration Assistant when a database is created
Finished running generic part of root script.
Now product-specific root actions will be performed.
Using configuration parameter file: /u01/app/grid/product/11.2.0/grid/crs/install/crsconfig_params
Creating trace directory
LOCAL ADD MODE
Creating OCR keys for user 'grid', privgrp 'oinstall'..
Operation successful.
LOCAL ONLY MODE
Successfully accumulated necessary OCR keys.
Creating OCR keys for user 'root', privgrp 'root'..
Operation successful.
CRS-4664: Node strong successfully pinned.
Adding Clusterware entries to upstart

strong     2017/12/07 23:44:59     /u01/app/grid/product/11.2.0/grid/cdata/strong/backup_20171207_234459.olr
Successfully configured Oracle Grid Infrastructure for a Standalone Server
[root@strong ~]#
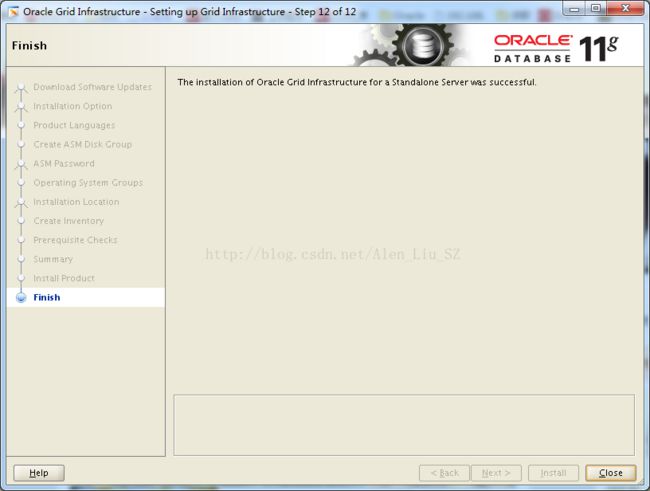
12、安装结束,点击Close。
问题:
如果ASM实例不能启动出现下面的错误:
[grid@strong ~]$ asmcmd startup
Connected to an idle instance.
ORA-01078: failure in processing system parameters
ORA-29701: unable to connect to Cluster Synchronization Service
解决办法:
[grid@strong ~]$ crsctl status resource
NAME=ora.DATA.dg
TYPE=ora.diskgroup.type
TARGET=OFFLINE
STATE=OFFLINE

NAME=ora.LISTENER.lsnr
TYPE=ora.listener.type
TARGET=ONLINE
STATE=ONLINE on strong

NAME=ora.asm
TYPE=ora.asm.type
TARGET=OFFLINE
STATE=OFFLINE

NAME=ora.cssd
TYPE=ora.cssd.type
TARGET=ONLINE
STATE=OFFLINE

NAME=ora.diskmon
TYPE=ora.diskmon.type
TARGET=OFFLINE
STATE=OFFLINE

NAME=ora.evmd
TYPE=ora.evm.type
TARGET=ONLINE
STATE=ONLINE on strong

NAME=ora.ons
TYPE=ora.ons.type
TARGET=OFFLINE
STATE=OFFLINE
[grid@strong ~]$ crsctl start resource ora.asm
CRS-2672: Attempting to start 'ora.cssd' on 'strong'
CRS-2672: Attempting to start 'ora.diskmon' on 'strong'
CRS-2676: Start of 'ora.diskmon' on 'strong' succeeded
CRS-2676: Start of 'ora.cssd' on 'strong' succeeded
CRS-2672: Attempting to start 'ora.asm' on 'strong'
CRS-2676: Start of 'ora.asm' on 'strong' succeeded
四 Oracle 11g R2 安装
安装Oracle 11g R2数据库软件
[oracle@strong soft]$ ls
p13390677_112040_Linux-x86-64_1of7.zip  p13390677_112040_Linux-x86-64_2of7.zip
[oracle@strong soft]$ unzip p13390677_112040_Linux-x86-64_1of7.zip
[oracle@strong soft]$ unzip p13390677_112040_Linux-x86-64_2of7.zip
详细步骤如下:
[oracle@strong soft]$ cd database/
[oracle@strong database]$ ls
install  readme.html  response  rpm  runInstaller  sshsetup  stage  welcome.html
[oracle@strong database]$ . runInstaller
1、配置安全更新页,去掉勾选点击Next,如图:

2、在下载软件更新页,选择跳过更新,点击Next,如图:
3、在安装选项页,选择只安装软件,点击Next,如图:
4、在安装类型页,默认,点击Next,如图:
5、在产品语言页,根据实际选择语言,默认,点击Next,如图:
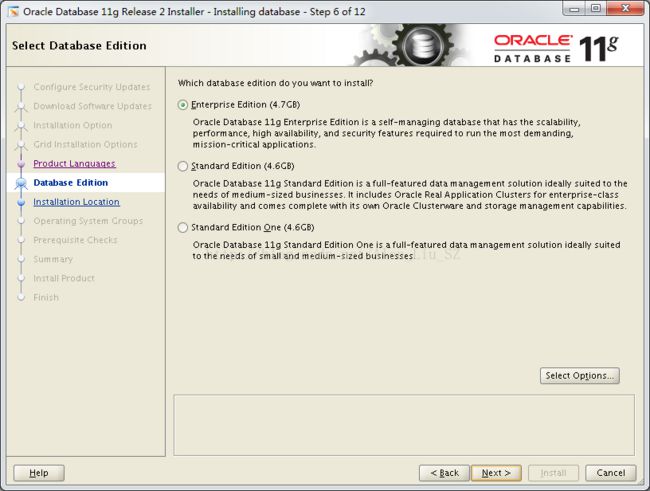
6、安装版本页,选择企业版,点击Next,如图:
7、在安装位置页,默认,点击Next,如图:
8、在权限操作系统组页,默认,点击Next,如图:
9、安装先决条件检查页,如没出错,则出现概要页:
10、概要页显示安装的概要信息,点击Next,如图:
11、在安装产品页,进行Oracle软件的安装:
[root@strong ~]# /u01/app/oracle/product/11.2.0/dbhome_1/root.sh
Performing root user operation for Oracle 11g

The following environment variables are set as:
    ORACLE_OWNER= oracle
    ORACLE_HOME=  /u01/app/oracle/product/11.2.0/dbhome_1

Enter the full pathname of the local bin directory: [/usr/local/bin]:
The contents of "dbhome" have not changed. No need to overwrite.
The contents of "oraenv" have not changed. No need to overwrite.
The contents of "coraenv" have not changed. No need to overwrite.

Entries will be added to the /etc/oratab file as needed by
Database Configuration Assistant when a database is created
Finished running generic part of root script.
Now product-specific root actions will be performed.
Finished product-specific root actions.
13、修改环境变量
[oracle@strong ~]$ vim ./.bash_profile -->将下面内容添加至.bash_profile
ORACLE_HOME=/u01/app/oracle/product/11.2.0/dbhome_1
export ORACLE_HOME
PATH=$ORACLE_HOME/bin:$PATH; export PATH
利用Netmgr配置监听器和服务
参考:Oracle 11g利用Netmgr配置监听器和服务
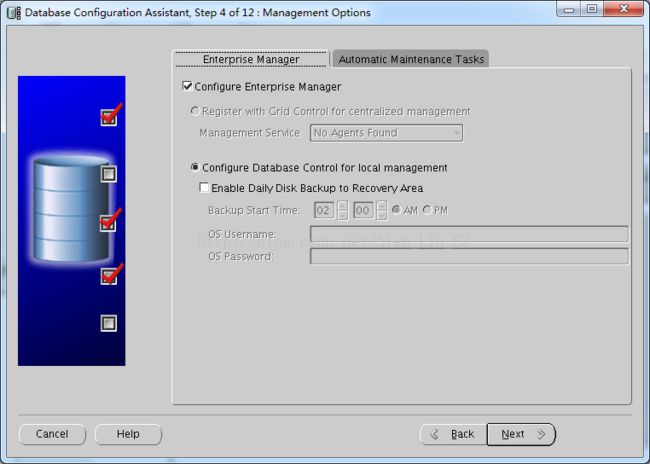
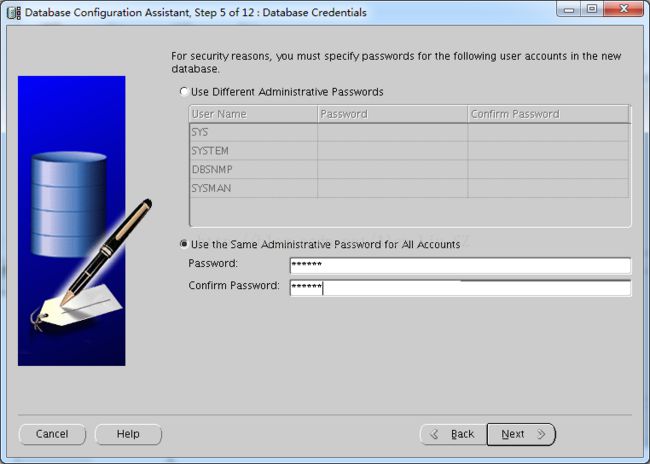
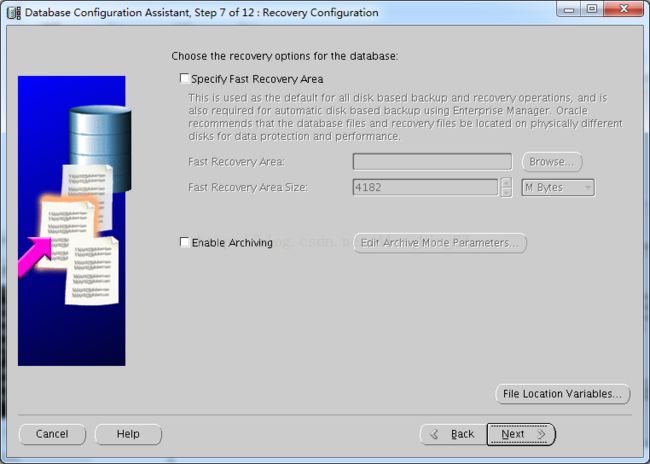
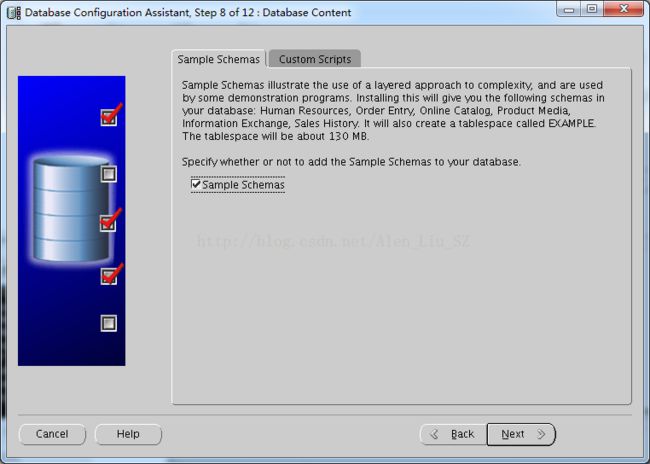
利用DBCA创建数据库
1、运行命令,出现建库界面:
[oracle@strong ~]$ dbca
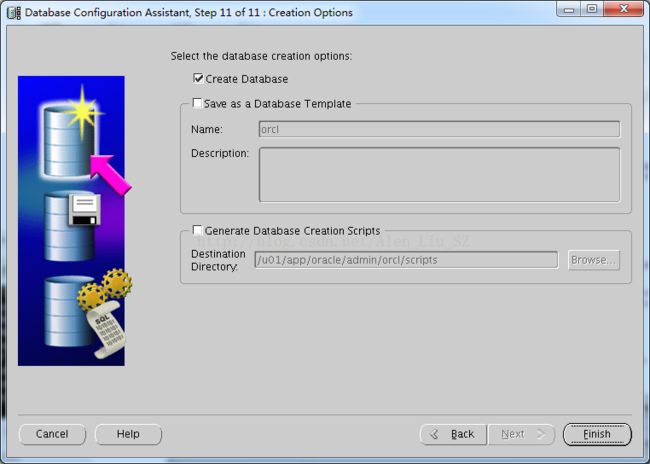
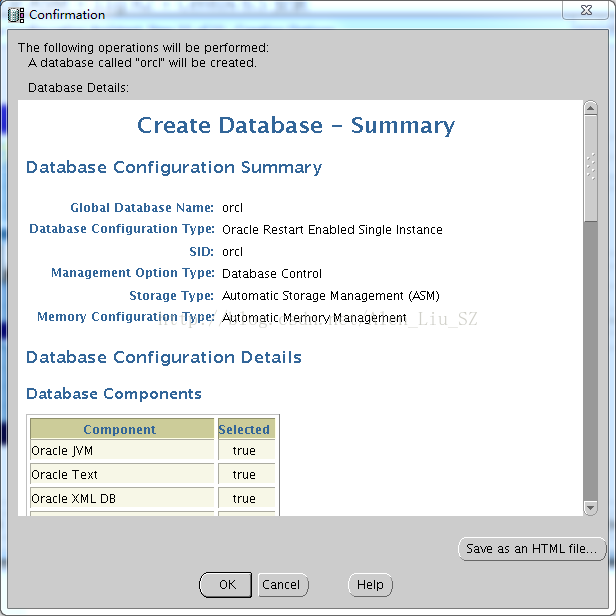
2、选择创建数据库,点击Next:

3、选择数据库模板,点击Next:
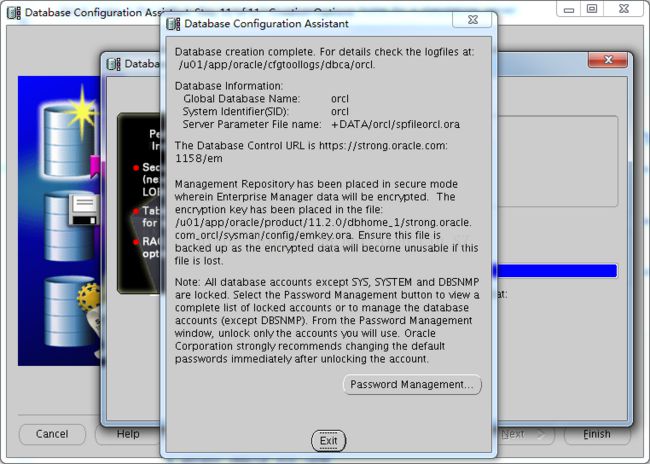
13、点击Exit退出完成安装。
五 验证安装
1、验证ASM实例
[grid@strong ~]$ asmcmd
ASMCMD> lsdg
State    Type    Rebal  Sector  Block       AU  Total_MB  Free_MB  Req_mir_free_MB  Usable_file_MB  Offline_disks  Voting_files  Name
MOUNTED  EXTERN  N         512   4096  1048576     20472    18498                0           18498              0             N  DATA/
ASMCMD> lsct
DB_Name  Status     Software_Version  Compatible_version  Instance_Name  Disk_Group
+ASM     CONNECTED        11.2.0.4.0          11.2.0.4.0  +ASM           DATA
orcl     CONNECTED        11.2.0.4.0          11.2.0.4.0  orcl           DATA
2、验证数据库
SQL> select instance_name,host_name , status from v$instance;
INSTANCE_NAME	 HOST_NAME	      STATUS
---------------- -------------------- ------------
orcl		 strong.oracle.com    OPEN