微信小程序开发实践之canvas绘图导出svg
又是好长一段时间没有写东西了(上一篇还是2018年8月份的-_-||)。
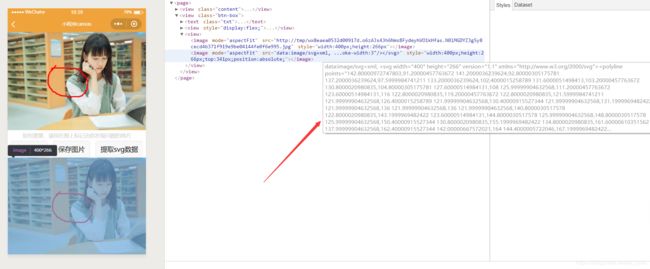
最近在开发微信小程序的过程中,遇到这样一个需求:在小程序中选择相册或拍照之后,要在图上进行标记,然后将标记保存为svg输出。
然额,就是这样一个需求,挠破头皮弄了两三天,不得不放弃o(╥﹏╥)o
佛祖开恩,今天突然灵光一闪,三两下就弄出来了,困扰了很久的问题迎刃而解,为自己鼓掌O(∩_∩)O哈哈~
下面就正式开始我的解决过程,有不对的地方还请各位大佬指正哈,嘿嘿
需求分析
前面已经说过了,我们需求将canvas绘制的图层轨迹数据导出成svg格式。
先贴上布局代码
<!--这一段是绘制标记的地方-->
<view class='content'>
  <image src='{{img}}' style='width:{{cw}}px;height:{{ch}}px' mode='aspectFit'></image>
  <canvas class='firstCanvas' style='width:{{cw}}px;height:{{ch}}px;top:0;position:absolute;' canvas-id="firstCanvas" bindtouchmove='move' bindtouchstart='start' bindtouchend='end' bindtouchcancel='cancel' bindlongtap='tap' disable-scroll='true' binderror='error'>
  </canvas>
</view>
<view class="btn-box">
  <text class="txt">如有需要,请你在图上标记出你发现问题的地方</text>
  <view style='display:flex;'>
 <!--这三个按钮调用函数用-->
    <button bindtap='clearClick'>重新标记</button>
    <button bindtap='saveClick' class="btn">保存图片</button>
    <button bindtap='saveAsSVG' class="btn">提取svg数据</button>
  </view>
  <!--这里是在标记完后显示结果的地方-->
  <view>
    <image src='{{img}}' style='width:{{cw}}px;height:{{ch}}px' mode='aspectFit'></image>
    <image src='{{srcimg}}' mode='aspectFit' style='width:{{cw}}px;height:{{ch}}px;top:{{ch+29+46}}px;position:absolute;'></image>
  </view>
</view>
wxss样式
样式代码不多,特简单。。。不解释
.content {
  display: flex;
  flex-direction: column;
  align-items: center;
}

.btn-box {
  display: flex;
  flex-direction: column;
  /* padding: 20rpx; */
}

.txt {
  font-size: 28rpx;
  color: #ccc;
  text-align: center;
  padding: 10rpx;
}

.btn {
  bottom: 0;
  left: 0;
  right: 0;
}
js代码
首先,我们需要定义几个全局变量,以方便接下来的调用。
canvas的context变量:var content = null;
轨迹数据变量:var touchs = [];
中间存储变量:var touching = []
导出svg需要的变量:var toucharr = []
对图片的宽高处理变量:var w2 = 0;var h2 = 0
data中定义的变量:data: { cw: '', ch: '', img: '', srcimg:'' }
到此,需要的变量基本定义完了,下面是canvas上对应的方法。
首先在onload中进行canvas初始化操作
onLoad: function(options) {
    console.log(options)
    var that = this
    var width = ""; //原始图片宽
    var height = ""; //原始图片高
    var max = 400
    var blc = 1.0
    that.setData({
      img: options.img
    })
    //获得Canvas的上下文
    content = wx.createCanvasContext('firstCanvas')
    //设置填充色
    content.setFillStyle('red')
    //设置线的颜色
    content.setStrokeStyle("red")
    //设置线的宽度
    content.setLineWidth(3)
    //设置线两端端点样式更加圆润
    content.setLineCap('round')
    //设置两条线连接处更加圆润
    content.setLineJoin('round')
    wx.getImageInfo({
      src: options.img,
      success: function(res) {
        width = res.width
        height = res.height
        if (width > height) {
          if (width > max) {
            blc = max / width
          }
        } else {
          if (height > max) {
            blc = max / height
          }
        }
        w2 = parseInt(width * blc);
        h2 = parseInt(height * blc);
        that.setData({
          cw: w2,
          ch: h2
        })
        console.log(w2 + '---' + h2)
        // content.drawImage(options.img, 0, 0, w2, h2)
        // content.draw()
      }
    })

  },
初始化操作完了,就是canvas需要的一系列方法了。
1.在canvas上开始绘制时
// 画布的触摸移动开始手势响应
  start: function(event) {
    // console.log(event)
    // console.log("触摸开始" + event.changedTouches[0].x)
    // console.log("触摸开始" + event.changedTouches[0].y)
    //获取触摸开始的 x,y
    let point1 = {
      x: event.changedTouches[0].x,
      y: event.changedTouches[0].y
    }
    touchs.push(point1)
    touching.push(point1)
  },
2.开始移动
// 画布的触摸移动手势响应
  move: function(e) {
    // console.log('绘制中' + e.touches[0].x)
    // console.log('绘制中' + e.touches[0].y)
    let point2 = {
      x: e.touches[0].x,
      y: e.touches[0].y
    }
    touchs.push(point2)
    if (touchs.length >= 2) {
      touching.push(point2)
      this.draw(touchs)
    }
  },
3.绘制结束
// 画布的触摸移动结束手势响应
  end: function(e) {
    // console.log("触摸结束" + e.changedTouches[0].x)
    let point3 = {
      x: e.changedTouches[0].x,
      y: e.changedTouches[0].y
    }
    touchs.push(point3)
    toucharr.push(touching)

    //清空轨迹数组
    for (let i = 0; i < touchs.length; i++) {
      // touchs.pop()
      touchs = []
    }
  },
4.实时绘制轨迹
//绘制
  draw: function(touchs) {
    // console.log(JSON.stringify(touchs[0]) + '---' + JSON.stringify(touchs[1]))
    let point1 = touchs[0]
    let point2 = touchs[1]
    touchs.shift()
    content.moveTo(point1.x, point1.y)
    content.lineTo(point2.x, point2.y)
    content.stroke()
    content.draw(true)
  },
5.重新绘制
//清除操作
  clearClick: function(e) {
    console.log(e)
    var that = this
    //清除画布
    content.clearRect(0, 0, w2, h2)
    content.drawImage(that.data.img, 0, 0, w2, h2)
    content.draw(true)
  },
6.其他的一些没多大用的方法
// 画布的触摸取消响应
  cancel: function(e) {
    console.log("触摸取消" + e)
  },

  // 画布的长按手势响应
  tap: function(e) {
    console.log("长按手势" + e)
  },

  error: function(e) {
    console.log("画布触摸错误" + e)
  },
以上方法都在canvas组件中有调用
<canvas class='firstCanvas' style='width:{{cw}}px;height:{{ch}}px;top:0;position:absolute;' canvas-id="firstCanvas" bindtouchmove='move' bindtouchstart='start' bindtouchend='end' bindtouchcancel='cancel' bindlongtap='tap' disable-scroll='true' binderror='error'>
在此贴出微信小程序的canvas的官方API,可以看看
canvas组件:传送门-》
canvas API:传送门-》
以上都是一些基础方法,导出svg的方法如下:
saveAsSVG:function(){
var that = this
var strSVG = 'data:image/svg+xml, w2+'" height="'+h2+'" version="1.1" xmlns="http://www.w3.org/2000/svg">'
for (var i = 0; i < toucharr.length;i++){
strSVG += 'for (var j = 0; j < toucharr[i].length;j++){
console.log(toucharr[i][j])
strSVG += toucharr[i][j].x + ',' + toucharr[i][j].y+' '
}
strSVG += '" style="fill:rgba(255,255,255,0);stroke:red;stroke-width:3"/>'
strSVG += ''
}
that.setData({
srcimg:strSVG
})
},
是不是很简单!其实,是我自己一开始想得太复杂,太依赖小程序的API,所以走了一些弯路,不过最后还是捋直啦,哈哈
原理就是需要我们自己组织一下常规的svg格式,然后将canvas轨迹数据的坐标(x,y)放到svg的points中,这样就可以输出一个完整的这样一个东西。
下面贴出完整的js代码(里面有些无用的代码,请忽略着看)。
var content = null;
var touchs = [];
var touchsdata = []
var x = []
var touching = []
var toucharr = []
var y = []
var canvasw = 0;
var canvash = 0;
var w2 = 0
var h2 = 0
//获取系统信息
wx.getSystemInfo({
success: function(res) {
canvasw = res.windowWidth;
canvash = canvasw * 9 / 16;
},
})
Page({
/**
* 页面的初始数据
*/
data: {
cw: '',
ch: '',
img: '',
srcimg:''
},
// 画布的触摸移动开始手势响应
start: function(event) {
// console.log(event)
// console.log("触摸开始" + event.changedTouches[0].x)
// console.log("触摸开始" + event.changedTouches[0].y)
//获取触摸开始的 x,y
let point1 = {
x: event.changedTouches[0].x,
y: event.changedTouches[0].y
}
touchs.push(point1)
touching.push(point1)
},
// 画布的触摸移动手势响应
move: function(e) {
// console.log('绘制中' + e.touches[0].x)
// console.log('绘制中' + e.touches[0].y)
let point2 = {
x: e.touches[0].x,
y: e.touches[0].y
}
touchs.push(point2)
if (touchs.length >= 2) {
touching.push(point2)
this.draw(touchs)
}
},
// 画布的触摸移动结束手势响应
end: function(e) {
// console.log("触摸结束" + e.changedTouches[0].x)
let point3 = {
x: e.changedTouches[0].x,
y: e.changedTouches[0].y
}
touchs.push(point3)
toucharr.push(touching)
console.log(touching.length)
console.log(toucharr.length)
console.log(toucharr)
//清空轨迹数组
for (let i = 0; i < touchs.length; i++) {
// touchs.pop()
touchs = []
}
for(var j = 0 ; j<touching.length;j++){
x.push(touching[j]['x'])
y.push(touching[j]['y'])
}
var s = {
"x": x,
"y": y
}
touchsdata.push(s)
console.log(JSON.stringify(touchsdata));
this.saveAsSVG()
},
// 画布的触摸取消响应
cancel: function(e) {
console.log("触摸取消" + e)
},
// 画布的长按手势响应
tap: function(e) {
console.log("长按手势" + e)
},
error: function(e) {
console.log("画布触摸错误" + e)
},
/**
* 生命周期函数--监听页面加载
*/
onLoad: function(options) {
console.log(options)
var that = this
var width = ""; //原始图片宽
var height = ""; //原始图片高
var max = 400
var blc = 1.0
that.setData({
img: options.img
})
//获得Canvas的上下文
content = wx.createCanvasContext('firstCanvas')
//设置填充色
content.setFillStyle('red')
//设置线的颜色
content.setStrokeStyle("red")
//设置线的宽度
content.setLineWidth(3)
//设置线两端端点样式更加圆润
content.setLineCap('round')
//设置两条线连接处更加圆润
content.setLineJoin('round')
wx.getImageInfo({
src: options.img,
success: function(res) {
width = res.width
height = res.height
if (width > height) {
if (width > max) {
blc = max / width
}
} else {
if (height > max) {
blc = max / height
}
}
w2 = parseInt(width * blc);
h2 = parseInt(height * blc);
that.setData({
cw: w2,
ch: h2
})
console.log(w2 + '---' + h2)
// content.drawImage(options.img, 0, 0, w2, h2)
// content.draw()
}
})
},
//绘制
draw: function(touchs) {
// console.log(JSON.stringify(touchs[0]) + '---' + JSON.stringify(touchs[1]))
let point1 = touchs[0]
let point2 = touchs[1]
touchs.shift()
content.moveTo(point1.x, point1.y)
content.lineTo(point2.x, point2.y)
content.stroke()
content.draw(true)
},
//清除操作
clearClick: function(e) {
console.log(e)
var that = this
//清除画布
content.clearRect(0, 0, w2, h2)
content.drawImage(that.data.img, 0, 0, w2, h2)
content.draw(true)
},
saveAsSVG:function(){
var that = this
var strSVG = 'data:image/svg+xml, w2+'" height="'+h2+'" version="1.1" xmlns="http://www.w3.org/2000/svg">'
for (var i = 0; i < toucharr.length;i++){
strSVG += 'for (var j = 0; j < toucharr[i].length;j++){
console.log(toucharr[i][j])
strSVG += toucharr[i][j].x + ',' + toucharr[i][j].y+' '
}
strSVG += '" style="fill:rgba(255,255,255,0);stroke:red;stroke-width:3"/>'
strSVG += ''
}
that.setData({
srcimg:strSVG
})
},
//保存图片
saveClick: function() {
var that = this
var pages = getCurrentPages() //获取页面
var prevPage = pages[pages.length - 2] //上一页
prevPage.setData({
signImage: this.data.img,
w: that.data.cw,
h: that.data.ch,
touchs: touchsdata,
isshow:true
})
wx.navigateBack({
delta: 1
})
// wx.canvasToTempFilePath({
// canvasId: 'firstCanvas',
// success: function(res) {
// //打印图片路径
// console.log(res.tempFilePath)
// prevPage.setData({
// signImage: res.tempFilePath,
// w: that.data.cw,
// h: that.data.ch
// })
// wx.navigateBack({
// delta: 1
// })
// }
// })
}
})
最终效果gif