Spring Cloud使用ribbon实现负载均衡
Ribbon是什么?
Ribbon是Netflix发布的开源项目,主要功能是提供客户端的软件负载均衡算法,将Netflix的中间层服务连接在一起。Ribbon客户端组件提供一系列完善的配置项如连接超时,重试等。也可以使用Ribbon实现自定义的负载均衡算法。
Spring Cloud使用Ribbon实现负载均衡
Ribbon默认使用轮询来实现负载均衡,也就是如果我们将同一个服务部署在A和B机器上,那么第一次请求将到A,第二次请求将到B
1.创建Eureka Server
创建一个Spring Boot工程eureka-server
注意Spring Boot与Spring Cloud版本必须对应,否则会报错。
[查看版本信息]https://spring.io/projects/spring-cloud
pom.xml
<project xmlns="http://maven.apache.org/POM/4.0.0" xmlns:xsi="http://www.w3.org/2001/XMLSchema-instance"
         xsi:schemaLocation="http://maven.apache.org/POM/4.0.0 http://maven.apache.org/xsd/maven-4.0.0.xsd">
    <modelVersion>4.0.0modelVersion>
    <parent>
        <groupId>org.springframework.bootgroupId>
        <artifactId>spring-boot-starter-parentartifactId>
        <version>2.1.5.RELEASEversion>
        <relativePath/>
    parent>
    <groupId>com.dfyanggroupId>
    <artifactId>eureka-serverartifactId>
    <version>0.0.1-SNAPSHOTversion>
    <name>eureka-servername>
    <description>Demo project for Spring Bootdescription>

    <properties>
        <java.version>1.8java.version>
    properties>

    <dependencies>
        <dependency>
            <groupId>org.springframework.bootgroupId>
            <artifactId>spring-boot-starterartifactId>
        dependency>
        <dependency>
            <groupId>org.springframework.bootgroupId>
            <artifactId>spring-boot-starter-testartifactId>
            <scope>testscope>
        dependency>
        <dependency>
            <groupId>org.springframework.cloudgroupId>
            <artifactId>spring-cloud-starter-netflix-eureka-serverartifactId>
        dependency>
    dependencies>
    <dependencyManagement>
        <dependencies>
            <dependency>
                <groupId>org.springframework.cloudgroupId>
                <artifactId>spring-cloud-dependenciesartifactId>
                <version>Greenwich.RELEASEversion>
                <type>pomtype>
                <scope>importscope>
            dependency>
        dependencies>
    dependencyManagement>
    <build>
        <plugins>
            <plugin>
                <groupId>org.springframework.bootgroupId>
                <artifactId>spring-boot-maven-pluginartifactId>
            plugin>
        plugins>
    build>
project>
application.yml
server:
  port: 8761
spring:
  application:
    name: eureka-server
eureka:
  client:
    # 是否将自己注册到Eureka Server,由于当前应用为Eureka Service,故为false
    register-with-eureka: false
    # 是否从Eureka Server获取注册信息,由于是单点,所以为false
    fetch-registry: false
    # 与Eureka Server交互的地址,默认是http://localhost:8761/eureka
    service-url:
      default-zone: http://localhost:8761/eureka/
在启动类上加上@EnableEurekaServer注解,表明是一个Eureka Server
package com.dfyang;

import org.springframework.boot.SpringApplication;
import org.springframework.boot.autoconfigure.SpringBootApplication;
import org.springframework.cloud.netflix.eureka.server.EnableEurekaServer;

@SpringBootApplication
@EnableEurekaServer
public class EurekaServerApplication {

    public static void main(String[] args) {
        SpringApplication.run(EurekaServerApplication.class, args);
    }

}
2.创建第一个服务提供者service-producer
创建一个Spring Boot工程service-producer
pom.xml
<project xmlns="http://maven.apache.org/POM/4.0.0" xmlns:xsi="http://www.w3.org/2001/XMLSchema-instance"
         xsi:schemaLocation="http://maven.apache.org/POM/4.0.0 http://maven.apache.org/xsd/maven-4.0.0.xsd">
    <modelVersion>4.0.0modelVersion>
    <parent>
        <groupId>org.springframework.bootgroupId>
        <artifactId>spring-boot-starter-parentartifactId>
        <version>2.1.5.RELEASEversion>
        <relativePath/>
    parent>
    <groupId>com.dfyanggroupId>
    <artifactId>service-producerartifactId>
    <version>0.0.1-SNAPSHOTversion>
    <name>service-producername>
    <description>Demo project for Spring Bootdescription>

    <properties>
        <java.version>1.8java.version>
    properties>

    <dependencies>
        <dependency>
            <groupId>org.springframework.bootgroupId>
            <artifactId>spring-boot-starterartifactId>
        dependency>
        <dependency>
            <groupId>org.springframework.bootgroupId>
            <artifactId>spring-boot-starter-webartifactId>
        dependency>
        <dependency>
            <groupId>org.springframework.bootgroupId>
            <artifactId>spring-boot-starter-testartifactId>
            <scope>testscope>
        dependency>
        <dependency>
            <groupId>org.springframework.cloudgroupId>
            <artifactId>spring-cloud-starter-netflix-eureka-clientartifactId>
        dependency>
    dependencies>
    <dependencyManagement>
        <dependencies>
            <dependency>
                <groupId>org.springframework.cloudgroupId>
                <artifactId>spring-cloud-dependenciesartifactId>
                <version>Greenwich.RELEASEversion>
                <type>pomtype>
                <scope>importscope>
            dependency>
        dependencies>
    dependencyManagement>
    <build>
        <plugins>
            <plugin>
                <groupId>org.springframework.bootgroupId>
                <artifactId>spring-boot-maven-pluginartifactId>
            plugin>
        plugins>
    build>
project>
application.yml
server:
  port: 8080
spring:
  application:
    name: service-producer
eureka:
  client:
    service-url:
      default-zone: http://localhost:8761/eureka/
启动类上加上@EnableEurekaClient,表明是一个Eureka Client。
每个服务提供者也能作为服务消费者消费服务
package com.dfyang;

import org.springframework.boot.SpringApplication;
import org.springframework.boot.autoconfigure.SpringBootApplication;
import org.springframework.cloud.netflix.eureka.EnableEurekaClient;

@SpringBootApplication
@EnableEurekaClient
public class ServiceProducerApplication {

    public static void main(String[] args) {
        SpringApplication.run(ServiceProducerApplication.class, args);
    }

}
编写接口
package com.dfyang.serviceProducer.Controller;

import org.springframework.web.bind.annotation.RequestMapping;
import org.springframework.web.bind.annotation.RestController;

@RestController
public class ProducerController {
    @RequestMapping("/service")
    public String service() {
        return "服务A";
    }
}
3.创建第二个服务提供者service-producer1
创建另一个一个Spring Boot工程service-producer1
要修改的只有两个地方,端口号和接口(为了展示区别)
application.yml
server:
  port: 8081
spring:
  application:
    name: service-producer
eureka:
  client:
    service-url:
      default-zone: http://localhost:8761/eureka/
编写接口
package com.dfyang.serviceProducer.Controller;

import org.springframework.web.bind.annotation.RequestMapping;
import org.springframework.web.bind.annotation.RestController;

@RestController
public class ProducerController {
    @RequestMapping("/service")
    public String service() {
        return "服务B";
    }
}
4.创建服务消费者service-consumer(eureka client)
创建一个Spring Boot工程service-consumer
pom.xml
<project xmlns="http://maven.apache.org/POM/4.0.0" xmlns:xsi="http://www.w3.org/2001/XMLSchema-instance"
         xsi:schemaLocation="http://maven.apache.org/POM/4.0.0 http://maven.apache.org/xsd/maven-4.0.0.xsd">
    <modelVersion>4.0.0modelVersion>
    <parent>
        <groupId>org.springframework.bootgroupId>
        <artifactId>spring-boot-starter-parentartifactId>
        <version>2.1.5.RELEASEversion>
        <relativePath/>
    parent>
    <groupId>com.dfyanggroupId>
    <artifactId>service-consumerartifactId>
    <version>0.0.1-SNAPSHOTversion>
    <name>service-consumername>
    <description>Demo project for Spring Bootdescription>

    <properties>
        <java.version>1.8java.version>
    properties>

    <dependencies>
        <dependency>
            <groupId>org.springframework.bootgroupId>
            <artifactId>spring-boot-starterartifactId>
        dependency>
        <dependency>
            <groupId>org.springframework.bootgroupId>
            <artifactId>spring-boot-starter-webartifactId>
        dependency>
        <dependency>
            <groupId>org.springframework.bootgroupId>
            <artifactId>spring-boot-starter-testartifactId>
            <scope>testscope>
        dependency>
        <dependency>
            <groupId>org.springframework.cloudgroupId>
            <artifactId>spring-cloud-starter-netflix-eureka-clientartifactId>
        dependency>
        <dependency>
            <groupId>org.springframework.cloudgroupId>
            <artifactId>spring-cloud-starter-netflix-ribbonartifactId>
        dependency>
    dependencies>
    <dependencyManagement>
        <dependencies>
            <dependency>
                <groupId>org.springframework.cloudgroupId>
                <artifactId>spring-cloud-dependenciesartifactId>
                <version>Greenwich.RELEASEversion>
                <type>pomtype>
                <scope>importscope>
            dependency>
        dependencies>
    dependencyManagement>
    <build>
        <plugins>
            <plugin>
                <groupId>org.springframework.bootgroupId>
                <artifactId>spring-boot-maven-pluginartifactId>
            plugin>
        plugins>
    build>
project>
application.yml
server:
  port: 8082
spring:
  application:
    name: service-consumer
eureka:
  client:
    service-url:
      default-zone: http://localhost:8761/eureka/
在启动类似加上@EnableDiscoveryClient(该注解与@EnableEurekaClient均表明是一个Eureka客户端,但@EnableEurekaClient只能在Eureka使用)
package com.dfyang;

import org.springframework.boot.SpringApplication;
import org.springframework.boot.autoconfigure.SpringBootApplication;
import org.springframework.cloud.client.discovery.EnableDiscoveryClient;
import org.springframework.cloud.client.loadbalancer.LoadBalanced;
import org.springframework.context.annotation.Bean;
import org.springframework.web.client.RestTemplate;

@SpringBootApplication
@EnableDiscoveryClient
public class ServiceConsumerApplication {

    public static void main(String[] args) {
        SpringApplication.run(ServiceConsumerApplication.class, args);
    }

    @Bean
    @LoadBalanced
    public RestTemplate restTemplate() {
        return new RestTemplate();
    }
}
消费者获取服务
package com.dfyang.serviceConsumer.controller;

import org.springframework.beans.factory.annotation.Autowired;
import org.springframework.web.bind.annotation.GetMapping;
import org.springframework.web.bind.annotation.RestController;
import org.springframework.web.client.RestTemplate;

@RestController
public class ConsumerController {

    @Autowired
    private RestTemplate restTemplate;

    @GetMapping("/consume")
    public String consume() {
        return restTemplate.getForObject("http://service-producer/service", String.class);
    }
}
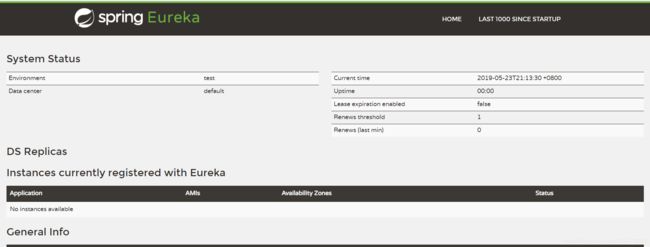
输入localhost:8761

输入http://localhost:8082/consume
我们会看到服务A与服务B在交替执行


使用Ribbon的其他负载均衡策略
随机
只需修改消费端程序入口
package com.dfyang;

import com.netflix.loadbalancer.IRule;
import com.netflix.loadbalancer.RandomRule;
import org.springframework.boot.SpringApplication;
import org.springframework.boot.autoconfigure.SpringBootApplication;
import org.springframework.cloud.client.discovery.EnableDiscoveryClient;
import org.springframework.cloud.client.loadbalancer.LoadBalanced;
import org.springframework.context.annotation.Bean;
import org.springframework.web.client.RestTemplate;

@SpringBootApplication
@EnableDiscoveryClient
public class ServiceConsumerApplication {

    public static void main(String[] args) {
        SpringApplication.run(ServiceConsumerApplication.class, args);
    }

    @Bean
    @LoadBalanced
    public RestTemplate restTemplate() {
        return new RestTemplate();
    }

    @Bean
    public IRule ribbonRule() {
        return new RandomRule();
    }

}
- BestAvailableRule
选择一个最小的并发请求的server - AvailabilityFilteringRule
过滤掉那些因为一直连接失败的被标记为circuit tripped的后端server,并过滤掉那些高并发的的后端server - WeightedResponseTimeRule
根据相应时间分配一个weight,相应时间越长,weight越小,被选中的可能性越低。 - RetryRule
对选定的负载均衡策略机上重试机制。 - RoundRobinRule
轮询调度 - RandomRule
随机选择一个server - ZoneAvoidanceRule
复合判断server所在区域的性能和server的可用性选择server

