PyTorch学习笔记(16)——编写你自己的PyTorch kernel(基于PyTorch1.2.0)
在前一阵看过PyTorch官方核心开发者Edward Z, Yang的在纽约举办的PyTorch NYC Meetup的关于PyTorch内部机制的讲解。从通过strides指定逻辑布局,tensor wrapper到autograd机制以及对PyTorch内部最重要的几个基本代码模块的扼要说明,让人受益匪浅。其中,在PyTorch写kernel是一个非常让人兴奋的内容,作为一个contributor,我对这个部分非常感兴趣。今天,我将手把手的构建一个标准的ATen kernel是如何构建并成功编译的,下面,让我们开始~
0. 写PyTorch的kernel需要什么?
E.Z Yang指出,PyTorch为未来的内核作者提供了许多有用的工具[1],我个人认为,能够写出kernel会帮助我们更深入的理解框架内层结构和布局,并可以在最基础的层面上实现一些对Tensor层面的功能,而这种目的一般无法仅仅依靠PyTorch提供的API来完成 。但是首先,我们需要搞明白写一个kernel需要哪几步?
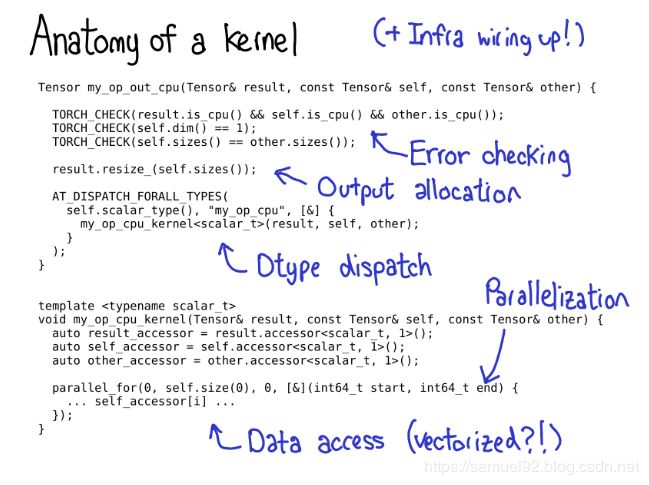
- 首先,我们需要编写一些 元数据(metadata) 来描述我们的kernel,在PyTorch中可以通过这种方式来 自动生成代码(code generation),并自动生成Python bindings,而不需要我们写一行额外的代码,是不是很cool?
First, there’s some metadata which we write about the kernel, which
powers the code generation and lets you get all the bindings to
Python, without having to write a single line of code.
- 接着,我们需要根据Tensor wrapper的构造,为你定义的kernel分配device type和layout(默认是
strided),类型检查非常重要,不要忘记。
Once you’ve gotten to the kernel, you’re past the device type / layout
dispatch. The first thing you need to write is error checking, to make
sure the input tensors are the correct dimensions. (Error checking is
really important! Don’t skimp on it!)
-
我们需要写该kernel的实现,并为它的输出分配一块新内存(inplace操作不需要)。
-
一些高性能的kernel需要某种程度的并行化,所以这块可以利用多CPU系统和一些比较复杂的底层机制。
Most performant kernels need some sort of parallelization, so that you
can take advantage of multi-CPU systems. (CUDA kernels are
“implicitly” parallelized, since their programming model is built on
top of massive parallelization).
- 最后,让我们开始吧~
Finally, you need to access the data and do the computation you wanted
to do!
1. 准备工作
PyTorch为我们提供了丰富的脚手架(scaffolding),使得我们可以比较容易的开发一个自己的PyTorch kernel。但是,在开始动工之前,我们也需要做一些准备工作:
- ① gcc/g++ 版本7.0以上 (本文用的gcc/g++都是7.4.0)
- ② cuda9.2及以上. (本文是cuda9.2 + cudnn 7.5.0) (如不需要编译cuda版本,则无需这项)
- ③ anaconda 比较新的版本. (2018年以后的就可以)
这3步准备完毕之后,让我们开始…
首先,我们需要创建一个虚拟环境,这步是为了避免搞乱系统的Python。
创建一个名为pytorch-build的虚拟环境。
conda create --name pytorch-build python=3.6.3 numpy=1.16.3 conda进入虚拟环境。
activate pytorch-build # 或者
source activate pytorch-build安装必备的包。
conda install
numpypyyamlmklmkl-includesetuptoolscmakecffityping安装magma-cuda92这步比较慢,网速不好的话很可能会失败… 慢慢等吧~, 如果等不及,可以只编译个cpu版本的
conda install -c pytorch
magma-cuda92
显式安装OpenMP,这个库可以更好的使用CPU的多线程。
sudo apt-get install libomp-dev
接着,我们需要显式告知CMake在哪里存放结果文件。
export CMAKE_PREFIX_PATH="$HOME/anaconda3/envs/pytorch-build"
2. 工程&实现基本的kernel
注意,因为我们需要start from scratch的编译PyTorch工程,是因为pytorch项目有很多子模块,所以需要一并clone下来。所以需要用git clone --recursive https://github.com/pytorch/pytorch的方式将工程clone到你的指定目录,我的路径是这样的:

ps: 因为实在太慢了,所以git clone --recursive [email protected]:pytorch/pytorch.git (原因: 实际上还是网络协议问题,git支持多种协议,包括上面的https协议以及原生的ssh协议,git对ssh的支持是最好的,速度也是最快的,所以我们改用ssh协议来clone)
好了,到这步,项目已经clone下来了,我们现在就可以进行实现我们自己的kernel的操作了~,我将编写一个基础的kernel分为如下几步,按照下面的步骤走,就可以实现一个基于最新版PyTorch 1.2.0a0+ede0849
- ① 修改kernel的描述文件
第一步,我们需要在aten/src/ATen/native/native_functions.yaml中添加自己定义的kernel,这里,我起的kernel名字就是我名字的缩写gdh。
...
- func: acos(Tensor self) -> Tensor
  variants: function, method

- func: gdh(Tensor self) -> Tensor
  variants: function, method

- func: acos_(Tensor(a!) self) -> Tensor(a!)
  variants: function, method
  dispatch:
    CPU: _acos__cpu
    CUDA: _acos__cuda
...
其中,function表示生成torch.gdh()这个函数, method表示如果你有一个Tensor a,可以调用a.gdh()方法。
- ② kernel实现编写
接着,我们需要完成这个gdhkernel的具体实现:我选择的位置是aten/src/ATen/native/TensorShape.cpp, 实测在aten/src/ATen/native/下的一般的***.cpp文件下定义其实都是可以的,并没有一般的限制。
...
Tensor gdh(const Tensor& self) {
  int64_t ndim = self.dim();
  printf(" gdh tensor shape %ld\n", ndim);
  return self.contiguous().view(-1)
}
...
- ③ 梯度定义
需要注意的是,如果你这个op需要参与register autograd,那就应该在tools/autograd/derivatives.yaml中定义梯度。
...
- name: acos(Tensor self) -> Tensor
  self: grad * -((-self * self + 1).rsqrt())

- name: gdh(Tensor self) -> Tensor
  self: grad

- name: add(Tensor self, Tensor other, *, Scalar alpha=1) -> Tensor
  self: grad
  other: maybe_multiply(grad, alpha)
 ...
3. 编译&运行
第2步完成之后,我们就可以编译了,编译的方式可以参考[2], [3],为了速度起见,这里我编译的是CPU版本。
我用的方式是:
1) # 进入虚拟环境.
source activate pytorch-build

2) # 设置环境变量.
export NO_MKLDNN=1 # disable due to GLIBC problem
export NO_SYSTEM_NCCL=1
export CMAKE_PREFIX_PATH="$(dirname $(which conda))/../" # 必不可少.
export USE_CUDA=0 USE_CUDNN=0 # 不适用CUDA和CUDNN. 还可以在clone下的顶层目录的CMakeLists.txt将CUDA和CUDNN对应的选项置为OFF.
export GEN_TO_SOURCE=/你的路径/pytorch/aten/src/ATen/core/ # 这个路径的设置也非常重要,如果不设置的话,系统会生成一个core_tmp/,会找不到文件需要链接的头文件导致编译失败~.

3) # 安装/清理.
python setup.py install     # build and install
python setup.py clean --all # clean the build
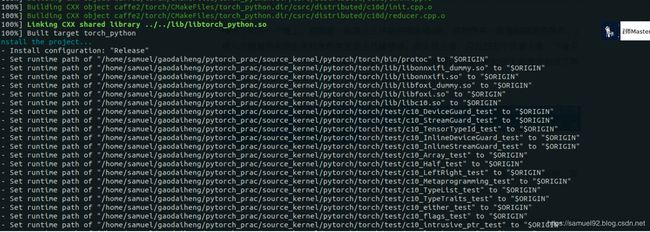
编译完成后,我们发现在最新的PyTorch python bindings非常ok,如果编译成功,你会看到如下的内容:


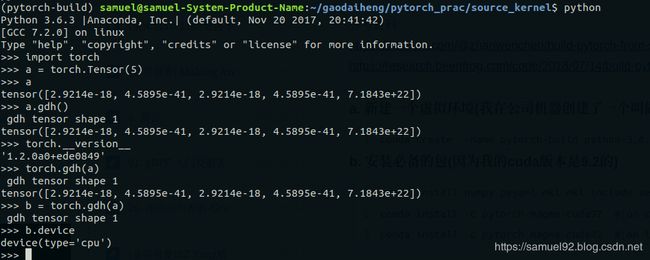
好了,现在让我们试验一下效果,可以看到,无论是调用torch.gdh()还是a.gdh(),都会调用我们定义在TensorShape.cpp中的printf(" gdh tensor shape %ld\n", ndim);,成功!!!

4. 问题
-
①
ModuleNotFoundError: No module named 'torch._C'

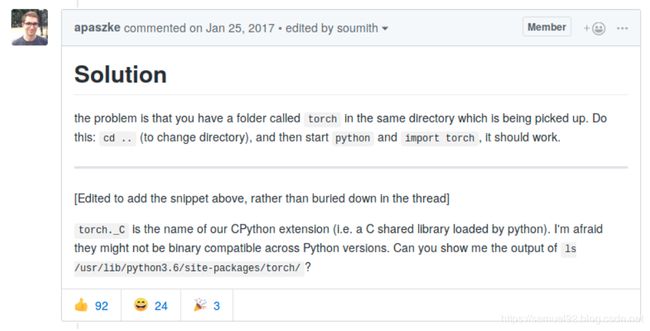
这个问题[5]是因为你调用python的当前目录下有torch文件夹导致的:

-
②
RuntimeError: Source files: ['Type.h', 'Tensor.h', 'TensorMethods.h'] did not match generated files.

这个问题是编译中产生的,原因是PyTorch1.0.0以后的版本aten/src/ATen/gen.py中的第42行加入了如下的部分[6], 也就是会创建一个core_tmp的文件夹,但是由于某种原因,Tensor.h, TensorMethods.h并没有被拷贝过去,所以我们显式的设置GEN_TO_SOURCE就可以避免这个问题。
export GEN_TO_SOURCE=/你的路径/pytorch/aten/src/ATen/core/ # 这个路径的设置也非常重要,如果不设置的话,系统会生成一个core_tmp/,会找不到文件需要链接的头文件导致编译失败~.
参考资料
[1] PyTorch internals
[2] Build pytorch from source—Beenfrog’s research blog
[3] Speed Up PyTorch by Building from Source on Ubuntu 18.04—Zhanwen Chen
[4] realdoug的native实现
[5] ModuleNotFoundError: No module named ‘torch._C’ #574
[6] Source code changes of the file “aten/src/ATen/gen.py” between
pytorch-0.4.1.tar.gz and pytorch-1.0.1.tar.gz

