Spring Cloud 应用篇 之 Spring Cloud Stream(消息驱动)
(一)简介
Spring Cloud Stream 是一个用来为微服务应用构建消息驱动能力的框架。它可以基于 Spring Boot 来创建独立的、可用于生产的 Spring 应用程序。Spring Cloud Stream 为一些供应商的消息中间件产品提供了个性化的自动化配置实现,并引入了发布-订阅、消费组、分区这三个核心概念。通过使用 Spring Cloud Stream,可以有效简化开发人员对消息中间件的使用复杂度,让系统开发人员可以有更多的精力关注于核心业务逻辑的处理。但是目前 Spring Cloud Stream 只支持 RabbitMQ 和 Kafka 的自动化配置。
(二)快速搭建
首先,我们通过一个简单的示例对 Spring Cloud Stream 有一个初步的认识。我们中间件使用 RabbitMQ,创建 spring-cloud-stream 模块
2.1 引入依赖
编辑 pom.xml 文件,引入 Spring Cloud Stream 对 RabbitMQ 支持的 spring-cloud-starter-stream-rabbit 依赖,该依赖包是 Spring Cloud Stream 对 RabbitMQ 支持的封装,其中包含了对 RabbitMQ 的自动化配置等内容。
        spring-cloud-components
        com.geny
        1.0-SNAPSHOT

    4.0.0

    spring-cloud-stream


            org.springframework.boot
            spring-boot-starter-web


            org.springframework.cloud
            spring-cloud-starter-stream-rabbit


                org.springframework.boot
                spring-boot-maven-plugin
2.2 配置文件
配置 RabbitMQ 的相关信息
server:
  port: 9898
spring:
  application:
    name: spring-cloud-stream
  rabbitmq:
    host: 192.168.174.128
    port: 5672
    username: guest
    password: guest
  cloud:
    stream:
      bindings:
        myInput:
          #指定输入通道对应的主题名
          destination: minestream
        myOutput:
destination: minestream2.3 创建消息通道绑定的接口
创建 StreamClient 接口,通过 @Input和 @Output注解定义输入通道和输出通道,另外,@Input 和 @Output 注解都还有一个 value 属性,该属性可以用来设置消息通道的名称,这里指定的消息通道名称分别是 myInput 和 myOutput。如果直接使用两个注解而没有指定具体的 value 值,则会默认使用方法名作为消息通道的名称。
public interface StreamClient {

    String INPUT = "myInput";
    String OUTPUT = "myOutput";

    @Input(StreamClient.INPUT)
    SubscribableChannel input();

    @Output(StreamClient.OUTPUT)
    MessageChannel output();
}
当定义输出通道的时候,需要返回 MessageChannel 接口对象,该接口定义了向消息通道发送消息的方法;定义输入通道时,需要返回 SubscribableChannel 接口对象,该接口集成自 MessageChannel 接口,它定义了维护消息通道订阅者的方法。
在完成了消息通道绑定的定义后,这些用于定义绑定消息通道的接口则可以被 @EnableBinding 注解的 value 参数指定,从而在应用启动的时候实现对定义消息通道的绑定,Spring Cloud Stream 会为其创建具体的实例,而开发者只需要通过注入的方式来获取这些实例并直接使用即可。下面就来创建用于接收来自 RabbitMQ 消息的消费者 StreamReceiver
2.4 创建消费者
创建用于接收来自 RabbitMQ 消息的消费者 StreamReceiver 类
@Component
@EnableBinding(value = {StreamClient.class})
public class StreamReceiver {

    private Logger logger = LoggerFactory.getLogger(StreamReceiver.class);

    @StreamListener(StreamClient.INPUT)
    public void receive(String message) {
        logger.info("StreamReceiver: {}", message);
    }
}
@EnableBinding 注解用来指定一个或多个定义了 @Input 或 @Output 注解的接口,以此实现对消息通道(Channel)的绑定。上面我们通过 @EnableBinding(value = {StreamClient.class}) 绑定了 StreamClient 接口,该接口是我们自己实现的对输入输出消息通道绑定的定义
@StreamListener,主要定义在方法上,作用是将被修饰的方法注册为消息中间件上数据流的事件监听器,注解中的属性值对应了监听的消息通道名。上面我们将 receive 方法注册为 myInput 消息通道的监听处理器,当我们往这个消息通道发送信息的时候,receiver 方法会执行。
2.5 启动类
创建启动类,在启动类添加一个接口,使用上面定义的消息通道绑定接口 StreamClient 向被监听的消息通道发送消息,具体如下:
@SpringBootApplication
@RestController
public class StreamApplication {

    public static void main(String[] args) {
        SpringApplication.run(StreamApplication.class,args);
    }

    @Autowired
    private StreamClient streamClient;

    @GetMapping("send")
    public void send() {
        streamClient.output().send(MessageBuilder.withPayload("Hello World...").build());
    }
}
2.6 验证
启动 StreamApplication,访问 http://localhost:9898/send 接口发送消息,通过控制台,可以看到,消息已成功被接收
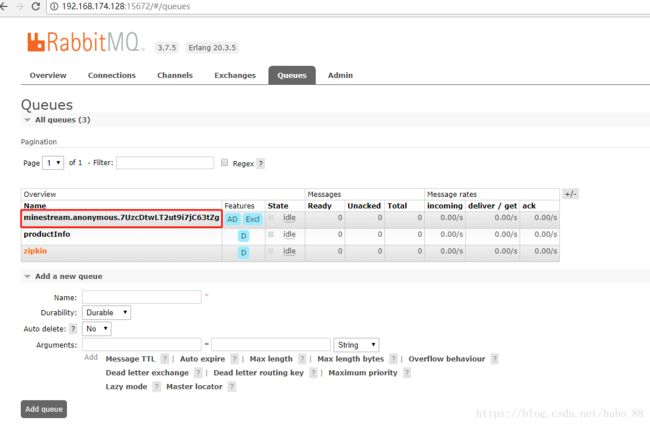
我们看一下 RabbitMQ 的界面
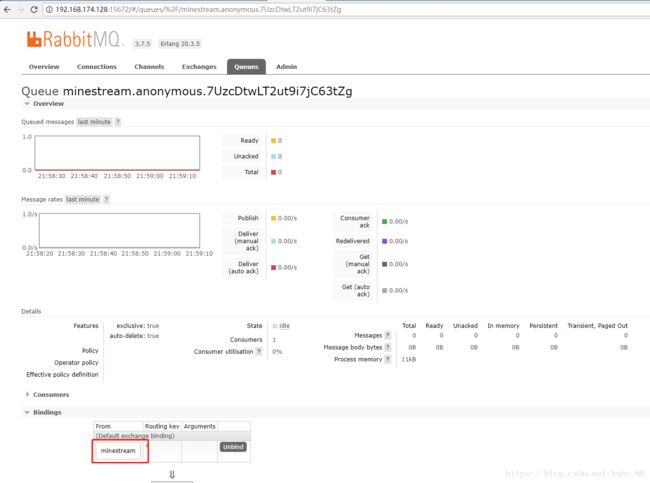
可以看到有个 minestream.anonymous...的队列,点击进入,可以看到该队列绑定了 minestream 这个 Exchange
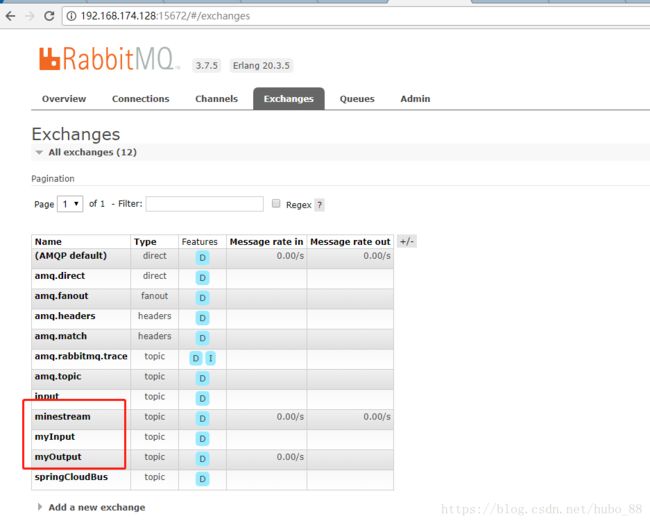
点击 Exchanges,可以看到有我们定义的 myInput,myOutput,还有一个是配置文件里让 myInput 和 myOutput 都指向的 minestream,正是有这个配置,StreamClient 发送的消息才会发送到 StreamReceiver 监听的消息通道上去。
(三)发布-订阅模式
Spring Cloud Stream 中的消息通信方式遵循了发布-订阅模式,当一条消息被投递到消息中间件后,它会通过共享的 Topic 主题进行广播,消息消费者在订阅的主题中收到它并触发自身的业务逻辑处理。所以这里就会有个问题,下面把 spring-cloud-stream 的端口号修改下,这里修改为 9899,然后再启动一个实例,访问 http://localhost:9898/send 发送消息,通过控制台查看:
端口号 9898 的实例日志:
端口号 9899 的实例日志:
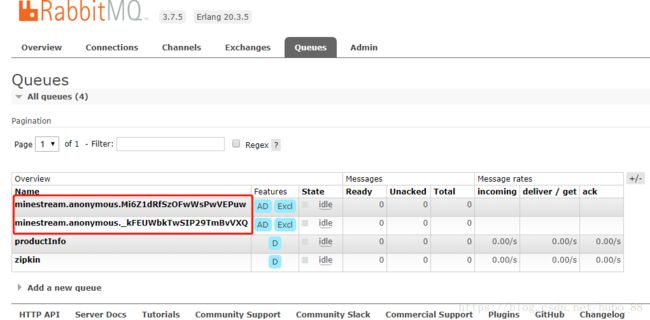
可以看到,两个实例都接收到了消息,再看下 RabbitMQ 的 Queues,可以看到这里有两个 minestream.anonymous...的队列都绑定了 minestream 这个 Exchange。
这显然是不合适的,我们只希望在集群的时候,只有其中一台获取到消息,并进行相应的业务逻辑处理,那要怎么办呢?Spring Cloud Stream 提供了消费组的概念。
(四)消费组
在现实的业务场景中,每一个微服务应用为了实现高可用和负载均衡,都会集群部署,按照上面我们启动了两个应用的实例,消息被重复消费了两次。为解决这个问题,Spring Cloud Stream 中提供了消费组,通过配置 spring.cloud.stream.bindings.myInput.group 属性为应用指定一个组名,下面修改下配置文件,修改如下:
server:
  port: 9898
spring:
  application:
    name: spring-cloud-stream
  rabbitmq:
    host: 192.168.174.128
    port: 5672
    username: guest
    password: guest
  cloud:
    stream:
      bindings:
        myInput:
          #指定输入通道对应的主题名
          destination: minestream
          #指定该应用实例属于 stream 消费组
          group: stream
        myOutput:
          destination: minestream
再次启动两个实例,先看下 RabbitMQ 的界面,可以看到现在只有 minestream.stream 这一个队列了,说明两个实例监听这一个队列
访问 http://localhost:9898/send 接口发送消息,为了方便查看后台日志,先把日志清空
端口号 9898 的实例日志:
端口号 9899 的实例日志:
可以看到,只有其中一个接收到了消息,这就达到了目的。
(五)消息分区
通过消费组的设置,虽然能保证同一消息只被一个消费者进行接收和处理,但是对于特殊业务情况,除了要保证单一实例消费之外,还希望那些具备相同特征的消息都能被同一个实例消费,这个就可以使用 Spring Cloud Stream 提供的消息分区功能了。
Spring Cloud Stream 实现消息分区只需要在配置文件里进行相应的配置即可,修改 StreamApplication 的配置文件如下:
server:
  port: 9898
spring:
  application:
    name: spring-cloud-stream
  rabbitmq:
    host: 192.168.174.128
    port: 5672
    username: guest
    password: guest
  cloud:
    stream:
      bindings:
        myInput:
          #指定输入通道对应的主题名
          destination: minestream
          #指定该应用实例属于 stream 消费组
          group: stream
          consumer:
            #通过该参数开启消费者分区功能
            partitioned: true
        myOutput:
          #指定输出通道对应的主题名
          destination: minestream
          producer:
            #通过该参数指定了分区键的表达式规则,可以根据实际的输出消息规则配置 SpEL 来生成合适的分区键
            partitionKeyExpression: payload
            partitionCount: 2
      #该参数指定了当前消费者的总实例数量
      instance-count: 2
      #该参数设置了当前实例的索引号,从 0 开始,最大值为 spring.cloud.stream.instance-count 参数 - 1
      instance-index: 0
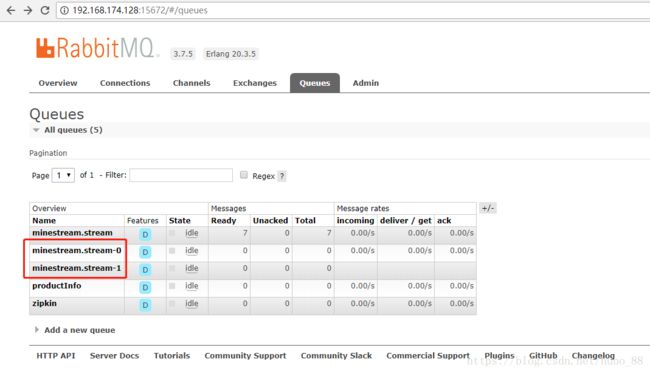
每个参数的说明,上面注释的很详细,启动多个实例只需要修改端口号和 instance-index 的值即可,到这里消息分区配置就完成了,可以看到 RabbitMQ 的队列里已经生成了两个名为 minestream.stream-* 的队列
访问 http://localhost:9898/send 接口发送消息,多发送几次,查看控制台日志:
端口号 9898 的实例日志:
端口号 9899 的实例日志:
可以看到发送的同一个消息,都被其中一个实例接收消费了,说明消息分区也已配置成功了。

