自定义控件的小总结------1组合式控件
今天着重分析一波这个组合式控件,实现自定义。
1,简单实现
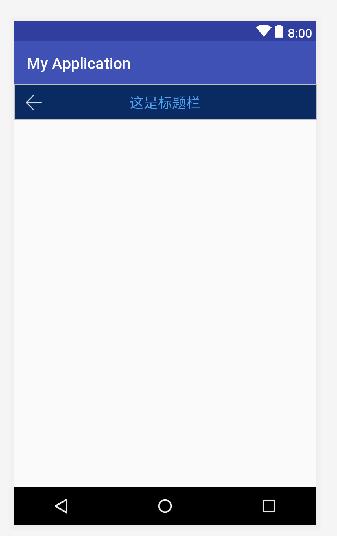
现在呢,要定义一个自定义一个actionbar控件。就简单的两个部分,一个是左侧的返回箭头,一个是中间的标题;希望可以使用一个控件就完成这-功能,而不用每次都去写一个布局容器,左侧放ImageView,中间放TextView来实现这个功能。
1,在value文件夹中定义一个attr.xml文件,在里面定义一个属性簇。
<resources>
    <declare-styleable name="CustomTopTitleView">

        <attr name="back_text_type" format="string" />
    declare-styleable>
resources>
2,自定义的actionbar的xml布局。
<RelativeLayout xmlns:android="http://schemas.android.com/apk/res/android"
    android:layout_width="match_parent"
    android:layout_height="45dp"
    android:background="#0A2B62"
    android:orientation="horizontal">

    <ImageView
        android:id="@+id/src_back_ivw"
        android:layout_width="wrap_content"
        android:layout_height="wrap_content"
        android:layout_alignParentLeft="true"
        android:layout_centerVertical="true"
        android:layout_gravity="center"
        android:layout_marginLeft="15dp"
        android:src="@drawable/selector_back" />

    <TextView
        android:id="@+id/text_back_tvw"
        android:layout_width="wrap_content"
        android:layout_height="wrap_content"
        android:layout_centerHorizontal="true"
        android:layout_centerVertical="true"
        android:layout_gravity="center"
        android:layout_marginLeft="10dp"
        android:gravity="center"
        android:singleLine="true"
        android:textColor="@color/zhxfFooterBarBg"
        android:textSize="18sp" />
RelativeLayout>
3,控件的java类,可以继承相对布局。
核心是这句代码:
TypedArray typedArray = context.obtainStyledAttributes(attrs, R.styleable.CustomTopTitleView);public class CustomTopTitleView extends RelativeLayout {
private ImageView mSrcLogo;//图标log
private TextView mTextTitle;//标题
public CustomTopTitleView(Context context) {
super(context);
}
public CustomTopTitleView(Context context, AttributeSet attrs) {
super(context, attrs);
initView(context);
initAttrs(context, attrs);
}
public CustomTopTitleView(Context context, AttributeSet attrs, int defStyleAttr) {
super(context, attrs, defStyleAttr);
initView(context);
initAttrs(context, attrs);
}
private void initView(Context context) {
View textView = LayoutInflater.from(context).inflate(R.layout.custom_top_title_layout, this);
mSrcLogo = textView.findViewById(R.id.src_back_ivw);
mTextTitle = textView.findViewById(R.id.text_back_tvw);
}
private void initAttrs(Context context, AttributeSet attrs) {
TypedArray typedArray = context.obtainStyledAttributes(attrs, R.styleable.CustomTopTitleView);
String titleType = typedArray.getString(R.styleable.CustomTopTitleView_back_text_type);//标题显示类型
typedArray.recycle();
setDefinedView(titleType);
}
private void setDefinedView(String titleType) {
mTextTitle.setText(titleType);
}
/**
* 返回事件
*
* @param listener
*/
public void toBackReturn(OnClickListener listener) {
mSrcLogo.setOnClickListener(listener);
}
public void setTopText(String text) {
mTextTitle.setText(text);
}
4,在需要添加actionbar的布局中,使用该控件。
<RelativeLayout xmlns:android="http://schemas.android.com/apk/res/android"
    xmlns:custom="http://schemas.android.com/apk/res-auto"
    android:layout_width="match_parent"
    android:layout_height="wrap_content"
    android:orientation="vertical">

    <com.xx.CustomTopTitleView
        android:id="@+id/customTopTitleView1"
        android:layout_width="match_parent"
        android:layout_height="wrap_content"
        android:layout_alignParentTop="true"
        custom:back_text_type="这是标题栏" />

RelativeLayout>可以看到,这里有了custom:back_text_type="这是标题栏"这个属性,这个属性的名字,就是在attr.xml中的CustomTopTitleView里命名的。
2多增加几个属性
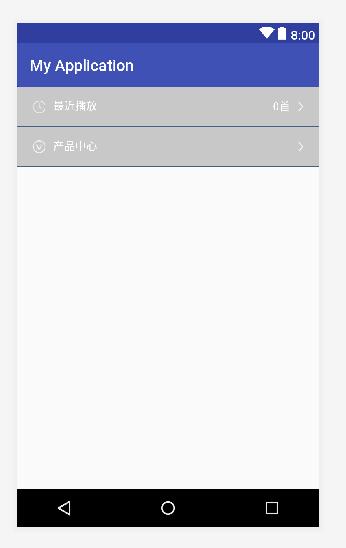
这个例子里只是一个属性,似乎看不出来什么优势,再举一个例子,这里多增加几个属性:1,左侧图片的展示,2,左侧图片旁边的文字展示,3,右侧文字展示,这个部分可以进行展示和影藏,4,右侧图片展示。平时的话,可能需要一个容器里放4个控件分别进行展示控制,这里要求用一个控件去实现,这4个要求用4个属性就可以实现了。
1,定义属性xml。
<resources>

    <declare-styleable name="CustomTextView">

        <attr name="src_log_type" format="reference" />

        <attr name="title_type" format="string" />

        <attr name="num_first_isState" format="boolean" />

        <attr name="num_first_string" format="string" />
    declare-styleable>
resources>
2,定义要自定义控件的xml布局。
<LinearLayout xmlns:android="http://schemas.android.com/apk/res/android"
    android:layout_width="match_parent"
    android:layout_height="50dp"
    android:background="@mipmap/phb_nrq"
    android:orientation="horizontal"
    android:padding="15dp">

    <ImageView
        android:id="@+id/src_logo_ivw"
        android:layout_width="wrap_content"
        android:layout_height="wrap_content"
        android:layout_gravity="center"
        android:layout_marginLeft="5dp" />

    <TextView
        android:id="@+id/text_title_tvw"
        android:layout_width="wrap_content"
        android:layout_height="wrap_content"
        android:layout_marginLeft="10dp"
        android:layout_weight="1"
        android:textColor="@color/white" />

    <TextView
        android:id="@+id/num_first_tvw"
        android:layout_width="wrap_content"
        android:layout_height="wrap_content"
        android:layout_gravity="center"
        android:textColor="@color/white" />

    <ImageView
        android:layout_width="wrap_content"
        android:layout_height="wrap_content"
        android:layout_gravity="center"
        android:layout_marginLeft="10dp"
        android:layout_marginRight="5dp"
        android:src="@mipmap/wd_dy" />
LinearLayout>
3,定义java类,在这个java类中进行自定义控件的逻辑处理。
public class CustomTextView extends LinearLayout {
    private ImageView mSrcLogo;//图标log
    private TextView mTextTitle;//标题
    private TextView mNumFirst;//多少首

    public CustomTextView(Context context) {
        super(context);
    }

    public CustomTextView(Context context, AttributeSet attrs) {
        super(context, attrs);
        initView(context);
        initAttrs(context, attrs);
    }

    public CustomTextView(Context context, AttributeSet attrs, int defStyleAttr) {
        super(context, attrs, defStyleAttr);
        initView(context);
        initAttrs(context, attrs);
    }

    private void initView(Context context) {
        View textView = LayoutInflater.from(context).inflate(R.layout.custom_textview, this);

        mSrcLogo = textView.findViewById(R.id.src_logo_ivw);
        mTextTitle = textView.findViewById(R.id.text_title_tvw);
        mNumFirst = textView.findViewById(R.id.num_first_tvw);
    }

    private void initAttrs(Context context, AttributeSet attrs) {
        TypedArray typedArray = context.obtainStyledAttributes(attrs, R.styleable.CustomTextView);

        int srclog = typedArray.getResourceId(R.styleable.CustomTextView_src_log_type, 0);//图标显示类型
        String titleType = typedArray.getString(R.styleable.CustomTextView_title_type);//标题显示类型
        boolean firstState = typedArray.getBoolean(R.styleable.CustomTextView_num_first_isState, true);//多少首是否隐藏
        String firstString = typedArray.getString(R.styleable.CustomTextView_num_first_string);//多少首动态设置文字

        typedArray.recycle();
        setDefinedView(srclog, titleType, firstState, firstString);
    }

    private void setDefinedView(int srclog, String titleType, boolean firstState, String firstString) {
        mSrcLogo.setImageResource(srclog);
        mTextTitle.setText(titleType);
        mNumFirst.setVisibility(firstState ? View.VISIBLE : View.GONE);
        mNumFirst.setText(firstString);
    }

    public void setNumFirst(String s) {
        mNumFirst.setText(s);
    }
}
4,在需要使用这个自定义控件的地方进行使用。
<LinearLayout xmlns:android="http://schemas.android.com/apk/res/android"
    xmlns:custom="http://schemas.android.com/apk/res-auto"
    android:layout_width="match_parent"
    android:layout_height="wrap_content"
    android:orientation="vertical">


    <com.xx.yy.CustomTextView
        android:id="@+id/custom_menu_2"
        android:layout_width="match_parent"
        android:layout_height="wrap_content"
        custom:src_log_type="@mipmap/wd_icon_2"
        custom:num_first_isState="true"
        custom:num_first_string="0首"
        custom:title_type="最近播放" />


    <View style="@style/view_line_sbc_header_text" />

    <com.xx.yy.CustomTextView
        android:id="@+id/custom_menu_3"
        android:layout_width="match_parent"
        android:layout_height="wrap_content"
        custom:src_log_type="@mipmap/wd_icon_3"
        custom:title_type="产品中心"
        custom:num_first_isState="false" />

    <View style="@style/view_line_sbc_header_text" />

LinearLayout>总结:
总结来说,这种自定义是非常简单的,主要是可以将重复的代码,进行抽取整合,进行代码的精炼,避免大量重复的代码,
采用这种自定义,画这样一个重复的条目出来不到1分钟就可以搞定,但是如果没有进行这样的自定义,每次实现一个这样的条目,都去copy一份这段代码,或者重复写一段这样的代码,好费时间不说,写这样的简单又没有营养的代码真是慢性自杀,

