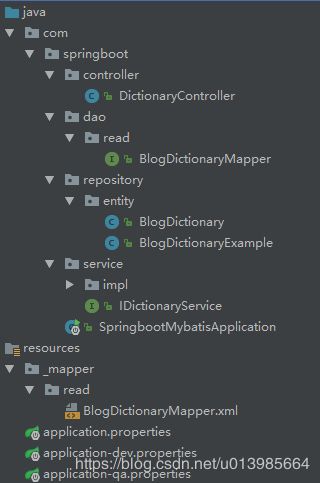
Spring Boot - 集成Mybatis以及多数据源配置
文章目录
- Spring Boot - 集成Mybatis
- 1.传统方式集成Mybatis
- 1.1 pom依赖引入
- pom.xml
- 1.2 配置Mybatis相关配置
- application.properties
- application-qa.properties
- 1.3 使用
- BlogDictionaryMapper .java(第一种)
- SpringbootMybatisApplication .java(第二种)
- 2.注解方式集成Mybatis
- UserMapper .java
- 3.事务管理配置
- SpringbootMybatisApplication.java
- DictionaryServiceImpl.java
- 4.多数据源配置
- application-qa.properties
- MasterDataSourceConfig.java
- SlaveDataSourceConfig .java
- MapperBeanNameGenerator.java
Spring Boot - 集成Mybatis
项目中的开发,操作数据库是必然的,项目中我们往往会选择一些持久化框架来进行操作,ORM框架的本质主要是为了简化编程中操作数据库的过程,目前使用频率比较高的主要就是可以灵活动态编写动态sql的mybatis以及对基本无需sql编写直接操作数据库的hibernate,具体选择需要根据各自业务需求灵活灵活使用。
我们这就来看一下Spring Boot集成Mybatis和之前有何区别,首先我们通过官网可以看到Spring Boot集成Mybatis使用主要有两种方式,第一种是我们传统的老方式,实体类、Dao层关联关系等,相比之前优化了Mybatis初始化繁琐的xml配置文件,第二种就是Spring Boot更喜欢的注解一切风格的实现方式。
1.传统方式集成Mybatis
1.1 pom依赖引入
所有的集成,pom文件的依赖都是必不可少的,Spring Boot集成Mybatis的起步依赖以及jdbc连接依赖是必不可少的,这里可以看到我们build配置了resources,若缺少该配置可能会导致编译之后resource下的xml文件缺失。
pom.xml
<project xmlns="http://maven.apache.org/POM/4.0.0"
         xmlns:xsi="http://www.w3.org/2001/XMLSchema-instance"
         xsi:schemaLocation="http://maven.apache.org/POM/4.0.0 http://maven.apache.org/xsd/maven-4.0.0.xsd">
    <parent>
        <artifactId>springboot-basicartifactId>
        <groupId>com.springbootgroupId>
        <version>0.0.1-SNAPSHOTversion>
    parent>
    <modelVersion>4.0.0modelVersion>

    <artifactId>springboot-mybatisartifactId>

    <dependencies>

        <dependency>
            <groupId>org.mybatis.spring.bootgroupId>
            <artifactId>mybatis-spring-boot-starterartifactId>
            <version>1.3.1version>
        dependency>

        <dependency>
            <groupId>mysqlgroupId>
            <artifactId>mysql-connector-javaartifactId>
        dependency>
    dependencies>

    <build>
        <resources>
            <resource>
                <directory>src/main/javadirectory>
                <includes>
                    <include>**/*.xmlinclude>
                includes>
            resource>
            <resource>
                <directory>src/main/resourcesdirectory>
                <includes>
                    <include>**/*.*include>
                includes>
            resource>
            <resource>
                <directory>src/main/webappdirectory>
                <targetPath>META-INF/resourcestargetPath>
                <includes>
                    <include>**/*.*include>
                includes>
            resource>
        resources>

    build>
project>
1.2 配置Mybatis相关配置
我们在核心配置文件中可以指定Mapper.xml文件的位置,然后在多环境配置文件中去配置数据库的相关配置,这样可以区分不同环境的数据库操作,springboot会自动加载spring.datasource.*相关配置,会自动将数据源注入到sqlSessionFactory中,sqlSessionFactory会自动注入到Mapper中,对于这些都不需要我们去配置,只需要使用即可。
application.properties
spring.profiles.active=qa

mybatis.mapper-locations=classpath:/_mapper/read/*Mapper.xml
application-qa.properties
spring.datasource.url=jdbc:mysql://127.0.0.1:3306/blog?autoReconnect=true&useUnicode=true&characterEncoding=UTF-8
spring.datasource.driver-class-name=com.mysql.jdbc.Driver
#Loading class `com.mysql.jdbc.Driver'. This is deprecated. The new driver class is `com.mysql.cj.jdbc.Driver'. The driver is automatically registered via the SPI and manual loading of the driver class is generally unnecessary.
#最新官方提示支持com.mysql.cj.jdbc.Driver驱动
#spring.datasource.driver-class-name=com.mysql.cj.jdbc.Driver
spring.datasource.username=root
spring.datasource.password=root
这里的配置属性只是Spring Boot集成Mybatis的一些基本配置,其他详细的属性参数需要各位去查阅官方文档资料根据所需进行配置,这里只为了简单的集成,不涉及业务和性能。
1.3 使用
通过上面简单两步,并且可以通过
mybatis-gernerate生成的代码放置对应位置即可,若要使能够正常使用,还需要将Dao层的Mapper扫描进容器,有两种方式,第一种是在需要使用的Mapper上添加@Mapper注解,第二种在入口类上添加@MapperScan扫描指定位置所有Mapper,推荐使用第二种可以不用每个Mapper都添加注解。
BlogDictionaryMapper .java(第一种)
package com.springboot.dao.read;


import com.springboot.repository.entity.BlogDictionary;
import com.springboot.repository.entity.BlogDictionaryExample;
import org.apache.ibatis.annotations.Mapper;

import java.util.List;

@Mapper
public interface BlogDictionaryMapper {
    int countByExample(BlogDictionaryExample example);

    List<BlogDictionary> selectByExample(BlogDictionaryExample example);

    BlogDictionary selectByPrimaryKey(Integer id);
}
SpringbootMybatisApplication .java(第二种)
package com.springboot;

import org.mybatis.spring.annotation.MapperScan;
import org.springframework.boot.SpringApplication;
import org.springframework.boot.autoconfigure.SpringBootApplication;
import org.springframework.transaction.annotation.EnableTransactionManagement;

/**
 * @MapperScan扫描mapper类 或者每个mapper类上添加@Mapper注解
 * @author hzk
 * @date 2018/12/19
 */
@SpringBootApplication
@MapperScan(basePackages = "com.springboot.dao")
public class SpringbootMybatisApplication {

    public static void main(String[] args){
        SpringApplication.run(SpringbootMybatisApplication.class);
    }
}
具体使用就不把代码贴出来了,和之前Spring结合Mybatis一直,注入Mapper即可使用。
2.注解方式集成Mybatis
注解集成的方式不需要之前繁琐的Mapper.xml文件,只需将sql语句通过注解在Dao层绑定。
UserMapper .java
package com.springboot.dao.read;


import com.springboot.repository.entity.BlogDictionary;
import com.springboot.repository.entity.BlogDictionaryExample;
import org.apache.ibatis.annotations.Mapper;

import java.util.List;

public interface BlogDictionaryMapper {

	@Select("SELECT * FROM dictionary")
	@Results({
		@Result(property = "itemId",  column = "item_id"),
		@Result(property = "itemName", column = "item_name")
	})
    List<BlogDictionary> selectAll();

	@Select("SELECT * FROM dictionary WHERE id = #{id}")
	@Results({
		@Result(property = "itemId",  column = "item_id"),
		@Result(property = "itemName", column = "item_name")
	})
    BlogDictionary selectByPrimaryKey(Integer id);

	@Insert("INSERT INTO dictionary (item_id,item_name) VALUES(#{itemId}, #{itemName})")
	void insert(BlogDictionary blogDictionary);

	@Update("UPDATE dictionary SET item_id=#{itemId},item_name=#{itemName} WHERE id =#{id}")
	void update(BlogDictionary blogDictionary);

	@Delete("DELETE FROM dictionary WHERE id =#{id}")
	void delete(Integer id);
}
我们可以简单了解下这几个注解的作用
@Select 负责查询
@Result 修饰返回的结果集,关联实体类属性和数据库字段对应,如果实体类属性和数据库属性名保持一致,就不需要这个属性来修饰。
@Insert 插入数据库使用,直接传入实体类会自动解析属性到对应的值
@Update 修改
@delete 删除
我们可以通过Mybatis官网提供的API文档可以了解更多属性的使用mybatis参考文档
注解方式和传统方式最大的区别就在于这里的注解替代xml映射文件,两种方式都有各自的特点,注解的方式可以更快速地开发,比如像现在流行的微服务的架构,单个微服务更多地对应自己独立的数据库和表,多表连接的使用减少的话注解方式更适合。
传统的方式更适合大型项目,自己灵活拼接sql,调整sql更方便。具体使用哪种方式还需要根据具体需求场景,任何技术都是现实需求的工具。
3.事务管理配置
既然我们进行了数据库的操作,那么有些场景事务是必不可少的,那在Spring Boot集成Mybatis的情况,我们如何去开启并且使用事务呢?
首先我们在入口类上添加@EnableTransactionManagement去开启事务支持,然后在需要开启事务的方法上添加对应@Transactional注解就行。
SpringbootMybatisApplication.java
package com.springboot;

import org.mybatis.spring.annotation.MapperScan;
import org.springframework.boot.SpringApplication;
import org.springframework.boot.autoconfigure.SpringBootApplication;
import org.springframework.transaction.annotation.EnableTransactionManagement;

/**
 * @MapperScan扫描mapper类 或者每个mapper类上添加@Mapper注解
 * @EnableTransactionManagement 开启springboot事务支持(在Service层也需要添加对应注解)
 * @author hzk
 * @date 2018/12/19
 */
@SpringBootApplication
@MapperScan(basePackages = "com.springboot.dao")
@EnableTransactionManagement
public class SpringbootMybatisApplication {

    public static void main(String[] args){
        SpringApplication.run(SpringbootMybatisApplication.class);
    }
}
DictionaryServiceImpl.java
package com.springboot.service.impl;

import com.springboot.dao.read.BlogDictionaryMapper;
import com.springboot.repository.entity.BlogDictionary;
import com.springboot.repository.entity.BlogDictionaryExample;
import com.springboot.service.IDictionaryService;
import org.springframework.beans.factory.annotation.Autowired;
import org.springframework.data.redis.core.RedisTemplate;
import org.springframework.stereotype.Service;
import org.springframework.transaction.annotation.Transactional;

import java.util.List;

/**
 * @author hzk
 * @date 2018/12/19
 */
@Service
public class DictionaryServiceImpl implements IDictionaryService{

    @Transactional(rollbackFor = Exception.class)
    @Override
    public int updateDictionary(){
        System.out.println("------------>updateDictionary");
        int a = 100/0;
        System.out.println("------------>updateDictionary Exception");
        return 0;
    }
}
这里我们就用最简单的示例去演示事务是如何开启的,大家可以在事务发生异常的前后进行数据库的操作,观察异常发生之后是否发生回滚。
4.多数据源配置
在我们真正的项目开发中,有时我们是需要进行多数据源配置的,比如我们的读写分离就需要配置主从两个数据源,又或者一个项目中必须用到两个数据源,当然现在的微服务架构体系下更多的提倡耦合度更低,可能不会存在这个问题,但是既然有需要,我们就来看下Spring Boot要如何去配置多个数据源。
我们知道,在引入了mybatis依赖之后,如果配置文件中配置了
spring.datasource.*的相关配置参数那么Spring Boot就会为我们创建一个DataSource,然后会自动创建该数据源的SqlSessionFactoryBean以及SqlSessionTemplate并注册到Spring容器中,所以当我们使用单个数据源的时候只需要简单配置就可以直接去进行数据库操作了,这里我们先看一下配置文件,我们在这里配置了主从两个数据源。
application-qa.properties
spring.datasource.master.url=jdbc:mysql://47.106.114.204:3306/blog?autoReconnect=true&useUnicode=true&characterEncoding=UTF-8
spring.datasource.master.driver-class-name=com.mysql.jdbc.Driver
spring.datasource.master.username=blog
spring.datasource.master.password=blog

spring.datasource.slave.url=jdbc:mysql://47.106.114.204:3306/blog?autoReconnect=true&useUnicode=true&characterEncoding=UTF-8
spring.datasource.slave.driver-class-name=com.mysql.jdbc.Driver
spring.datasource.slave.username=blog
spring.datasource.slave.password=blog
配置好了多个数据源的配置之后,我们要如何才能够让其注册到Spring容器中供我们使用呢,这里需要利用@Configuration注解去创建两个数据源配置类,主要是对
DataSource、DataSourceTransactionManager、SqlSessionFactory、SqlSessionTemplate四个数据项进行配置。分别配置每个数据源映射的Dao层和Mapper文件目录,需要注意的是当有多个数据源时,Mybatis需要一个默认的主数据源,所以我们在生成数据源相关Bean时,主数据源需要添加上@Primary注解修饰。
MasterDataSourceConfig.java
package com.springboot.config;

import org.apache.ibatis.session.SqlSessionFactory;
import org.mybatis.spring.SqlSessionFactoryBean;
import org.mybatis.spring.SqlSessionTemplate;
import org.mybatis.spring.annotation.MapperScan;
import org.springframework.beans.factory.annotation.Qualifier;
import org.springframework.boot.context.properties.ConfigurationProperties;
import org.springframework.boot.jdbc.DataSourceBuilder;
import org.springframework.context.annotation.Bean;
import org.springframework.context.annotation.Configuration;
import org.springframework.context.annotation.Primary;
import org.springframework.core.io.support.PathMatchingResourcePatternResolver;
import org.springframework.jdbc.datasource.DataSourceTransactionManager;

import javax.sql.DataSource;

/**
 * 主数据源配置
 * @author hzk
 * @date 2019/1/4
 */
@Configuration
@MapperScan(basePackages = "com.springboot.dao.write",sqlSessionTemplateRef = "masterSqlSessionTemplate")
public class MasterDataSourceConfig {

    @Bean(name = "masterDataSource")
    @ConfigurationProperties(prefix = "spring.datasource.master")
    @Primary
    public DataSource setDataSource(){
        return DataSourceBuilder.create().build();
    }

    @Bean(name = "masterTransactionManager")
    @Primary
    public DataSourceTransactionManager setTransactionManager(@Qualifier("masterDataSource") DataSource dataSource){
        // druid数据源
        // return new DruidDataSource();
        return new DataSourceTransactionManager(dataSource);
    }

    @Bean(name = "masterSqlSessionFactory")
    @Primary
    public SqlSessionFactory setSqlSessionFactoryBean(@Qualifier("masterDataSource") DataSource dataSource) throws Exception {
        SqlSessionFactoryBean sqlSessionFactoryBean = new SqlSessionFactoryBean();
        sqlSessionFactoryBean.setDataSource(dataSource);
        sqlSessionFactoryBean.setMapperLocations(new PathMatchingResourcePatternResolver().getResources("classpath:_mapper/write/*.xml"));
        return sqlSessionFactoryBean.getObject();
    }

    @Bean(name = "masterSqlSessionTemplate")
    @Primary
    public SqlSessionTemplate setSqlSessionTemplate(@Qualifier("masterSqlSessionFactory") SqlSessionFactory sqlSessionFactory){
        return new SqlSessionTemplate(sqlSessionFactory);
    }

}
SlaveDataSourceConfig .java
package com.springboot.config;

import org.apache.ibatis.session.SqlSessionFactory;
import org.mybatis.spring.SqlSessionFactoryBean;
import org.mybatis.spring.SqlSessionTemplate;
import org.mybatis.spring.annotation.MapperScan;
import org.springframework.beans.factory.annotation.Qualifier;
import org.springframework.boot.context.properties.ConfigurationProperties;
import org.springframework.boot.jdbc.DataSourceBuilder;
import org.springframework.context.annotation.Bean;
import org.springframework.context.annotation.Configuration;
import org.springframework.context.annotation.Primary;
import org.springframework.core.io.support.PathMatchingResourcePatternResolver;
import org.springframework.jdbc.datasource.DataSourceTransactionManager;

import javax.sql.DataSource;

/**
 * 从数据源配置
 * @author hzk
 * @date 2019/1/4
 */
@Configuration
@MapperScan(basePackages = "com.springboot.dao.read",sqlSessionTemplateRef = "slaveSqlSessionTemplate")
public class SlaveDataSourceConfig {

    @Bean(name = "slaveDataSource")
    @ConfigurationProperties(prefix = "spring.datasource.slave")
    public DataSource setDataSource(){
        return DataSourceBuilder.create().build();
    }

    @Bean(name = "slaveTransactionManager")
    public DataSourceTransactionManager setTransactionManager(@Qualifier("slaveDataSource") DataSource dataSource){
        // druid数据源
        // return new DruidDataSource();
        return new DataSourceTransactionManager(dataSource);
    }

    @Bean(name = "slaveSqlSessionFactory")
    public SqlSessionFactory setSqlSessionFactoryBean(@Qualifier("slaveDataSource") DataSource dataSource) throws Exception {
        SqlSessionFactoryBean sqlSessionFactoryBean = new SqlSessionFactoryBean();
        sqlSessionFactoryBean.setDataSource(dataSource);
        sqlSessionFactoryBean.setMapperLocations(new PathMatchingResourcePatternResolver().getResources("classpath:_mapper/read/*.xml"));
        return sqlSessionFactoryBean.getObject();
    }

    @Bean(name = "slaveSqlSessionTemplate")
    public SqlSessionTemplate setSqlSessionTemplate(@Qualifier("slaveSqlSessionFactory") SqlSessionFactory sqlSessionFactory){
        return new SqlSessionTemplate(sqlSessionFactory);
    }

}
完成上面这些配置,我们在Service层即可和之前一样注入使用Dao,需要注意的是这里我们把写和读的操作分开了,在Dao层和xml文件目录都分别放在了write和read目录下,如果Dao层读写Mapper名称一致在Service层注入时会出现问题,可以通过自定义注入别名去分开注入解决,也可以通过添加一个
BeanNameGenerator实现类在项目初始化时就用不同的名称注册。
MapperBeanNameGenerator.java
package com.blog.cas.common.utils;

import org.springframework.beans.factory.config.BeanDefinition;
import org.springframework.beans.factory.support.BeanDefinitionRegistry;
import org.springframework.beans.factory.support.BeanNameGenerator;

/**
 * Mapper Bean名称生成类 用于读写分离区分 IOC注入
 * @author hzk
 * @date 2018/11/14
 */
public class MapperBeanNameGenerator implements BeanNameGenerator {

    @Override
    public String generateBeanName(BeanDefinition definition, BeanDefinitionRegistry registry) {
        String beanClass = definition.getBeanClassName();
        int w = beanClass.indexOf(".write.");

        int r = beanClass.indexOf(".read.");
        return (w > 0) ? beanClass.substring(w + 1) : beanClass.substring(r + 1);
    }
}
通过我们这种方式比较简单就能做到多数据源的配置和使用,也有些同学使用AOP结合注解的方式去实现动态多数据源的使用,可以参考下面这位博友的文章,内容比较完善springboot2.0动态多数据源切换
